Cross training workouts and exercises for runners. This is what you need to do off-road to improve your running performance and protect yourself against injry
If you’re serious about taking your running game to the next level and reducing your risk of injuries, then listen up, because I’ve got some exciting news for you. It’s time to bring deadlifts into the spotlight and make them your new best friend on the road or trail!
Now, you might be thinking, “Wait a minute, isn’t running all about endurance? Why would I need to bother with body strength?” Well, my friend, let me tell you something: that’s a common misconception, and it’s time to set the record straight. Strength training is an absolute game-changer for runners, and one exercise in particular stands tall among the rest—yes, you guessed it—the deadlift!
But hold on, don’t roll your eyes just yet! I promise you, this is not your typical boring workout routine. Deadlifts are like a secret weapon for runners, providing a whole range of benefits that can supercharge your performance. They’re not only runner-friendly but also downright awesome for building strength and resilience. Trust me, once you discover the power of deadlifts, you’ll wonder how you ever ran without them.
In this article, I’m going to spill the beans and share with you why deadlifting is an absolute must for runners. I’ll also let you in on a few of the most efficient deadlift variations that you can seamlessly integrate into your cross-training routine. So, lace up your shoes, grab a water bottle, and let’s dive into the world of deadlifts together!
Ready? Let’s hit the ground running, quite literally, and uncover the secrets behind this extraordinary exercise. Buckle up, because it’s about to get exciting!
Are Deadlifts Good for Runners
Let’s talk science for a moment. The deadlift is not just any exercise—it’s a compound movement that targets a wide range of major muscles in your body. We’re talking about the ones that truly matter for us runners, like the powerful back muscles, glutes, and hamstrings.
These muscle groups are the driving force behind our forward propulsion, and they hold the key to unlocking our speed and stability while pounding the pavement or conquering the trails.
Now, you might be wondering, “How exactly do I nail the deadlift technique?” Fear not, my friend, for I’ve got your back. There’s a treasure trove of deadlift variations out there, just waiting for you to discover them and add them to your cross-training routine. But here’s the catch: you’ve got to do them right. We don’t want any unnecessary injuries derailing your running dreams, do we? Proper form is crucial, so take the time to learn and master the technique.
But hey, don’t fret over which variation is the “best” one for you. The beauty of deadlifts lies in their versatility. Choose the variation(s) that resonate with you the most, considering factors like personal preference, injury history, and your specific training goals. It’s like crafting your own unique path to greatness, tailor-made for your individual needs.
Now, I know you might be thinking, “Hey, can you back up these claims with some evidence?” Absolutely! Let me unleash the power of research and share a few pearls of wisdom with you. Numerous studies and research papers have highlighted the remarkable benefits of deadlifts for runners. They not only enhance overall strength but also contribute to improved running economy and injury prevention. It’s like giving your body an upgrade, boosting your performance, and safeguarding you from potential setbacks. Talk about a win-win situation!
Beginners Start Slooooow
Beginners, start with a relatively lightweight and focus on proper form.
So if you are a beginner, start with relatively lightweight (a 40-pound loaded bar, for instance) and focus on your technique.
Ego won’t work here, make sure to make form a priority.
Here are six deadlift variations to try, whether you’re seeking to improve your strength, speed, power or endurance
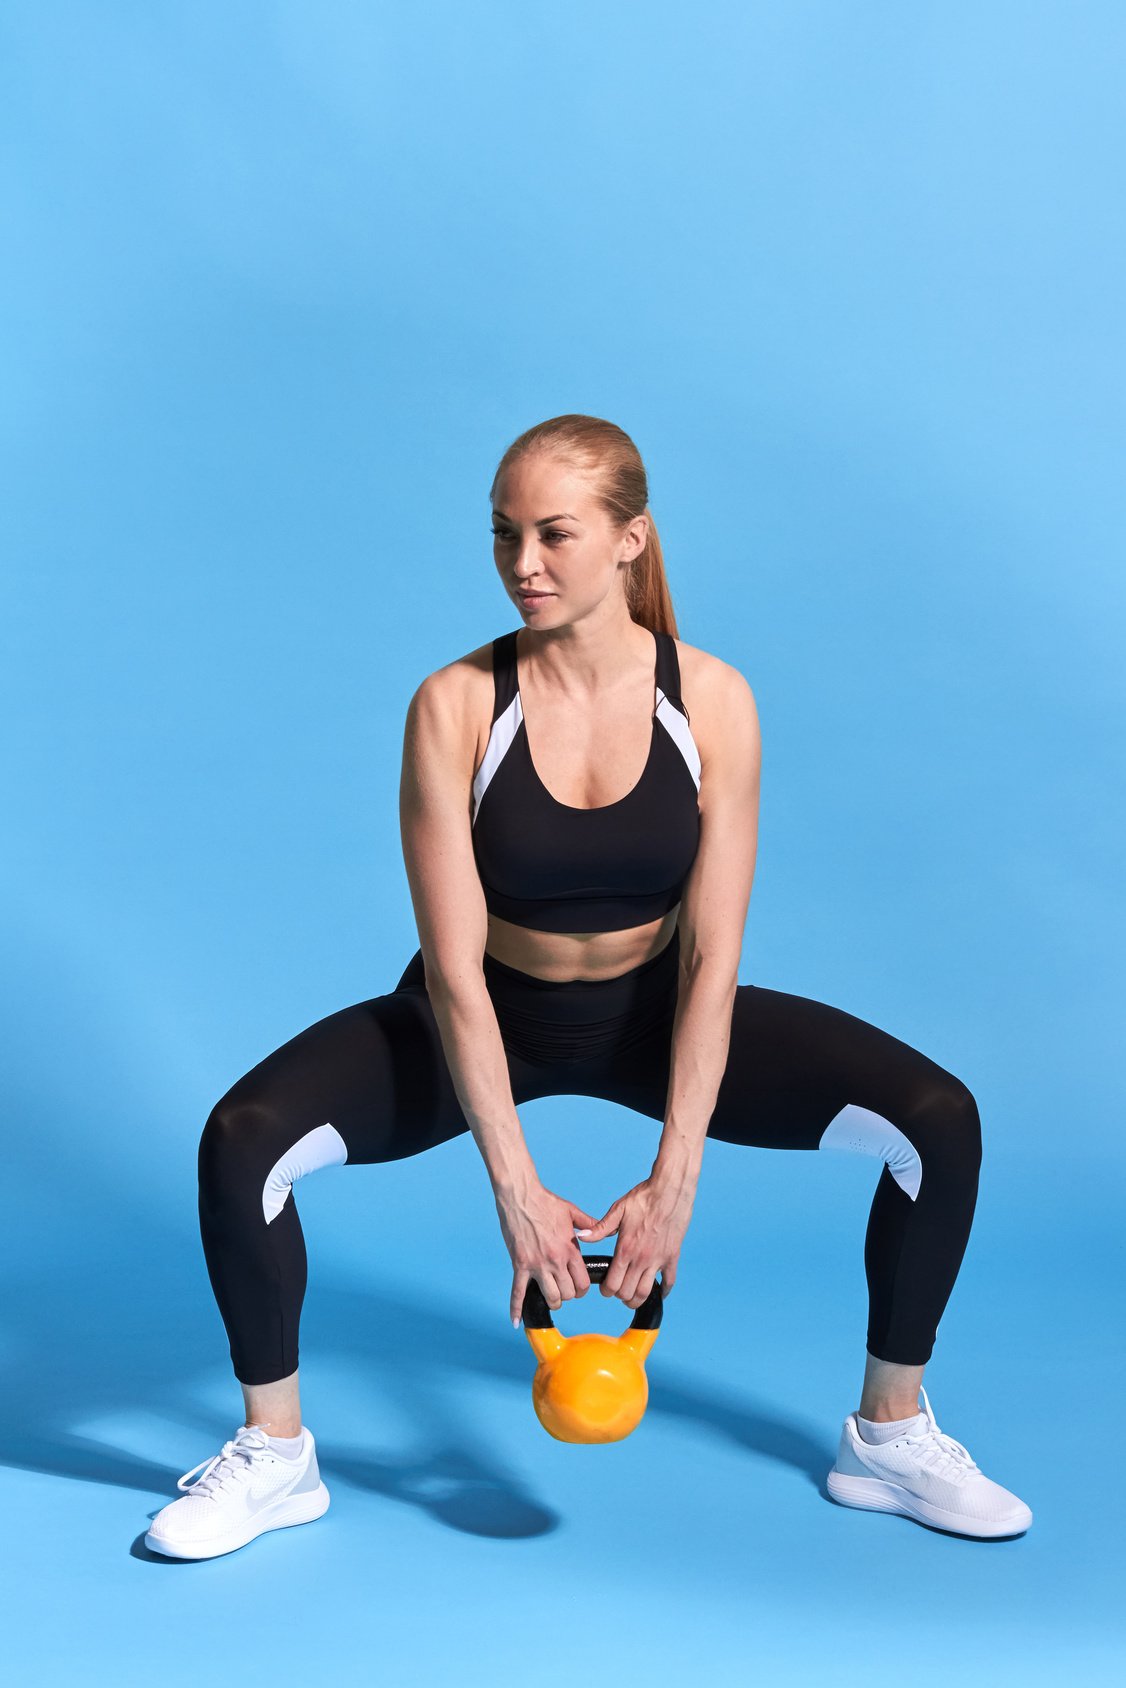
1. Conventional Deadlift
This is the classic form of a deadlift and the foundation of all other variations.
Get this one right, and the other versions will come in handy.
There is a lot to cover here, so please hang with me here.
Proper Form
Stand tall, feet a bit wider than shoulder-width apart, toes pointing straight ahead or slightly outward.
Line up the balls of your feet under the bar.
Then, hinge from the hips, bend your knees, then grip the barbell with shoulder width or slightly wider with an overhand grip.
This is your starting position.
Be kind to your spine.
Always protect your spine by activating your core.
I’m talking about your abdominal muscles here.
If you feel somehow painful in your lower back, drop it down, activate more.
Next, raise the weight up by extending your hips and.
Remember to contract your glutes, hamstrings, quads, and calf muscles while keeping the weight close to your body head up, chests out, back flat, and knees pointed in the same direction throughout the movement.
Hold for a moment, then slowly bring the weight down to the floor by bending your hips and knees.
2. Sumo Deadlift
The sumo deadlift is the wider stance version of a deadlift, and it focuses primarily on the quadriceps, the inner thighs, and glutes.
The move can also help you improve your range of motion (especially within your hip flexors) needed for lifting heavier weights without injury.
Proper Form
Start by standing tall, feet twice shoulder-width apart, toes pointing out at an angle, chest up, again core should be activated.
Next, while keeping your back flat, bend your knees, hold the bar and lift it up by pressing through your heels and thrusting your hips forward.
Stand all the way up, pause, then slowly lower it to starting position and repeat.
3. Romanian Deadlift
The Romanian Deadlift is a fantastic variation for the hamstrings, an important running muscles.
Feel free to perform it by either using a loaded barbell or with dumbbells.
Proper Form
Begin by standing with shoulder width or a narrower stance—depending on your own personal preference.
Grab the bar from the floor with shoulder width to wide overhead grip and keep looking straight ahead as you lift the weight up.
Next, while keeping your arms straight and knees slightly bent, slowly bend at your hip joint and lower the loaded barbell as far as you can without rounding your back.
Make sure to extend your hips forward until you starting feeling a good stretch in the back of your thighs.
Bend down as far as your flexibility allows, but don’t force it; otherwise, expect trouble.
Once you reach the bottom portion, pause, then pull the weight back up to starting position and repeat.
Make sure to squeeze your hamstrings and core muscles at the top of the motion.
4. Trap Bar Deadlift
Trap Bar version is back friendliest deadlift-.
No room for injury to stop you.
This variation helps you cut injury risk while upping your ability to lift heavier loads.
Proper Form
Stand in the center of the trap bar, bend your hips and knees, then lower down until your thighs are parallel to the floor.
Next, while keeping your back straight and core engaged, grab hold of the bar’s handles using a neutral grip, then lift it up by thrusting your hips forward, pause, then slowly return to the starting position.
5. Kettlebell Sumo Deadlift
The Kettlebell Sumo Deadlift focuses on the inner thighs and lower back muscles.
It also improves balance, strength, coordination in the entire lower body.
Proper Form
Assume a wider stance, your toes pointing outwards, core engaged, and back flat.
Next, while bending at the hips, grasp a kettlebell of challenging weight with both hands, then lift up off the ground by extending your knees and hips.
Then, stand tall with chest out, head held high, and core engaged.
Lift the kettlebell off the floor by extending your hips and knees.
Make sure to stand tall, with chest out, core engaged, and back straight.
The Single-Leg Deadlift works the glutes like nothing else.
The glutes are the central power of your running stride, and essential for keeping stability throughout your gait.
Make sure to build the proper form first before do it with single leg.
I’d suggest that you perform this variation with a kettlebell as it’s more convenient, but feel free to use other tools.
Proper Form
Hold a 15 to 20-pound kettlebell in your right hand, and lift your left foot slightly off the ground.
Next, while activating your core and keeping your back straight, lean your entire torso forward and lower the weight toward the floor by bending at the hip and extending the left leg behind.
Hold for a count of three, then press back up to starting position.
Super worth a try, right?
For a stable posture during your running schedule. Deadlift not as scary as the name, though.
Have you ever thought about supercharging your running routine with a touch of yoga magic? Well, today is your lucky day!
In this comprehensive guide, I’ll be your yoga guru, unveiling a treasure trove of poses to boost your flexibility, mobility, and strength.
But before we roll out the yoga mat, let’s first uncover the incredible perks yoga brings to your running game.
Yoga Increases Flexibility
As a runner, you’re no stranger to muscle tightness. Those nagging aches and pains often stem from muscles that are too tight, leading to injuries and subpar performance. But fear not, yoga has your back (and hamstrings and calves)!
Yoga is your secret weapon against muscle tightness. Through regular yoga practice, you’ll improve your flexibility, which is crucial for maintaining a healthy range of motion in your joints and muscles. Say goodbye to those stiff glutes, hamstrings, and lower back muscles – yoga will help you regain your suppleness.
Enter yoga, your ticket to a balanced, full-body workout. In yoga, you’ll engage all your muscles in various poses and movements, building strength evenly across your body. Think of it as a holistic approach to fitness. With yoga, you’ll discover newfound strength in your core, upper body, and those oft-neglected stabilizing muscles.
Yoga Enhances Mind-Body Connection:
Running can sometimes turn into a monotonous activity – one foot in front of the other, focusing on your pace, and miles ticking away. Yoga adds a refreshing twist to your routine by introducing mindfulness and a deep mind-body connection.
Yoga encourages you to be present in the moment, tuning into your body’s sensations and connecting with your breath. This newfound awareness can enhance your running form, making you more efficient and less prone to injury.
Strengthen Your Mind with Yoga
Running isn’t just about physical endurance; it’s a mental game as well. Your inner game, which includes self-confidence, self-esteem, and mental resilience, plays a vital role in achieving your running goals and conquering life’s challenges.
Yoga is your go-to tool for building a robust inner game. Through yoga, you’ll learn valuable techniques to calm your mind, manage stress, and boost your self-confidence. Poses like the Warrior series can instill a sense of power and determination, translating directly to your running endeavors. When your mind is strong, your body follows suit.
Breathe Deep With Yoga
As a runner, you understand the critical importance of lung capacity. Efficient breathing fuels your runs, providing the oxygen your muscles need to perform at their best. Yoga takes your lung capacity to the next level.
Yoga teaches you the art of full-spectrum breathing, engaging not just your shallow upper lungs but also your middle and lower lungs. This holistic approach to breathing increases your lung capacity and oxygen intake, benefiting your running performance.
On the yoga mat, you’ll discover the significance of breath control. Deep, controlled breathing not only optimizes your physical performance but also nurtures your mental state. It helps you stay calm under pressure, manage pre-race jitters, and focus during challenging runs.
Yoga For Runners as a Restorative Practice
Yoga, especially its restorative asanas (postures), possesses incredible soothing and healing powers. These gentle poses are like a comforting embrace for your tired body. They promote deep relaxation and conscious restoration after a challenging run.
This restorative aspect of yoga accelerates your recovery process, making you a healthier and more resilient runner in both the short and long term. It’s your secret weapon to bounce back faster and stronger.
Yoga is The Best Form Of Active Recovery
Active recovery, the practice of engaging in light exercise on your rest days, is essential for runners. Yoga reigns supreme in the realm of active recovery. Why, you ask?
Imagine this: It’s your rest day, and you’re itching to stay active without pushing too hard. Yoga steps in as the perfect solution. It provides a gentle yet effective way to keep your body engaged, promoting flexibility, mobility, and muscle recovery.
So, when recovery days roll around, don’t miss the opportunity to incorporate yoga into your routine. It’s your chance to rejuvenate and maintain your running prowess.
The Yoga Gear You Need
So, you’re ready to dive into yoga as a runner, but before you strike a pose, let’s talk yoga gear.
Having the right equipment can elevate your practice and ensure you’re getting the most out of it. Don’t worry; you don’t need a shopping spree – just a few essentials to get started. Let’s break down what you need:
A Yoga Mat
Just as runners rely on their shoes, yogis lean on their mats. A yoga mat is your sacred space, offering comfort and stability for your practice. It’s where you’ll find your balance, both physically and mentally.
Investing in a quality mat is worthwhile. Look for renowned brands like Hugger Mugger or JadeYoga.
While fancy mats can range from $90 to $120, you can snag a starter mat for as little as $25 on Amazon. Keep in mind that cheaper mats may lack durability and cushioning, so consider your usage frequency when choosing.
Straps
When practicing yoga, comfort is key. Opt for breathable, moisture-wicking yoga attire that allows you to move freely. Whether it’s leggings, shorts, or tank tops, make sure your outfit supports your practice.
Yoga Blocks:
In the world of yoga, the trusty yoga block is your best buddy. It’s a versatile tool that can help you enhance your practice, improve flexibility, and maintain proper alignment. Whether you’re a beginner or an experienced yogi, yoga blocks have your back (or should we say your spine?). Let’s dive into why these blocks are a game-changer:
Bolster:
If you want to take your practice to the next level, consider a yoga bolster. It’s a cushioned prop that enhances relaxation during restorative poses and meditation.
Just as you choose the right running gear, picking the perfect yoga clothing can make a world of difference.
Here’s what to consider:
High-Performance Fabrics: Seek out yoga attire made from high-performance, moisture-wicking fabrics. These materials keep your body dry and comfortable during your practice.
Yoga Pants: A classic choice for both men and women, yoga pants come in various colors like navy, brown, or black. They offer flexibility and ease of movement, allowing you to flow through your practice comfortably.
Form-Fitting Tops: Opt for form-fitting tops that stay in place, even during those deep forward bends. You don’t want your shirt flying over your head mid-pose!
Mix and Match: Get creative with your yoga attire by mixing and matching different tops and pants. Express yourself through your clothing choices while keeping functionality in mind.
Take Classes
Embarking on a yoga journey is a marvelous way to harmonize mind, body, and soul.
But where do you begin? Allow me to guide you through the process:
Explore Live Classes
The energy of a live yoga class is truly unique. Consider joining a local yoga studio or fitness center. You’ll experience the guidance of a skilled instructor and the camaraderie of fellow yogis. It’s a journey best shared.
Online Yoga Classes
If a live class isn’t accessible, online classes are a fantastic alternative. You’ll discover a multitude of free yoga classes on platforms like YouTube.
Here are some YouTube channels that I recommend:
Travis Eliot
Yoga with Kassandra
Yoga With Adriene
Online Subscription Services
For a more extensive yoga experience, you might explore subscription services like Yoga Download. These services typically cost between $10 to $15 per month and offer a treasure trove of yoga courses suitable for all ages and backgrounds. They may even have specialized programs tailored for runners.
Whichever path you choose, remember that yoga is a personal journey. It’s not about how perfectly you perform each pose; it’s about connecting with your inner self, finding balance, and embracing mindfulness.
Yoga For Runners – The Best 27 Poses
Without further ado, here’s a long list of yoga poses for runners that improve flexibility, strength, and functional fitness.
Enjoy!
Note – A Yoga Warm-up Routine
Before you try any of the yoga poses shared below, please make sure you’re well warmed up.
Perform the following warm-up yoga sequence (even following a run) to get your muscles and joints for action.
Yoga For Runners – The Flexibility Routine
The following yoga poses are exactly what you need to improve your flexibility as a runner.
1. Forward Fold (Uttanasana)
The Forward Fold asana is ideal for runners since it opens up and stretches out the hamstrings, glutes, and lower back—some of the most troubled areas in runners.
Proper Form
Begin in standing pose, then as you exhale, hinge at the hips and bend forward, lengthening the front of your torso.
Next, fold forward slowly and grab onto your shins, or for a more intense stretch, reach down for your toes or ankles.
Breathe deeply and let the crown of your head move toward the floor, releasing and relaxing your neck and head as much as possible.
I highly suggest that you hold this pose for as long as you can.
Anyway, as long as you are breathing deeply and feeling the stretch, you are doing just fine.
A yoga strap is really welcome.
Step over the strap and try to pull the strap first.
After your spine neutral, reach deeper with the strap.
2. Downward-Facing Dog (Ado Muka Svanasana)
This asana mainly stretches the hamstrings.
Runners are notoriously infamous for tight hamstrings— this tightness can hinder performance and lead to injury.
Plus, it also adds strength to the ankle, thighs, and knee, helping you ward off a plethora of running injuries.
Proper Form
To perform the Triangle pose, begin by standing straight and extending your right leg to the side a little more than hip-width distance apart.
Make sure to turn the right toes in slightly and rotate the right thigh open to turn your left foot at about 90-degree angle.
Next, turn your right foot perpendicular to your left as you extend your right arm straight above your right foot, then gradually fold over at your right hip and lower your hand down to grab your thigh, knee or shinbone.
If you want more, slowly walk your hand down to grasp your calf or ankle, or big toe, but never compromise good form.
Hold the position for five breaths, then slowly press back to starting position and switch sides
5. Eagle Pose (Garudasana)
This is a must yoga pose for runners since it opens up and stretches the scapula, shoulders, elbows, ankles, hips, and knees, and also strengthens the calves and ankles, as well as improving balance and coordination.
Plus, it speeds up blood flow, leading to faster recovery rates after a workout.
Proper Form
Stand with your feet hip-width apart, raise your hands above your head, and swing them down in front of your body, wrapping your left arm under your right arm.
Next, bend your right knee and cross your left leg around the right leg, hooking your left foot on either side of your right leg.
Lower your butt down as much as you can and lift up through the arms to stay well balanced.
Keep the pose for the five deep breaths, then unwind and switch sides.
6. Camel (Uṣṭrāsana)
As a runner, chances that you spend a lot of time hunched over, shoulders in, and chest down.
That’s why a heart-opening pose, like the Camel, is ideal.
This yoga asana improves flexibility and strength in the upper body, and it also can help you build better posture—on and off the running track.
Plus, opening your chest will not only counter some of the bad posture patterns from running, but it will also open up your chest and give you more space to breathe, and as you know, the better you breathe, the more oxygen you pump into your blood and working muscles, thus the better you run.
Proper Form
To safely perform the Camel asana, begin with your knees on the floor, hip-width distance apart, and hands on the hips.
Next, stack your hips right over your knees, draw the shoulder blades down the back, and reach back with your hand to take your low back.
Focus on your knees, if its in a V shape, you are doing something wrong.
Then, from there, take the center of your chest up and slide your palms down as far as you can.
Try to reach back to take hold of your feet or ankle.
Reach as far down as it’s pain-free.
Shoulder blades should be facing to the sides of your body, not forming M shape.
Avoid M shape on your shoulder blades for deeper pose and bigger space.
Stay in the pose for five deep breaths, then slowly come back to starting position.
7. Pigeon (Eka Pada Rajakapotasana)
As a runner, stress, and tension can build up in the hips and create tightness—a tightness that can compromise performance and lead to a plethora of running injuries.
The Pigeon asana increases the range of motion and flexibility in your hips, boosting running performance and reducing the risks of injury—especially knee pain.
Proper Form
To perform the Pigeon right, start from table pose (on all fours), then slide your right knee forward toward your right hand, then straighten and stretch your left leg back as far your hips will allow.
Rest your right shin on the floor, slightly behind your hands.
Next, square your hips and lower your body down as far as you can while feeling the stretch in your hips, glutes and groin area.
You can sit up and rest on your palms, elbow, or lie all the way down for a deeper stretch.
Hold the pose for five deep breaths, then to come out from the Pigeon, tuck your left toes under and bend your left knee and slowly glide your right leg back until you are back to starting position.
Switch sides.
Yoga For Runners – The Recovery Routine
Here are my yoga poses for post-run muscle soreness and recovery for runners.
8. Legs Up The Wall (Viparita Asana)
If you pick only one pose from my my yoga for runners list, do the Viparita asana.
This inverted pose speeds up recovery by draining fluids from the legs, stretching the hamstrings—troubled area for runners—and releasing tightness and stress in the lower back, feet, and legs.
Plus, it’s so simple and easy to perform.
Proper Form
To perform the Viparita asana, start by sitting with one hip close to a wall.
Next, swing both legs up the wall and get your butt as close to the wall as it’s comfortable.
If you feel any pain in the lower body—especially in the hamstrings—then slide a few inches away from the wall.
Hold the position for as long as you can, then to come out safely from the pose, bring your knees into your chest for a couple of breaths, roll to one side, rest for a moment, then slowly get up.
Make sure spine neutral, not curving so your legs are not going to put stress on your spine.
9. Seated Star Pose (Baddha Konasana)
A great pose for releasing tension in the hips, lower back, shoulders, and neck.
Proper Form
Begin by sitting down on the floor with the soles of the feet together, heels roughly 20 inches in front, and knees bent in a kite shape, forming a diamond shape with the legs.
Next, straighten your spine then slowly round the spine forward, bringing the forehead towards the heels.
Hold the pose for one to two minutes before slowly releasing.
Here are seven yoga poses for your post-run routine that will help you speed up recovery rate, thus bounce back faster and keep you running injury free for the long haul.
A great restorative yoga asana for releasing the abductors, chest, hips, groin, and the lower back.
Proper Form
Start by sitting in a Staff Pose, with the legs extended straight in front of you on the floor.
Then, bend your knees and draw your heels in toward your pelvis.
Next, press the soles of your feet together and slowly drop the knees open to the sides, then slowly lean backward and bring your elbows to the mat.
Lower your back as far as you can.
Hold the pose for ten deep breaths, then to come out safely, roll over to your right side, and sit up, using the hands to support you.
Feel free to use props to deepen your pose.
Blocks can be placed under the knee.
If you are into Iyengar, you can wrap strap and sit on it, so you can really control the stretch.
12. Happy Baby Pose (Ananda Balasana)
Another ideal pose for opening and releasing the hips and groin.
This pose stretches the hip joints, which can get tight and stiff from running.
Plus, this pose is very calming for the body and mind.
Proper Form
Start by lying down on your back, and on the exhale, draw your knees into your chest and grab the outside edges of your flexed feet with your hands.
If this stretch feels too much, then grab behind your thighs.
Next, open the knees and bring your hips down to the floor as far as you can, and hold the outside of the feet as you draw the knees toward your armpits while keeping your lower back firmly on the floor.
Breathe deeply and make sure to rock gently from side to side to release any tension.
Hold the pose for ten deep breaths, then move on to the next pose.
13. Supine Spinal Twist (Supta Matsyendrasana)
This asana twists and releases the spine, and also stretches the shoulder, glutes and the hips—troubled areas for runners.
This pose lengthens the back muscles, which is good for relieving back pain— especially following a long run or after sitting for prolonged periods of time.
Proper Form
Start off by lying on your back, then bend both knees and place the soles of your feet on the floor.
Next, bring your right knee close to your chest and extend the left leg straight on the floor.
For the twist, drop your right knee over to the left side of your body, twisting the spine and low back.
For more stretch in the upper body, open your right arm to the right side in line with your shoulders, while resting your left hand on your right knee for a deeper release and twist in the spine and lower body.
Hold the pose for ten deep breaths, then slowly bring your right knee back, straighten your right leg, and do the other side.
14. Corpse Pose (Savasana)
The perfect pose for rest, relaxation, letting go, and contemplating after a workout.
Proper Form
To make the most out of this awesome pose, lie flat on your back with your knees bent, feet on the floor.
Use a small pillow (or fold your mat) below your neck if you have to.
Next, close your eyes, keep your legs comfortably apart, release your feet and knees complexly and breathe deeply.
There is nothing to do.
Just be present and turn your attention inward and scan your body from head to toe, looking for tension and contracted muscles.
Go as deep as you can, and enter a complete state of total relaxation.
Let your mind go then bring all of our attention to your breath.
Be in the now.
Stay in Shavasana for at least 10 minutes.
You can have soothing and relaxing music in the background.
It’s okay to fell asleep during this pose.
Most of the yogis did that too!
Yoga for runners couldn’t be this easy.
Yoga For Runners – The Strength Routine
Here are seven yoga poses that every runner should do to increase strength in the whole body
If you find any of these poses too easy and boring, then just hold the asana for one full minute or longer while making sure you have proper alignment and the right form to test your strength and stamina.
Don’t cheat.
That’s the motto.
15. Four-Limbed Staff Pose (Chaturanga Dandasana)
This is a must since running is an exclusive lower-body activity, so the upper body gets tossed to the side.
So don’t be surprised if you have the upper strength of a 9-year-old.
The good news is that this pose is perfect for you.
This yogic pushup position builds strength in the upper body when done properly.
Yoga for runners at its best.
Proper form
Lie facedown, then propel yourself up to plank position.
Make sure your body is aligned from head to toe.
Next, come a little bit forward on your toes and bend the arms straight back, keeping the upper arms hugging into your sides as you lower your body to hover a few inches above the floor.
Pause for a moment, then push back up slowly to a plank position, or roll over the toes, and come back to upward facing dog.
Make sure to keep your shoulder below the level of your elbows and keep your whole body straight.
Do at least ten slow push-ups before you move on to the next asana.
Ideally, shoot for five sets of 10 reps.
Try not to collapse your hip or chest.
For easier one, try to move your wrist wider to the side.
16. Low Lunge (Anjaneyasana)
The low lunge is a great pose that strengthens the thighs and the calves.
This asana also stretches the front of your hips.
Proper Form:
To perform Burning Low Lunge, step your right forward three to four feet to assume a lunge position.
Next, press back through the right heel to straighten the left leg.
Lower your left knee until it almost touches the floor and bring down your hands to the sides of the front foot, under the shoulders.
Hold the position for five deep breaths, then switch sides.
17. Warrior III (Virabhadrasana III)
Warrior III increases strength and length in the spine, core, and torso while also strengthening the muscles in your legs.
Plus, it also builds balance and concentration.
Proper form
Start by standing in mountain pose with feet hip-distance apart, arms at your sides.
Then, step forward with your right foot three to four feet in front.
Turn your right foot out 90 degrees, so your toes point to the top of the mat, and pivot your left foot inward at a 45-degree angle.
Next, shift your weight forward onto the front heel as you gently kick up your back up in the air while bringing your torso forward until it is parallel to the floor.
Make sure to engage your core and that your neck is in a relaxed position.
Gaze at the floor a few feet in front of your body and hold the pose for five deep breaths, then bring your left leg slowly to the floor, and switch sides.
18. Crescent (Anjaneyasana)
This dynamic standing yoga pose strengthens all the muscles in your lower body. It also stretches the lower body while improving balance and stability.
Proper form
From mountain pose, step your right foot three to four feet in front of you, then lower your hips into lunge position and shift your weight onto the ball of your back foot, bringing your hands to your hips or above you and reach for the ceiling, with palms facing each other if balance is not an issue.
Make sure to keep your upper body as high as you can while staying up on the ball of the back foot.
And check that your hips are squared the entire time.
Hold the position for five breaths then switch sides.
19. Goddess (Utkata Konasana)
Running requires a lot of glutes and quads action, and this pose can come in handy.
The Goddess asana is a wide squat variation that will tone your lower body and core like no other asana.
Proper form
From mountain pose, take a step open to the right, so your feet are about three to four feet apart, and lift your arms out to the sides at shoulder height.
Next, turn your toes out slightly, then on the exhalation, bend your knees directly over your toes and squat down, so your quads are parallel with the floor.
Hold the position for up to ten deep breaths, then slowly lower your hands to your hips, and press firmly into your feet to go back to starting position.
20. Three-Legged Dog (Eka Pada Adho Mukha Svanasana)
This is a powerful variation of the classic downward dog asana, and it will help you build immense strength and mobility in your lower body, especially in the glutes—also known as the buttocks—and lower back.
Proper Form:
In downward dog, step your feet together, so your big toes are touching.
Then with arms and legs straight, inhale and raise your right leg while keeping your hips level and the right foot strongly flexed, raising the right leg up in the air, and coming into a downward Dog split.
Hold the pose for five deep breaths, then switch sides.
Make sure to engage your core throughout the pose and to keep your shoulder parallel to the floor.
For more challenge, try balancing on one the right foot, left arm, then switch side—left foot with the right arm.
21. Bent Standing Split (Tadasana)
If you have any flexibility issues in the hamstrings, quads, and hips, then this asana will be extremely difficult (and really useful!).
Chances you are tight in these areas if you run regularly (and don’t a proper stretching routine to counteract the effects of pounding the pavement).
This move also increases balance, which enhancing coordination and strengthening the thighs, knees, and ankles—this can help you stop ankle sprains and reduce the risks of knee pain and injury.
Proper form
From mountain pose or Tadasana, hinge at the hips to come into a mild forward fold, with your fingertips touching the ground.
Next, shift your weight onto the right foot, then on the inhale, lift your left leg parallel to the floor.
As you lift your leg higher, bring your torso closer to your right leg.
For more challenge, walk your hands to either side of your right foot and grab your foot or ankle as much as you can.
Hold the pose for five deep breaths, then bring your left leg down on the exhale, recover for a moment, then on the inhale repeat on the other side.
The core muscles are key for developing good running form and posture, stopping you from bending at the waist—especially when fatigue starts to set in.
This can help you ward off back pain along with a host of biomechanical problems.
The sequence includes seven powerful yoga poses to fire up and strengthen all of your core muscles—with no exception.
It also builds upper body and low back strength and lengthens the spine.
Proper Form
Assume a push-up position with hands and knees shoulder width apart, fingers spread wide apart with the middle finger pointing forward, and toes tucked under, pressing into the palms with the straight arms.
Form a straight line from your head to your ankles by tucking your tailbone under and engaging your core muscles to keep your pelvis torso steady and firm.
No sagging allowed.
To keep your legs active through the hold makes sure to press with your heels toward the back of the mat.
While maintaining your neck soft and gazing down at the floor, hold the plank position for one to two minutes before moving into the next asana.
Lift the base of the skull away from the back of your neck and gaze down the floor.
To come out of this pose, slowly bend your knees to the floor to assume child pose, then move on to the next asana.
23. Dolphin Plank (Makarasana)
Or elbow plank, this is a variation of the classic plank, resting on the elbow this time.
This asana targets more of the muscles of the abs, with less strain on the arms and shoulders.
This is a great asana for runners since it targets the entire core as well as helping improve posture and adding strength to stabilizer muscles.
Proper Form
Start by lying face down on the mat, resting your upper body on your forearms with your elbows right under the shoulders, and palms firmly grounded.
Next, to come into the dolphin plank, raise your hips towards the ceiling, coming onto the tips of your toes while staying on your forearms.
Make sure to maintain a straight line from your head to your heels by keeping your back flat and abs engaged throughout the hold.
If your spine curving, retreat and try again.
Make sure to protect your spine straight.
Hold the pose for one to two minute, then lower down and move to the next asana.
24. Balancing Star (Vasisthasana)
This is the third plank variation I’m sharing with you today.
This asana mainly targets your side core muscles—what’s known as the obliques—as well as strengthening the thighs, glutes, shoulders, and arms.
It also challenges your balance like no other asana—except for, maybe, Warrior III.
Proper Form
Start in the classic plank position, then roll open to your right side and raise your left hand off the floor, and stack your left leg your right leg.
Then, shift to face the side of your mat with your weight equally distributed between your right arm and right foot.
Make sure to keep your shoulders, spine, and hips in one straight line from the head to the ankle.
You can stay here balancing on your right hand with feet stacked.
But to come into the full version of Balancing star, raise your left foot up as high as you can and reach your arm to the ceiling as high and straight as you can without losing balance.
Be sure to keep a straight line from your head to your ankles.
For more challenge in the balance department, try looking up at your top hand.
Hold the pose for 45 seconds to one full minute while keeping the core engaged and pose steady throughout the hold.
To come down, lower slowly to classic plank then switch sides.
25. Boat (Navasana)
This is one of the simplest yoga moves with one and only purpose: sculpting and toning the abdominals.
This asana engages the deeps muscles of the abs and will improve your running posture and stability.
Proper Form
Begin by sitting on your mat with legs in front of you.
Next, bend your knees, lift your legs off the mat, and lean back a bit to balance on your sit bones, then bring your knees in toward your chest with your thighs at a right angle to the floor and shins parallel to the floor.
To do the Boat right, make sure to sit as tall as you can, then slowly start to straighten your legs, bring your arms out straight in line with your shoulders, forming a “V” shape with your body.
Don’t lean on your buttocks, that’s cheating as you’re not engaging your core properly.
Hold the pose for one to two minutes, then take your time to slowly lower down to the floor.
26. Sunbird Pose
Begin in tabletop pose, then reach forward with your right arm like you are about to shake someone’s hand and raise your left leg up, holding it parallel to the floor.
Make sure to engage your core muscles while you are doing your best to pull the extended limbs away from each other.
Next, bring your knee towards your chest while curling the right elbow to the left knee on the exhale, as if you are performing a crunch.
Then inhale and extend your arm forward and leg back.
Continue the motion for 12 to 15 reps, then switch sides.
27. Locust Pose (Salabha)
This asana is ideal for strengthening the lower back, the muscles that surround the back of the spine and abdominals as well as improving posture.
It’s also a great spine opener.
And it can help you undo the hunching effects of running, vital for building better posture, both on and off the running field.
Proper Form
Begin lying on your stomach on the mat with arms along the sides of your torso.
Then, place your hands, palms faced down, next to your chest, with your elbows bent like chicken wings.
Next, raise your chest off the mat by only using your back muscles, curving your spine upwards, and lifting your legs off the mat using your inner thighs up toward the ceiling as you reach the crown of your head up as high as you can.
In fact, if you log in serious miles every week and have zero calluses, consider yourself one of the lucky ones.
Here’s the truth.
Excessively large calluses aren’t just a problem of appearance, but can also cause discomfort during exercise, especially when running.
They’re also pretty common among athletes from all training backgrounds.
In today’s post, we’ll go through what causes this skin build-up while running, how to prevent calluses, and how to treat them.
Sounds great?
Let’s get started.
Foot Callus From Running – The Definition
Also known as a corn, a callus is hardened skin that occurs in friction-prone areas, such as the bottom of the foot, or over bony projections.
Often painless, calluses are your skin’s natural protective reaction of pressure sites.
The affected skin may start getting dry, flaky, and harder than the rest of your skin.
For most runners, this hardened mass of skin tends to build up in the heel, likely from the edge of the shoe rubbing repeatedly against the back of the foot.
What’s more?
If you run in improper shoes, you might develop a callus along the outside of your big toe.
Here’s the good news.
There are many things you can do to lower your risk of developing calluses during running.
Here are a few.
The Symptoms of A Running Callus
It’s easy to tell that you have a callus.
Usually, the skin of a plantar callus is yellowish or gray.
It may also feel flaky, tough, and dry.
The skin may be tender when direct pressure is applied to the region.
Not a Bad Thing
Getting a callus as a runner isn’t necessarily a bad thing.
There’s actually a benefit of having calluses when pounding the pavement.
This hardened skin buildup in areas prone to friction and rubbing against your shoes protect you from forming blisters.
In essence, calluses protect your feet against blisters and sores while running.
Although calluses your our body’s natural reaction for protecting the skin, like all good things in life, too much of a good thing can do you more harm than good.
How To Prevent A Running Callus
Here are a few simple measures to help you prevent and manage painful calluses.
Proper Running Shoes
Running in improper shoes can be a real problem for your feet, likely resulting in numbness, blisters, and calluses.
This is especially the case if your shoes are too narrow and tight in the forefoot, causing pinched-nerve pain and calluses.
If you’re prone to calluses, make sure your running shoes suit your feet and running style.
They should be wide enough across the front, so there little no friction or pinching.
If your calluses are painful, you should take some measures to ease the pain.
Here’s how to treat running-induced calluses by yourself.
First, start by soaking your feet in soapy, warm water for 5 to 10 minutes. This helps soften the skin.
Next, get a pumice stone (available at your local drugstore), get it wet, then gently shave lightly the dead skin, AND the callus using circular or sideways motions for two to three minutes.
Stay safe.
Do not take too much skin off—or else, you’ll wound your foot.
And you don’t want that.
Repeat this process many times per week or as needed.
Apply moisturizing foot cream following the scrub sessions to keep the area soft.
The ingredients should include Ammonium, Salicylic Acid, Urea, or Ammonium Lactate.
When to See A Doctor
Although most cases of callus do not require medical attention, you need to have it looked at by your doctor or podiatrist.
The following scenario deserves attention from a healthcare professional.
The callus is red, dry, and cracking. This may indicate chronic athlete foot.
The callus is chronic and recurring. Your sports-oriented physician may help you figure out why your calluses keep returning.
If you notice that your callus is warm to the touch, red, or particularly painful, seek medical attention.
These red flags could signal an infection.
The callus is thick and painful. It should be treated by a sports-oriented physician.
The callus has clear fluid or pus discharge. This could indicate that the callus might be infected or ulcerated, thereby, requires medical attention.
If you have heart problems, diabetes, or circulatory problems, suffering from any of these conditions makes it more likely for you to develop an infection.
If you have any of these conditions, check your feet for damage regularly.
Training on the treadmill is a fantastic way to stay consistent with your training all year round.
But pounding the belt day in and day out can get boring—pretty fast.
Don’t lose hope.
With the right tools and mindset, you can make treadmill training something to look forward to.
One way to get the most out of your treadmill runs is to use one of the many running apps available.
A lot of companies have started in recent years to develop apps that make treadmill training much more fun and challenging.
You can find apps that encourage you to reach your running goals.
You can even participate in group run classes from the comfort of your home, and so much more.
Want to try some of these running apps on your own?
Then you’re in the right place.
In today’s post, I’ve separated the wheat from the chaff and am sharing five apps that will take your indoor runs up a gear.
They’ll motivate you to hit the belt again and again
1. Zwift
Want to be taken into a virtual reality world?
Then Zwift is all you need.
Zwift lets you run in Watopia, complete with the road, trails, sand, jungle, volcanoes, and the countryside, plus routes in New York, London, among others.
You can choose from 5 virtual worlds and with over 80 routes.
However, there’s a downside.
This running app requires a bit more accessories to help provide you with accurate feedback on cadence and speed.
First, you’ll need to bring up the app on your phone, tablet, laptop, or tv.
You’ll also need a footpad to monitor your cadence and heart rate monitor.
This app has been around for a long time, and it keeps on getting better.
You can find within the Nike + Run Club app more than 50 guided runs—some of which are led by Nike superstars, such as Shalane Flanagan and Eliud Kipchoge.
You can also choose from six running routines, specifically tailored for the treadmill.
The sessions are roughly 15 to 20 minutes long and come with audio instructions—for everything from speed and incline settings to encouraging tips.
What’s more?
By setting your running surface, the app monitors your pace, time, distance, and calorie burn.
The instructions provide good suggestions on how fast or had you should go, so it’s a good idea to know your training and recovery paces beforehand.
What’s more?
You can also link the app with other Nike products, like the Fuel band, load up on Nike Fuel.
This app is for you, especially if you love the energy of group classes.
You can find more than 170 Tread Studio live on-demand running classes that range from 15 to 60 minutes long.
These routines cover everything from recovery runs to interval workouts and hill reps.
You can also filter by class type, duration, difficulty, instructor, or music genre.
The app also has also other types of guided training, such as stretching yoga, walking, and boot camp, and other exercises that require no equipment at all.
Looking to turn your treadmill runs into a horror movie adventure with zombies?
Try Zombies.
Run! App.
The app comes with basic features you’d expect in a running app, but it’s also a multi-player game, taking place in a post-apocalyptic world infested with zombies.
Zombies! Run is straightforward.
You set it up, put on your earbuds, and start playing one of the 60 missions.
You begin by walking, or running, then as soon as you hear zombies approaching, you run for your life.
5. Ghost Race
Ghost Race may seem to have a lot in common with Zombies, Run! But the ghost here isn’t much of a supernatural entity but a virtual body you create before each workout to compete against.
This created entity is crafted based on your pace, distance, and time, though you can re-adjust to push yourself even harder.
The app also allows you to monitor your times on different surfaces and compare your performance from day-to-day.
It also keeps you updated on your growth against your ghost in real-time.
What’s more?
You can also save previously running times and then race against those during future training sessions.
When you fail to keep up your previous time, a “ghost” will manifest in front of you, moving at a faster pace.
Conclusion
There you have it.
Using running apps, like the ones mentioned above, is one of the best ways to make treadmill training more fun and less boring.
Now it’s up to you to download the apps and start training.
The rest is just details.
Please feel free to leave your comments and questions in the section below.
Looking for a powerful mobility training routine to help you improve performance and reduce injury risk?
You’re in the right place.
All runners know that stretching is part and parcel of a well-rounded training plan.
Regular stretching feels good, increases flexibility, releases tension, corrects muscle imbalance, and improves technique—all of which make running more enjoyable and efficient.
That said, mobility training is also important.
It’s actually one of the keys to training longevity as it helps reduce injury risk, keep the joints healthy, and ensure optimal performance.
Yet, so many runners miss out on its benefits, whether they don’t know much about mobility’s impact on performance or are simply unwilling to invest time doing mobility drills (I understand, we’re all busy, but that’s no excuse).
Here’s the truth: Improving your mobility doesn’t have to burn off long hours from your day.
In fact, as little as 10 to 15 minutes a day is enough to reap physical performance gains.
In today’s article, I’ll explain what mobility is all about and share a few mobility drills as well as how to incorporate mobility work into your workout routine.
Before we go into the many ways mobility training improves your athletic performance, let’s take a look at what mobility actually means.
Flexibility VS Mobility
Most runners know what flexibility is, but they often confuse it with mobility.
Understanding the difference is key as mobility training is much more than just stretching.
Let’s see which is which.
Flexibility stands for the ability of the soft tissues to stretch in a specific direction.
It’s the lengthening of muscles in a passive way.
For example, if you can reach your toes from a standing position without bending your knees, or scratch every part of your back unassisted, you’re pretty flexible.
Mobility, on the other hand, is about how freely you can move a joint through a range of controlled motions, before being limited with control.
It’s your ability to exert force throughout a greater range of motion.
For example, if you can press dumbells behind your neck, get into a deep squat with weights on your back, or do gymnastics, you have good mobility.
Now that you have an idea what mobility is all about, let’s look at how it can help improve your running performance.
The Benefits Of Mobility Training For Runners
Whether you just took up running to lose weight, are preparing for your 5th marathon, or just running for the joy of it, working on improving your mobility could give you a big performance boost!
Good mobility helps us pay more attention to our bodies and our range of motion, leading to improved running technique and fewer injuries.
Let’s see why…
Improved Speed
Poor mobility limits your ability to run at a faster pace.
The main goal of mobility training is to improve the position of the joint, which helps increase power output, resulting in efficient performance.
When you have a good range of motion, you can push move much more efficiently.
This translates to a faster pace and improved athletic performance.
Reduced Injury Risk
A lack of mobility makes you prone to pain and injury, especially as you ramp up your training.
For instance, research shows that limited hip mobility may lead to patellofemoral pain syndrome, iliotibial band syndrome, hip pain, and a host other issues.
Better Awareness & Technique
Mobility training can make you more aware of how your body moves and your range of motion, which results in better running form.
The Mobility Training Routine You Need
Here’s a 15-minute routine to improve the range of motion in all major joints and strengthen the surrounding stabilizing muscles.
You can perform these movements as part of your dynamic warm-up or your cool-down.
Perform it two to three times a week to take your running efficiency and power to the next level.
Squat to Stand
A great movement for mobilizing the inner thighs and hamstrings.
Proper form
Begin by standing, feet slightly farther than shoulder-width apart.
Next, while bending your knees much as needed, bend over and grab the bottom of your feet, pulling yourself into a deep squat position.
As you assume the bottom position, focus on pushing your knees out, forcing your chest up, and keeping the heels low as you lower your body toward the floor.
Hold for a moment, then push your hips upward until you feel the stretching in your hamstrings.
Try to keep a slight arch in the lower back, chest up and knees out the entire time.
Without further ado, here’s a series of exercises you can almost do anywhere to improve your hip mobility and strength. The following exercises will help loosen your hip flexors and strengthen the surrounding stabilizing muscles.
Standing Hip Figure Eight
Begin by standing on your left leg, then bring your right knee up to a 90-degree angle and then move it through a figure “8” motion. Hold on to a chair or wall for balance.
2. The 90/90
Start by sitting on the ground, then bend your right leg in front of your body with your hip rotavated out.
Next, get your chin as close to your foot as possible by moving your upper body forward. Again, keep the motion fluidly and only hold at the bottom for a moment.
Repeat the movement 8 to 10 times, then switch sides. Make sure to keep your torso stacked over your hips the entire time.
You should feel tension throughout your body as you go through the movements.
Spend around 60 to 90 seconds on each side to complete one set.
Start by placing your right leg forward and your left back. Next, position your left leg beside you while keeping your hip rotavated inward and your ankle and shin on the floor. Next, bend your right knee so your leg forms a 90 degrees angle. Your ankle should be neutral, and your left knee in line with your hip.
3. Spiderman Stretch
Assume a push-up position, supporting your weight on your hands and toes. Make sure to engage your core, so your back is flat and not arched or rounded.
Next, bring your right leg to the outside of your hands, with the foot pointed forward and the entire foot planted on the floor. Next, let your right knee travel far ahead of your foot for more stretch by dropping your hips toward the ground. Just keep your heel planted on the ground the entire time.
Hold the position for 5 to 10 seconds, flexing slightly forward for a deeper stretch. Then bring your right leg back to the push-up position and change sides for anywhere from 6 to 8 reps for each leg.
4. Supine Hip Rotation
Start by lying flat on your back, arms extended to your sides with your palms on the floor.
Next, while bending your knees to a 90-degree angle, bring your legs into the air, then drop them to your right side. Again, make sure to keep the upper and middle back flat on the ground.
You should feel the stretch deep into your left hip. Hold for 15 to 20 seconds, then bring your legs back to the starting position and switch sides.
Repeat 4 to 6 times per side.
5. Frog Stretch
Start in a table position on your hands and knees, facing sideways on your mat. Make sure your knees are under your hips and your wrist under your shoulders.
Next, lower your upper body to your forearms while sliding your knees apart. If your knees are sensitive, you can fold your yoga mat or add planets to help take off some of the pressure.
Hold the stretch for one to two minutes. Then slowly return to starting position. You’re doing it right if you only feel the stretch or tightness in your inner thigh/adductor area.
6. The Yogi Squat
This is a hard one to pull off, so if you struggle to stay upright and/or on your feet, feel free to hold onto a chair or railing for balance.
Assume an athletic stance, with feet about shoulder-width apart and legs turned out from your hips. Next, while engaging your core and keeping your low back fat, lower yourself into a low squat position. Do your best to tock side to side without falling over.
Bend your knees and hips and slowly lower into a very low squat while keeping your chest up, knees in line with your toes, and heels planted on the floor the entire time.
For a deeper stretch, place your elbows within your knees, then press your palms together in front of your chest.
7. Reverse Plank/inverse tabletop
Start by lying on your back with hands placed by your rips and fingertips facing your feet.
Next, press your hips upward so that your hands and feet are the only part of your your body in contact with the ground. Make sure your body is straight from your head to your feet.
For a deeper stretch, lift your right knee off the floor and hold for 20-30 seconds.
Conclusion
There you have it! If you’re looking to improve your mobility as a runner, then today’s article will put you on the right path. The rest is just details.
Whether you just took up running or a serious athlete, log enough miles, and you’ll experience aches and pains in your muscles, joints, bones, and connective tissue.
In some cases, you might able to keep running through the discomfort, but often serious running pain means that you need to assess your running routine, even stop training altogether.
So how do you know when it’s okay to run through the pain, when to slow it down, and when to rest and go see a doctor?
If you’re looking for answers, then you’re in the right place.
In this post, I’ll briefly explain the different types of running pains, with suggestions on when it’s okay to keep training and when to stop.
Sounds great?
Let’s get started.
Word of caution. Let the record clearly state that I’m not encouraging anyone to keep running through injury.
If you have chronic pain, get it checked out by a professional.
I’m not a doctor nor play one on the internet.
Measure your Pain
Running pains are not created equal.
Instead, these come in many forms, whether it’s a sore muscle, achy joint, bone fracture, inflamed tendon, or throbbing headache.
They also vary from one runner to the next.
To help you decide how to best react to these running pains, consider grading them on a pain scale of 1 to 10.
Here’s how.
Mild Pain 1-3
You experience it at the beginning of a run, but it usually subsides as you start to warm up and continue running.
In general, it’s safe to run through mild pain.
If you have any problem areas, opt for the RICE protocol after your session.
Moderate Pain 4-6
This type of pain manifests as you start running, but stays at a tolerant intensity throughout the workout.
While you can still run through it, it’s better to listen to your body and adjust your training approach accordingly to prevent things from getting worse.
Severe pain – 7 to 10
This type of pain is so serious that you feel it before, during, and after your runs.
In fact, the agony increases as you log in more miles, forcing you to limp or change your gait.
Never run through this type of pain as it will do you more harm than good.
Instead, take as many days off from training as long as you have symptoms.
You should also consult your doctor, who will recommend the right treatment and prevention options to help you return to running pain-free.
Where is the pain?
Now let’s dive into some of the most commonly affected limbs while running.
Pinpointing the exact affected area can help you determine what’s going on and how best to proceed.
Pain Region – The Head
If you’re experiencing a headache after running, it could be caused by bright sunlight (especially squinting), dehydration, or exhaustion (due to swelling blood vessels).
To avoid it, make sure (1) you’re drinking plenty of water before, during, and after your runs; (2) wear a hat with a brim and running sunglasses when running in the sun; and (3) change your running duration or time of the day.
But if you often get headaches after running, or suffer from any other unusual symptoms, such as a stiff neck, confusion, double vision, vomiting, or God forbid, fainting and loss of consciousness, then seek medical care.
Pain region – The Foot
Since the feet take the brunt of the repetitive pounding of the sport, it’s an injury-prone region in runners.
The foot is an incredibly complicated structure made up of a network of bones, tendons, ligaments, muscles, and fascia that work together in harmony and serve as the foundation to every running step you take—and there are plenty of things that can go awry with this key body part.
One dysfunctional cog and the whole machine can be slowed down to a screeching halt—or stop functioning altogether.
Let’s look at a few issues.
Reason 1 – Improper Running Shoes
If your feet feel tingly or numb, poor blood circulation could be the culprit.
Check if your shoes are too tight.
If it’s the case, loosen them up and give your toes enough wiggle room.
Apply the RICE protocol as soon as you get home.
Seek medical care if the numbness persists.
Reason 2 -Heel Pain
If you experience most of the pain in your heel, especially if it’s worse in the morning, you could be dealing with plantar fasciitis.
Every case is different.
You might push through mild plantar fasciitis, but in other cases, any extra miles can cause more damage to the ligament.
If your pain is severe, stop training for a few days, then start running again once you’re pain free.
Reason 3 – A Blister
Blisters are by no means a serious injury, thereby, running through them should be no problem, as long as you minimize the friction against your skin.
Apply gel, jelly-like blister bandages or put a tissue over the affected area
Pain Region – The Shins
The lower leg, including everything between the knee and ankle, is a prime spot for aches and pain thanks to running’s high impact nature.
Runners can suffer from a couple of different overuse injuries that strike this region.
Reason 1 – Shin Splints
If the pain is neither on the front or the back of the shins, you could have shin splints, which is a common overuse injury among beginner runners who try to do too much too soon.
Shin splints are the catch-all term used to describe pain below the knee either on the inside part of the leg (medial shin splints) or on the front outside part of the leg (anterior shin splints).
Shin splints can often be treated with rest and ice, but if symptoms don’t improve, consult your physician to make sure you have a stress fracture.
Reason 2 – Stress Fracture
If the pain starts off mildly and gradually gets worse the more miles in, it could be a stress fracture, which requires immediate medical attention.
Stress fractures consist of small cracks, or severe bruising, in a bone that causes discomfort and pain.
It often strikes runners in the shins and feet.
The condition happens when muscles become fatigued and can no longer absorb added shock.
Taking time off running is essential as continued strain on the bone can lead to more serious injury.
And you don’t want that.
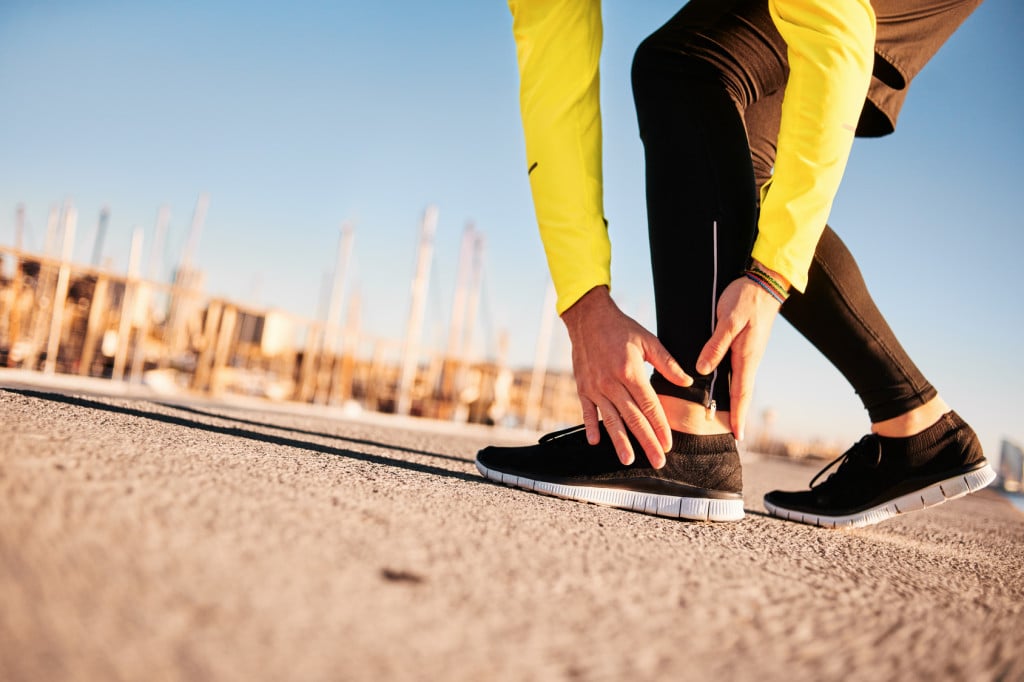
Pain Region – The Ankle
Your ankle joint is one of the most important running joints—so it’s no surprise that it’s a common source of pain.
The joint forms the connection between your body and the ground, and there are several roots for running-induced ankle pain.
The following are the most common:
Reason 1 – Ankle Sprain
If you sprain your ankle during a run, stop running, especially if the joint is swollen or the pain is intense.
Running on a sprained ankle may damage the affected ligament, making you prone to further injury.
As a rule of thumb, get home straightway, and apply the RICE method.
Try to keep the affected joint mobile but don’t overstress it.
Reason 2 – Achilles Tendonitis
Experience soreness on the back of the ankle?
It could be Achilles tendonitis, which is an overuse injury of the Achilles’ tendon, the large tendon that attaches your calf muscles—the gastrocnemius and soleus— to the back of your heel bone.
Under repeated load, the tendon contracts and is forced too hard, resulting in inflammation or irritation.
If you have it, stop running and go home.
Next, rest, apply ice, compress, and keep the affected limb raised above heart level.
Pain Region – Knees
The knees are a problematic area for runners as there are different overuse injuries that involve knee pain.
In fact, out of all aches and pains that plague runner, knee pain from running is the most frustrating and debilitating.
Reason 1 – Runners Knee
If you feel pain under or around the kneecap, runners’ knee might be the culprit.
Also known as patellofemoral pain syndrome, the condition consists of damage to the cartilage under the kneecap, and it’s often caused by movements that load the knee joint on a flexed position.
Stop running for a few days, and RICE the affected knee.
You should also work on strengthening your quadriceps and stretching your hamstrings and hip muscles.
Reason 2 – Iliotibial Band Syndrome
If you feel pain around the knee on the outside of your leg, it could be the inflammation of the iliotibial band.
The IT band stretches along the outside edge of the upper leg, from hips to the knee.
Rest immediately the moment you notice IT band pain.
That means shorter distances or no running at all.
The condition can turn chronic if you don’t give yourself a break from running.
Reason 3 – Patellar tendon strain
Feel the pain just below the kneecap?
If so, it could be a patellar tendon strain, which is an inflammation of the tendon surrounding the kneecap (patella).
This tendon is a key part of leg structure, attaching the patella to the shinbone as well as helping keep the patella in line as the leg bends and straightens during the running gait.
Running through a tendon strain is asking for trouble.
If the pain doesn’t subside within a few days, have it looked at.
Pain region – The Hips
Prolonged sitting often causes tight hip flexors, which are usually made tighter the more miles you log in without following a consistent stretching routine.
In most cases, the pain subsides as you get fitter and gain more experience running.
You should also stretch and use a foam roller to improve mobility and release tension in that area, especially in the hip flexors.
Reason 2 – Bursitis
If you notice pain or swelling directly in the joint, then you could be dealing with hip bursitis.
If it’s the case, halt your running routine and opt for pain-free cross-training options and stretches you can do at home.
Pain region – The Lower back
Running’s high impact nature can take a toll on your back, causing soreness in the lower back, especially in runners taking up the sport for the first time.
Experience back pain during a run?
Try stopping and stretching for a few minutes.
If symptoms don’t improve, stop running altogether, and seek treatment.
Most cases of back pain are caused by a specific cause that you need to address before it gets better.
To prevent lower back pain in general, work on strengthening your core as well as trunk control and unilateral lower-body resistance training.
Pain region – The Chest
Stop running on the sport if the pain is spreading to your neck or shoulder and/or being accompanied by double vision, breathlessness, profuse sweating, and faintness.
In some cases, these are the symptoms of a heart attack.
Next, seek medical help immediately —or pray someone is nearby to help.
Conclusion
There you have it.
The above covers some of the most common pains runners experience during training as well as how to proceed in the presence of pain.
The key thing is to always listen to your body and readjust your training approach accordingly.
The rest is just details, as the saying goes.
Please feel free to leave your comments and questions in the section below.
If you’re a beginner looking to delve into the world of running strides, you’ve come to the right place.
Running strides can be a valuable addition to your training routine.
They introduce your body to faster paces and speedwork, help you prepare for challenging sessions, and allow you to loosen up after easy workouts. In essence, by incorporating strides into your running routine, you’ll be taking significant steps toward achieving your running goals.
So, what exactly are running strides, and why are they important? In this post, we’ll answer these questions and guide you on how to integrate strides effectively into your weekly running regimen. Let’s dive in and get started.
What are Strides in Running?
Whether you’re a 10K beginner, cross country athlete, or training for the 9th marathon, strides are key for building coordination and speed—the kind you need to reach your full running potential.
Strides, also referred to as accelerations, are a valuable tool in a runner’s training regimen, regardless of their experience level. These short bursts of speed can help you build coordination, increase speed, and enhance your overall running performance.
Strides are brief, controlled bursts of speed during a run. They typically involve transitioning from a relaxed jog to nearly 95 percent of your maximum speed and then gradually decelerating to a stop. The goal is to run smoothly, focusing on good form and controlled effort.
Purpose of Strides:
Strides serve several purposes in a runner’s training routine:
Speed Development: Strides help improve your top-end speed, which can be beneficial for finishing races strongly or achieving personal records.
Running Mechanics: During strides, you can concentrate on your running form, ensuring that you maintain proper posture, arm movement, and foot placement.
Coordination: Strides enhance your neuromuscular coordination by requiring precise control over your running motion.
Anaerobic Capacity: These short, intense efforts engage your anaerobic energy system, improving your body’s ability to handle faster paces.
Why Do I Need To Do Running Strides?
Running strides, those brief and speedy bursts during your workout, offer a multitude of advantages that can significantly boost your running performance. Let’s dive into why you need to incorporate them into your training regimen:
Speed Enhancement:
Strides provide a convenient way to introduce speed work into your training routine without dedicating an entire day to high-intensity workouts.
They help you acclimate your body to running at a faster pace, preparing you for hard training sessions or races.
Improved Running Technique:
Strides are an effective tool for refining your running form and enhancing your running economy. By reinforcing proper running techniques, they make you more efficient.
They encourage a focus on aspects like posture, arm movement, and foot placement, promoting better running mechanics.
Strides can also increase your stride length, further improving your running mechanics and speed.
Time-Efficient:
Perhaps one of the most appealing aspects of strides is their time efficiency. You can reap significant benefits in just a few minutes.
Strides can be seamlessly integrated into your training, whether it’s after an easy run as post-run drills or as part of a structured workout.
Versatile Location:
Strides don’t require a specialized location. You can perform them virtually anywhere as long as you have enough space to accelerate and decelerate safely.
Whether it’s a track, a grassy field, or a quiet road, you can easily incorporate strides into your training terrain.
Mental Focus:
Strides demand a high level of concentration and control, which can sharpen your mental focus and resilience.
Mastering the art of striding with precision can translate to improved race performances, as you’ll be better equipped to maintain your form during the toughest moments of a race.
Here’s a comprehensive guide on how to execute them effectively:
Choose Your Terrain:
Find a flat, straight surface that’s long enough to sustain a 30-second burst of speed. A typical range is about 250 to 300 feet, but adjust as needed based on your fitness level.
Ideal locations include tracks, long stretches in local parks, or quiet dead-end streets away from traffic.
Start Gradually:
Begin the stride by running at an easy pace for approximately five seconds. Focus on maintaining a quick and short stride during this initial phase.
Accelerate Smoothly:
Gradually increase your speed as you progress through the stride. Lengthen your stride and put in more effort.
By the time you reach the three-quarter mark of your chosen distance, you should be running at close to your maximum speed.
Decelerate Gradually:
As you near the end of your chosen distance, start to slow down. Shorten your strides and ease into a gentle deceleration.
Avoid abrupt stops, as these can strain your muscles and disrupt your form.
Transition to a Jog:
After completing the stride, transition smoothly into a slow jog. This phase helps in recovery and gradually brings your heart rate down.
Post-Stride Walk:
Walk for one to two minutes after your stride to facilitate recovery and allow your heart rate to return to a comfortable level.
Repeat as Desired:
You can incorporate multiple strides into your workout routine, with each one separated by a short recovery period.
The number of repetitions and the frequency of strides depend on your fitness goals and the specifics of your training plan..
Strides – The Running Technique
When it comes to running strides, having the right form is crucial to maximize their effectiveness and minimize the risk of injury. Here’s a breakdown of the key elements to focus on:
Posture Is Paramount:
Maintain an upright, tall posture throughout your stride. Keep your back flat and your core engaged.
Slightly lean forward from the ankles, creating a subtle forward tilt. This helps you harness the force of gravity for propulsion.
Embrace Relaxation:
Strides should feel effortless and fluid. Avoid tensing up any part of your body.
Unclench your jaw, let your cheeks dangle, and relax your facial muscles. Facial tension can sometimes translate into bodily tension.
Loosen Up:
Keep your body relaxed and free from tension. Ensure your arms, shoulders, and neck are loose.
Let your arms swing naturally at your sides. Avoid overextending or flailing them, as this can waste energy.
Short, Quick Strides:
Keep your strides short and quick to minimize overstriding.
Land Lightly:
Aim to land on your midfoot, closer to your toes, rather than striking with your heel. This promotes a more efficient stride.
A light, controlled landing reduces the risk of jarring impact on your joints and muscles.
Focus on Breath:
Pay attention to your breathing rhythm. Maintain a steady and controlled breath pattern.
Sync your breathing with your stride to ensure a smooth flow of oxygen to your muscles.
Running strides can be integrated into your workout routine in various ways, each offering unique benefits:
Warm-up: Strides can be used as part of your warm-up routine. They help elevate your heart rate, increase blood flow to your running muscles, and mentally prepare you for the upcoming run, all of which contribute to improved performance.
Weekly Runs: Incorporate strides into your weekly runs, particularly during easy runs or as part of your speed workout. This allows you to practice speed and form in a controlled manner while breaking up the monotony of long, steady runs.
To maximize the benefits of strides, try adding them to your routine for a few weeks and assess how they impact your running. As a general guideline, aim to perform strides two times a week, with each session consisting of 4 to 8 strides, each lasting approximately 20 to 30 seconds.
While we’ve covered the fundamentals of running strides, it’s essential to recognize that there’s more to this valuable training tool than meets the eye. F
or beginners and seasoned runners alike, delving into different types of strides can provide a more comprehensive understanding of how to incorporate them effectively into your training regimen.
Downhill Strides:
Purpose: Downhill strides involve running at a faster pace while descending a gentle slope. They are excellent for building speed, coordination, and leg turnover.
Benefits: Downhill strides challenge your body in a unique way by emphasizing eccentric muscle contractions, which can enhance strength and stability. They are particularly useful for downhill sections in races.
Technique: When doing downhill strides, focus on maintaining control and balance. Keep your strides short and quick to avoid overstriding, which can lead to injury.
Uphill Strides:
Purpose: Uphill strides involve running at an increased effort level while ascending a hill. They improve strength, power, and cardiovascular fitness.
Benefits: Uphill strides target your quadriceps, glutes, and calf muscles, helping to build strength and endurance for hillier courses. They also improve your aerobic capacity.
Technique: When tackling uphill strides, maintain an upright posture and focus on driving your knees and arms to generate power. Shorten your stride and take quicker steps.
Strides on a Track:
Purpose: Utilizing a standard 400-meter track can be an excellent way to measure your strides accurately and gauge your progress over time.
Benefits: Strides on a track allow you to fine-tune your pacing and get a better sense of your speed improvements. They are a fantastic addition to your speed workout routine.
Technique: Run one stride along the straight section of the track and recover by jogging or walking around the curve. Repeat this process for several laps.
Progressive Strides:
Purpose: Progressive strides involve gradually increasing your speed within each stride. They are effective for teaching your body to transition smoothly from easy to hard efforts.
Benefits: Progressive strides mimic race scenarios where you start at a comfortable pace and progressively increase your effort. They improve your ability to handle pace changes during a race.
Technique: Start each stride at a slower pace, and then pick up the speed as you go along. The last few seconds of the stride should be at close to maximum effort.
Strides with Form Focus:
Purpose: These strides emphasize running with impeccable form. They can be integrated into your regular runs to reinforce proper technique.
Benefits: Strides with form focus help engrain good running habits and make you more conscious of your technique during races and workouts.
Technique: Concentrate on specific aspects of your form during these strides, such as arm swing, posture, or foot placement.
Progressing Your Running Strides:
As a beginner, incorporating running strides into your training routine is an excellent way to improve your speed, running form, and overall performance.
Although strides have a lot to offer, it’s also key to follow a structured progression plan to ensure continued growth and prevent plateaus.
Here’s how you can progress your stride workouts effectively:
Frequency:
Start with one stride workout per week: When you’re just beginning, one session of strides per week is sufficient. This allows your body to adapt gradually to the increased intensity.
Progress to two sessions per week: After a few weeks of consistent strides, consider adding a second session. Ideally, space these sessions a few days apart to allow for recovery.
Intensity:
Begin with moderate intensity: Initially, focus on strides that are around 80-90% of your maximum speed. This moderate intensity helps your body adapt to the demands of faster running.
Increase intensity gradually: As you become more comfortable with strides, start incorporating faster bursts, reaching closer to 95-100% of your maximum speed. This higher intensity can further improve your speed and running economy.
Duration:
Start with shorter strides: Initially, aim for 20-30 second strides. This duration allows you to focus on form and get used to the feeling of running at higher speeds.
Extend stride duration: Over time, consider gradually increasing the duration of your strides. You can work your way up to 40-60 second strides, but maintain a strong focus on maintaining proper form throughout.
Recovery:
Shorten recovery periods: In the early stages, take longer recovery periods between strides to allow for adequate rest. A 1-2 minute recovery between strides is a good starting point.
Reduce recovery time: As you progress, work on reducing the recovery time between strides. Aim for 45 seconds to 1 minute of recovery between each stride.
Total Volume:
Start with a lower volume: When you begin, limit the number of strides in each workout. Four to six strides per session can be a suitable starting point.
Gradually increase stride volume: As your fitness and comfort with strides improve, you can gradually increase the number of strides in a single session. Aim for 8-10 strides or more, depending on your goals.
Incorporate Variety:
Experiment with different types of strides: As you become more experienced, consider incorporating variations like downhill strides, uphill strides, or diagonal strides. These variations challenge different aspects of your running performance.
Running Strides for Beginners – Conclusion
There you have it.
That’s all you need to know about running strides for beginners. These are easy to implement and can help you achieve great progress toward your running goals.
The rest is just details.
Please feel free to leave your comments and questions in the section below.
So, you’re ready to tackle the Couch to 5K, but the thought of running outside right now isn’t appealing?
Trust me, I’ve been there!
Sometimes the weather or the idea of dodging cars and people makes running outside feel like a chore.
Enter the treadmill—your new best friend for getting started on your running journey.
Without further ado, let me break down what the couch to 5K treadmill plan is all about.
Why the Treadmill Works for C25K
While the traditional C25K plan usually takes place outdoors, there are many reasons to consider running indoors.
Training on a treadmill has advantages from avoiding bad weather to easily tracking your pace and progress. This beginner running treadmill plan lets you ease into running while offering the convenience and control of indoor workouts.
I trained exclusively on a treadmill to build my endurance when I started running.
The consistent surface, ease of pace control, and the ability to track all my stats in one place were game-changers for me.
I didn’t have to worry about outdoor conditions, which gave me the mental space to focus on improving my fitness.
Is Couch to 5K Possible on a Treadmill?
Absolutely! Running on a treadmill can be just as effective as outdoor running.
It can sometimes be more convenient, especially when weather or terrain challenges make it tough to run outside.
The treadmill offers a soft, cushioned surface, which is easier on your joints than pounding the pavement. Plus, you can easily adjust your pace and incline, simulating the ups and downs of an outdoor course without leaving your house or gym.
Here are some important tips to keep in mind as you get started with your Couch to 5K treadmill plan:
Choose the Right Shoes: Make sure your running shoes have good cushioning and support for treadmill running. Treadmills may be easier on the joints, but you’ll still need footwear that’s up for the challenge.
Set a Comfortable Pace: Aim for a conversational pace where you can still speak without getting winded. For beginners, this might be around 6-8 km/h (3.7-5 mph) for running, and 3.5-4.5 km/h (2.2-2.8 mph) for walking. Don’t worry if it feels slow initially—focus on building endurance.
Watch Your Form: Keep your posture upright and avoid slouching over the treadmill console. Look ahead, not down at your feet, and maintain a relaxed, steady stride.
Start Slow, Build Gradually: The Couch to 5K is about easing into running. Don’t push yourself too hard—stick to the plan, listen to your body, and take walking breaks as needed.
The Couch to 5K Treadmill Plan: Week-by-Week Breakdown
This eight-week C25K treadmill plan is designed to take you from zero running experience to completing a 5K (3.1 miles).
You can also check this beginner post and my C10K program for more running advice.
The beginner running treadmill program involves three sessions per week. On your non-running days, feel free to work your muscles in other ways by doing different forms of exercise, such as strength training, spinning, or yoga.
The more, the merrier. However, always listen to your body, adjust your training, and plan as needed to allow recovery.
Personal Tip: Watch Out for the “Dreadmill”
I’m not going to sugarcoat it—the treadmill can get boring. That’s why I call it the “dreadmill” sometimes. But you can fight the boredom with a few tricks. I’ve had some of my best treadmill runs while watching old “How I Met Your Mother” episodes or listening to podcasts like “The Joe Rogan Experience.” Distracting your mind helps, trust me.
Week 1: Building the Habit
Workout 1: Run 1 minute, walk 2 minutes. Repeat 8 times.
Workout 2: Run 1 minute, walk 2 minutes. Repeat 10 times.
Workout 3: Run 1 minute, walk 1 minute. Repeat 8 times.
Week 2: Gaining Confidence
Workout 1: Run 2 minutes, walk 2 minutes. Repeat 5 times.
Workout 2: Run 2 minutes, walk 2 minutes. Repeat 7 times.
Workout 3: Run 3 minutes, walk 2 minutes. Repeat 4 times.
Week 3: Pushing Forward
Workout 1: Run 3 minutes, walk 2 minutes. Repeat 5 times.
Workout 2: Run 3 minutes, walk 1 minute. Repeat 5 times.
Workout 3: Run 2 minutes, walk 2 minutes. Repeat 5 times.
Week 4: Longer Runs, Fewer Breaks
Workout 1: Run 5 minutes, walk 3 minutes. Repeat 3 times.
Workout 2: Run 5 minutes, walk 2 minutes. Repeat 3 times.
Workout 3: Run 5 minutes, walk 2 minutes. Repeat 4 times.
Week 5: The Next Challenge
Workout 1: Run 8 minutes, walk 3 minutes. Repeat 2 times.
Workout 2: Run 8 minutes, walk 2 minutes. Repeat 2 times.
Workout 3: Run 6 minutes, walk 2 minutes. Repeat 3 times.
Week 6: Pushing Through
Workout 1: Run 10 minutes, walk 3 minutes. Repeat 2 times.
Workout 2: Run 10 minutes, walk 2 minutes. Repeat 2 times.
Workout 3: Run 12 minutes, walk 2 minutes. Repeat 2 times.
Week 7: Almost There
Workout 1: Run 12 minutes, walk 3 minutes. Repeat 3 times.
Workout 2: Run 12 minutes, walk 2 minutes. Repeat 2 times.
Workout 3: Run 15 minutes, walk 2 minutes. Repeat 2 times.
Week 8: Race Week
Workout 1: Run 20 minutes, walk 5 minutes, run 10 minutes.
Workout 2: Run 20 minutes, walk 5 minutes, run 15 minutes.
Workout 3: Run a 5K distance at a comfortable pace.
By the end of this eight-week plan, you’ll be ready to run a full 5K! Once you’ve completed the program, I recommend transitioning to outdoor running to mix up your routine.
Running outside is a different experience, and adjusting can take a little time. But with your treadmill training base, you’ll be ready for the challenge!
If you follow this sofa to 5K treadmill plan consistently, you’ll be amazed at how far you can go in just eight weeks. Start slow, trust the process, and keep moving forward—even on the tough days. And remember, every runner starts somewhere. You’ve got this!
Feel free to reach out if you have any questions or need some motivation along the way. I’m here to help you make the most of your running journey, whether on the treadmill or outdoors.
Ready to lace up those sneakers and hit the pavement? Well, hold on tight because today, we’re diving headfirst into the world of plantar fasciitis – that pesky, heel-aching injury that can strike fear into the hearts of runners everywhere.
In fact, it’s so notorious in the running community that it’s earned itself a nickname: ‘Runners Heel.’ Yes, that’s right! Plantar fasciitis is the heel’s arch-nemesis, and it’s responsible for a whopping 80% of all those dreaded cases of heel pain.
But here’s the kicker – it’s not just a pain in the heel; it’s also one of the top culprits behind about 1 in every ten running injuries out there.
Fret no more.
In today’s post, we’re diving deep into this condition. More specifically, I’ll be explaining:
What is plantar fascia
The causes of the injury
Why it’s common among runners
The fastest way to treat it
How stretching helps
The link between running surfaces and heel pain
Exercises you can do to prevent heel pain
And so much more
Sounds exciting? Let’s get started.
What’s the Plantar Fascia?
Plantar fasciitis is a common cause of heel pain that affects both runners and non-runners. The human body is equipped with this fibrous band of tissue called the plantar fascia. It’s like the support beam of your foot, stretching from your heel (the calcaneum) to the middle of your foot bones, bridging the gap between your heel bone and your toes.
Now, when that support beam gets all irritated and inflamed, that’s plantar fasciitis for you. It’s like your foot’s way of saying, “Hey, I hurt!”
It’s especially common in runners
Plantar Fasciitis is no stranger to runners.
In fact, it’s one of the most frequently reported causes of chronic heel pain. A study published in the Journal of Foot and Ankle Research vouches for this.
And in the realm of running, Plantar Fasciitis is quite the troublemaker. It’s responsible for approximately 8 percent of all running injuries, as revealed by a retrospective study analyzing 2000 running-related injuries.
The Process of The Injury
Plantar Fasciitis kicks off when the delicate fibers of the fascia, that fibrous band of tissue running from your heel to your toes, start to accumulate tiny tears.
It’s like your foot’s way of saying, “Hey, we’ve had enough tension here!”
Initially, it might seem like a minor annoyance, but as you keep pounding the pavement, those small irritations can snowball into a full-blown injury.
The key here is early detection and prompt treatment. Ignoring it could lead to some unpleasant consequences down the road.
Causes of Plantar Fasciitis
Overuse is the main culprit. However, several factors can increase your chances of developing this painful condition.
Here’s the lowdown on some of them:
Overdoing It Too Quickly: Pushing your limits too fast is a classic mistake. Rapidly increasing your running distance can put undue stress on your plantar fascia, paving the way for injury.
Carrying Extra Weight: If you’re on the heavier side, your plantar fascia might bear the brunt of the load. Those extra pounds can lead to irritation, pain, and, eventually, Plantar Fasciitis.
Gender: Surprisingly, women are about twice as likely to develop Plantar Fasciitis compared to men, as indicated by research.
Inadequate Footwear: Wearing the wrong running shoes can spell trouble. Shoes with insufficient arch support, heel cushioning, or sole flexibility can exacerbate the problem.
Poor Running Form: If you’re not running with the proper technique, you’re increasing the strain on your plantar fascia. Make sure to follow guidelines on proper running form to minimize the risk.
Mobility Issues: Research suggests that a tight Achilles tendon, that large tendon above your heel, can contribute to the development of Plantar Fasciitis. Stretching exercises can help alleviate this problem.
The Main Symptoms
Plantar Fasciitis typically presents with distinct symptoms that can help you identify the condition:
Gradual Heel Pain: The hallmark of Plantar Fasciitis is the gradual onset of sharp pain on the bottom of your heel, especially near the inside of the foot.
Morning Discomfort: You might notice intense heel pain during your first few steps in the morning. This phenomenon is often referred to as “first-step pain.”
Pain After Rest: After periods of rest, such as sitting for a while or getting up from a chair, you may experience heel pain.
Aggravation with Activity: Activities that put pressure on your feet, like climbing stairs or standing for extended periods, can trigger or exacerbate the pain.
Evening Recurrence: The heel pain may temporarily subside during the day, but make a return in the evening.
Treatment of Plantar Fasciitis
As I have already clearly stated, the condition can be a real nagging injury that only gets worse the longer it’s present.
Hence, the sooner you put in place an aggressive treatment plan, the better off you’ll be, both for the short and long term.
For that, here is the step-by-step treatment plan you need to follow:
Rest
Taking a break from activities that aggravate your condition, such as running and high-impact exercises, is essential. The duration of your rest period can vary depending on the severity of your condition. It might last a few days, several weeks, or even a few months. Pay attention to the intensity and frequency of your pain as a guideline for when to resume activity.
Keep in mind that Plantar Fasciitis typically develops over time due to accumulated injuries, so it’s important to give your foot the time it needs to heal properly. Resting is a crucial step in the recovery process.
Self-massage and soft-tissue manipulation can provide relief from Plantar Fasciitis pain.
Here’s how you can do it:
Get a golf ball or a similar round, hard object.
Gently roll the affected foot back and forth over the ball.
Start with a few minutes a day and gradually increase to 5 minutes daily.
You can also use a frozen water bottle by rolling it under your injured foot.
Active Release Technique is a more advanced soft-tissue manipulation technique that may help alleviate Plantar Fasciitis pain. While scientific evidence supporting its effectiveness is limited, some individuals find it beneficial.
Try Orthotics
Consider using Over-The-Counter (OTC) orthotics to provide additional arch support, especially if you have a history of Plantar Fasciitis, faulty foot mechanics, or high arches. Research indicates that orthotics can help reduce pain and address faulty foot mechanics, a common cause of this condition.
OTC orthotics are readily available and cost-effective compared to custom orthotics, which can take weeks to receive. Ensure you use them in both shoes, even if only one foot is affected. If OTC orthotics don’t provide relief, consult a podiatrist for custom orthotics tailored to your needs.
If you’re experiencing severe pain, consider using cold therapy on the affected area. Apply an ice pack (you can use a store-bought ice pack or a bag of frozen peas or corn wrapped in a towel) for 10 to 15 minutes daily.
Additionally, you can take over-the-counter pain relievers like ibuprofen, naproxen, or paracetamol to alleviate pain and inflammation.
Stretch it
Stretching is another effective strategy to expedite your recovery and reduce the risk of re-injury. Incorporate these stretches several times a day, making sure to stretch both feet.
Perform a few (check below) stretches pre-run, in the morning, and whenever you experience soreness or pain after running. A recommended stretching routine involves three to five sets of 30 seconds per stretch.
See a Doctor
If your pain persists despite trying the aforementioned measures, it’s crucial to consult a sports podiatrist.
In some cases, your doctor may recommend treatment options like cortisone injections, foot taping, night splints, or other tools to alleviate symptoms and expedite recovery. In severe cases, physical therapy may be necessary to fully restore plantar fasciitis function.
How to Treat Plantar Fasciitis When Running – The Conclusion
There you have it.
The above measures are some of the best you can implement right now as a part of your running routine to help reduce the risks of developing plantar fasciitis.
If you suspect you have plantar fasciitis—or any other overuse injury—visit your doctor or physical therapist for an evaluation.
The best way to determine the culprit behind your pain and provide a quick path toward full recovery is by doing a full examination of the biodynamics of your ankle, foot, and gait.
As a runner, your feet are your best ally.
They take you wherever you want to go.
But you have to take good care of them to lead a healthy, active life.
The rest is up to you.
Please feel free to leave your comments and questions in the section below.
If you’re looking for an answer, you have to the right place.
When I first took up running a few years ago, I relied on sweat as my main indicator of how hard I was pushing myself.
The more I sweat, the better and more accomplished I felt.
As I got fitter, however, I noticed that I’d started to sweat a lot more than before.
In fact, most of the time I ended up a sweaty mess by the end of my runs.
The profuse sweating scared me, as I thought there was something wrong.
Concerned, I did what most people would do:
I Googled it.
To my relief, I found that I’d been worried over nothing.
In this post, you’ll learn the basics of what sweating is, why it happens, and how to deal with it if you’re concerned about it.
You’ll soon understand that when you’re a runner, sweating is your best ally and friend.
Sweating While Running Explained
Let’s break down the science of sweat.
Sweating is the natural process that regulates your core body temperature by keeping it as close to 98.6 degrees as possible.
When your body starts to overheat (for instance, while running), the nervous system activates the sweat glands to release perspiration, which is a water-and-electrolyte solution.
That in turn cools off the skin, resulting in a chain reaction of temperature reduction that eventually brings your core temperature down.
There are other forms of sweat that have nothing to do with heat regulation.
People sweat profusely when they’re nervous, or even as a response to spicy foods or hormonal changes.
Why Do I Sweat so Much When I Run – The Factors
Since every runner’s body is different, sweat rates vary from one person to the next.
The exact amount that you sweat is determined by a slew of factors including the number of sweat glands you have (between 3 and 5 million), outdoor temperature, resting body temperature, clothes worn, training intensity, fitness level, etc.
Generally speaking, the fitter you are, the more you’ll sweat.
The reason boils down to engine efficiency.
Fitter athletes tend to sweat more, and they start sweating a lot earlier in their workouts because their body’s thermoregulation system kicks into action faster.
That in turn helps them keep their core temperature down from the start of their session to the end.
Speaking for myself, I started noticing my increased sweat rate once I got serious about my running, doing lots of long runs and more intense interval workouts.
Nowadays I simply think of it as the price I pay for being fit.
What’s Normal Sweating?
Any amount of sweat is considered normal.
Everyone sweats a baseline amount at all times, even if you’re sweating more profusely than your training buddy.
The average person sweats between 0.8 to 1.4 liters, or 27.4 to 47.3 ounces per hour of exercise.
That’s equal to roughly one to three pounds of body weight.
Excessive Sweating While Running
If you still think you sweat too much, you probably do, especially if you sweat from a specific area of the body without engaging in any physical activity.
It may indicate hyperhidrosis, a common affliction marked by excessive sweating that affects roughly three percent of the U.S. population.
Hyperhidrosis is typically described as any sweating that obstructs normal daily activities.
People who have it may sweat up to four to five times the amount that other people do.
They also report sweating in cool environments for no obvious reason.
If this is your particular case, consult a doctor to discuss the treatment options available and to rule out any other underlying conditions.
Keep in mind that only a certified physician can officially diagnose such a condition.
Now that you know how much you’re sweating when running, the next step is to replace the fluid losses.
To keep your body well hydrated, make sure to drink plenty of water before, during and after your runs.
For longer sessions, hydrate on the run.
Drink eight to ten ounces of water for every 15 to 20 minutes of exercise, and make sure to drink an extra eight to ten ounces of fluid within 30 minutes of finishing your run.
During your runs, you’re also likely losing lots of vital electrolytes through your sweat.
If you sweat profusely or run for extended periods of time in hot weather, make sure to take in some salt to make up for your electrolyte losses.
When running on a treadmill, turn on a fan, open a window, or lower the air conditioning to reduce humidity in the air.
Consider Medicating
Use an over-the-counter antiperspirant containing about 10 to 15 percent aluminum chloride, and don’t restrict your use to your armpits.
Antiperspirants can also help curb sweating when applied to the palms and soles of the feet.
Just keep in mind that some antiperspirants are prescription only, so consult your doctor for the best option for you.
Cool Off
Immediately following a run, take a cold shower (if possible).
Anything that lowers your core body temperature will help you stop sweating faster.
Keep It Tidy
Shaving your armpits removes hair that keeps deodorant and antiperspirants from getting to your skin.
It also helps decrease odor because your hair holds more bacteria than your skin does.
Dress Properly
Invest in summer-friendly running apparel.
That means going for lightweight, synthetic fabrics with ample ventilation that will pull sweat away from your skin to the outer surface where it evaporates.
This type of clothing allows heat to move away from the body.
Your diet can influence your athletic performance, your health, and your sweat rate.
Consuming certain foods, including caffeine, garlic, onions, and curry, can stimulate your sweat glands, making you sweat more than normal.
Making these simple tweaks to your diet might solve your sweat problems.
New to Running? Start Here…
If you’re serious about running, getting fit, and staying injury free, then make sure to download myRunners Blueprint Guide!
Inside this guide, you’ll learn how to start running and lose weight weight the easy and painless way. This is, in fact, your ultimate manifesto to becoming a faster and a stronger runner. And you want that, don’t you?
Click HERE to check out my Runners Blueprint System today!
Don’t miss out! My awesome running plan is just one click away.
Conclusion
There you have it! I hope today’s post offers a clear answer on the “Why do I sweat so much when I run” question.
If you have any concerns or questions, feel free to leave them in the comments section below.