9 Agility Ladder Drills for Runners to Boost Speed & Cadence

When I first heard about agility ladder drills, I thought they were some kind of secret weapon for speed.

Back then I was still a newbie runner, and convinced that a few quick foot tricks would turn me into Usain Bolt in flip-flops.

Reality smacked me hard.

On my first ladder workout, I tripped over the rungs like a baby goat on roller skates. My coach was trying not to laugh.

I was red-faced, tangled up, and questioning all my life choices.

But honestly? That awkward first session was a turning point.

After a few weeks of sticking with it, things changed. My feet started moving with purpose. I wasn’t just surviving trails anymore—I was gliding through rocky terrain, hopping over roots, and weaving past stray dogs.

That’s when I realized agility work wasn’t just about speed. It was about control. Coordination. Building the kind of movement that makes you feel fast even when you’re not racing.

These days, as a coach, agility ladder drills are a regular part of what I give my runners. Not because they’re flashy, but because they work. They sharpen your footwork, lift your cadence, and prep you for trail chaos.

No, they won’t magically shave minutes off your 5K time—but they will build the groundwork for smoother form and faster reactions.

So if you’re serious about running smarter and moving better, stick with me.

I’ll walk you through the whole thing—what ladder drills actually are, why they matter (with a few honest truths), and my 9 favorite drills.

I’ve also added a 4-week plan you can do at home, plus real-world answers to the most common questions I get.

Let’s break it down.

What Are Agility Ladder Drills?

Agility means being able to change direction fast, without flailing or losing control.

It’s not just about being quick—it’s about reacting. Moving clean. Staying in control when things go sideways.

Sounds fancy, but here’s what it means for runners: being able to adjust your stride at the last second—like when you suddenly spot a hole in the pavement or have to swerve around pedestrians hogging the sidewalk.

Agility ladder drills help you get better at that. You move your feet through a ladder laid flat on the ground, following specific step patterns—kind of like foot choreography for runners.

These drills train your feet to be quicker and more precise, which means more control on the run.

I tell my athletes: “Ladder drills teach your feet to dance.” They dial in your brain-to-foot connection—what nerds call the neuromuscular system—so that when the road gets sketchy or the trail gets wild, your feet already know what to do.

I’ve had moments out running—like flying downhill in the rain or threading through a crowded street—where I could literally feel the ladder work kicking in.

My legs moved faster than my brain could think. That’s the magic of training this way.

Now, don’t get it twisted: agility ladder drills aren’t true agility. In sports like soccer or tennis, athletes respond to unpredictable cues—like a defender or a ball. Ladder drills are planned.

You’re following patterns, not reacting to surprises.

But that’s okay. These drills still build the raw tools—balance, foot speed, coordination—that help you react better in the real world.

So think of agility drills like sharpening your blade. They’re not the whole battle, but they make you a better fighter.

What Is an Agility Ladder (a.k.a. Speed Ladder)?

An agility ladder is basically a flat ladder you roll out on the ground. (See Image)

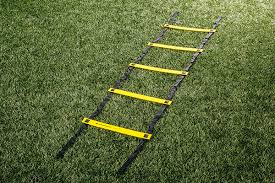
No, not the kind you use to clean gutters. It’s usually made of nylon sides and thin plastic “rungs” spaced about 18 inches apart. Each box is a landing zone for your feet during drills.

You can buy one online or at a sporting goods store for around $20. Mine’s been with me for years and rolls up like a yoga mat. Easy to pack. Easy to toss into a backpack.

But if you’re scrappy (or broke), make your own.

I once built a DIY ladder in my garage with duct tape and a pile of paint stir sticks. Took about an hour, and it worked just fine. There’s something satisfying about training with gear you built yourself.

Here’s what you’ll need if you go the DIY route:

  • About 25–30 feet of duct tape
  • 10 flat sticks or cardboard strips (around 18 inches long)
  • Measuring tape (space rungs ~18 inches apart)
  • Scissors

Lay out two long strips of duct tape, slap the “rungs” between them, and boom—you’ve got a functional agility ladder. Not pretty, but it gets the job done. Chalk or even jump ropes on the ground can work in a pinch, too.

Agility Ladder Specs:

  • Most are 10 yards long, 16 rungs.
  • Modular ones come in smaller sections (great if space is tight).
  • Flat rungs are safer—because trust me, you will hit them sometimes.
  • Use it on a grippy surface like grass, rubber floor, or turf.
  • Avoid concrete unless you like sore joints and the taste of gravel.

I usually throw mine down in a parking lot or quiet patch of grass. Indoors, tape it to a hallway floor or gym mat. Just make sure there’s nothing breakable nearby—especially if you’re still working on your coordination!

Why Should Runners Care?

This isn’t just about looking cool or copying football players. Agility drills make you better on trails, in races, and in life.

They help you stay upright when the ground gets sketchy, or when you need to change direction without throwing your stride out of whack.

Here’s what I’ve seen in my own training and with my runners:

  • Cadence goes up: You learn to move your feet faster, without trying harder.
  • Form gets smoother: The foot-brain link strengthens, reducing the clunky shuffle that slows you down.
  • Confidence spikes: You trust your body more, especially when terrain gets tricky.

And here’s the kicker: agility work is fun. It breaks up the grind of regular mileage. It makes you feel like an athlete, not just someone out logging steps on Strava.

But yeah—don’t expect miracles. Ladder drills alone won’t get you to a sub-20 5K. You still need tempo runs, intervals, and strength training. But they will make those runs feel smoother and more dialed-in.

Let me break down the reasons runners need agility ladder training.

🔹 They Fire Up Your Brain–Body Connection

You ever feel like your feet and brain aren’t always on the same page—especially when you’re tired? Ladder drills fix that. They train your brain and legs to talk fast and react even faster.

I remember the shift myself. After a few weeks of drills, I was hitting rocky trails with more control, barely thinking about foot placement. It was like my nervous system finally got the memo.

🔹 They Help You Pick Up Cadence (Yes, That Means Speed)

Stuck in that heavy, slow stride that sounds like bricks hitting pavement? Been there. Ladder drills force you to move fast and light. Think quick, short, snappy steps.

I’ve coached runners who couldn’t break 160 steps per minute. After adding agility work, they started hitting 175+ like it was nothing. It’s not magic. It’s muscle memory.

🔹 They Make You a More Efficient Runner

No wasted motion. That’s what we’re after. Ladder work teaches you to move clean—less flailing, more control. You’ll start landing under your center of gravity instead of reaching and overstriding.

For me, I felt it most on long runs. My legs didn’t fall apart late in the game. They held strong. That’s running economy in real life—not just something you read in a study.

(But for the record, this stuff is backed by science—like a study in the Journal of Strength & Conditioning Research showing agility drills improve lower-body coordination and speed.)

🔹 They Wake Up Your Balance and Stability Muscles

Every little hop and shift in a ladder drill lights up those tiny stabilizer muscles—especially in your feet, ankles, and hips. These are the muscles that stop you from rolling your ankle on a root or crashing on a descent.

Trust me, I used to crash. A lot. Rocky trails were my nemesis until I built up this kind of foot control. Now I stay upright more often than not.

🔹 They’re Trail Running Gold

If you love trail running like I do, these drills are your cheat code. You’ll move laterally better, lift your feet higher, and react faster to whatever nature throws at you.

I swear by lateral ladder drills before a big trail race. Makes dodging roots and rocks feel automatic.

Coach’s Final Word

Look, ladder drills won’t replace your hill repeats or tempo runs. But they will sharpen the blade. You’ll feel quicker, more controlled, and more confident out there.

I treat them like a secret weapon. 10–15 minutes, twice a week, and the benefits sneak up on you.

So if you’ve been skipping footwork drills because they look “fancy” or “not for runners,” stop that. They’re for you. Let’s level up your stride.

9 Agility Ladder Drills for Runners

These are the drills I keep coming back to—with myself and with the runners I coach. I’ve broken them down with clear steps and thrown in some personal notes to show how each one plays out in real life.

(Quick note: Do each drill for 30 seconds to a minute. Rest. Then repeat for 2–3 rounds. Twice a week is enough to see gains.)

1. Ladder Linear Run (The Classic Speed Drill)

This is your bread and butter. Great warm-up. Great turnover booster.

This drill didn’t click for me at first. I was too stiff, trying to “nail” each step perfectly. One day I just sprinted through—no overthinking—and boom: I flew. No ladder hits. Just flow. Felt like I unlocked a new gear in my legs.

Once you feel it, you’ll know. The rhythm is addicting.

How to do it:

  • Start at the bottom of the ladder, facing straight ahead.
  • Run through it, one foot per box—left-right-left-right.
  • Light steps. Stay bouncy. Don’t let your heels drag.
  • Land on the balls of your feet. Keep it fast and light—imagine running over hot coals. Arms should drive in rhythm.

2. High-Knees Run (The “A-Skip” Variation)

If your stride feels sluggish or you struggle with posture, this one is for you.

I used to picture running through tires, like in those old football training montages. One day I was doing this drill in a park and a bunch of kids started mimicking me—knees way too high, laughing the whole time.

At first I felt silly. Then I realized: screw it, I’m training smart. They were just having fun. This drill helped fix my lazy shuffle. Gave me more spring and improved my form. If you’re always dragging your feet, start here.

How to do it:

  • Both feet land in each box.
  • Right foot in → left foot follows.
  • Then next box. Each time, lift your knee high—aim for waist height.
  • Keep elbows bent at 90 degrees. Drive your arms with the opposite knee. It’s a rhythm thing.

3. Lateral Quick Step Shuffle

Running isn’t just about pounding forward. If you’ve ever had to dodge a wayward scooter in Bali or hop a puddle mid-run, you already know that side-to-side agility is crucial.

The lateral shuffle drill trains exactly that—giving your feet the kind of quickness that keeps you upright, stable, and ready to move.

How to Do It:

  • Start by facing sideways at the edge of the ladder, with it stretching out to your right.
  • Step your right foot into the first box, then quickly bring your left foot in too—both feet land inside.
  • Now step out with your right foot (outside the ladder), then left foot into the next box, followed by right foot in again.
  • Repeat this “in-in, out” rhythm as you shuffle laterally down the ladder.

4. Carioca (Grapevine) Step

Here’s where things get spicy. The carioca drill—some call it the grapevine—is all about hip mobility, timing, and smooth coordination. Think of it as dancing through the ladder while secretly training your running mechanics.

How to Do It:

  • Stand on the left side of the ladder with your right shoulder facing it.
  • Step your right foot into the first box, then cross your left foot behind the right into the next box.
  • Right foot into the third box, left foot crosses behind again into the fourth box, and so on.

5. In-and-Out (Jumping Jack Feet)

Ready to get your heart rate up? This one’s like a horizontal jumping jack—simple, but man, it wakes up your legs and coordination fast.

I used to think my coordination was solid… until I realized my left foot was always late to the party. This drill exposed that. It also lit up my adductors (inner thighs), which I didn’t even know were weak.

Now I think of this drill as mini ski hops—it’s helped my trail running, especially when pushing off from uneven terrain.

How to Do It:

  • Stand at the start of the ladder with both feet together.
  • Jump both feet into the first box, landing hip-width apart.
  • Then jump forward out of the ladder, landing with your feet straddling the next rung—wider than hip width.
  • Next, hop both feet together into the second box. Then out again, and so on.
  • Bounce on the balls of your feet. Keep your knees soft and chest up. Arms help: down when feet are together, out when feet go wide—just like a jumping jack. Use your eyes to scan ahead, not down.

6. Ickey Shuffle (Three-Step Lateral Pattern)

This is the drill that makes you feel like an athlete. Named after NFL legend Ickey Woods, it’s all about rhythm and reaction—perfect for runners who want sharper footwork and faster cadence.

How to Do It:

  • Start on the left side of the ladder. The pattern is “In-In-Out.”
  • Step your right foot into the first box.
  • Bring your left foot in.
  • Step your right foot out to the right of the ladder.
    Then:
  • Step your left foot into the next box.
  • Bring your right foot in.
  • Step your left foot out to the left side.
  • Repeat all the way down.

7. Forward & Backward Jumps

This one’s a killer — I call it the boomerang hop. It teaches your feet to react fast and your brain to stay locked in. The rhythm is simple: two boxes forward, one back. It sounds playful — but it’ll torch your calves and challenge your focus like crazy.

How to Do It:

  • Stand at the base of the ladder. This is a two-foot jump drill.
  • Start by hopping over the first box and landing in the second.
  • Then jump backward one box to the first.
  • Next, jump forward two — you’ll land in box 3.
  • Then back to box 2. Forward to box 4. Back to 3. Keep going.

The pattern:
Box 2 → back to 1 → into 3 → back to 2 → into 4 → back to 3… and on.

My routine? I walk back to the start after each round (honestly, that walk is the best breather). If you want extra challenge, flip the drill: go forward one, back two. But trust me — forward-2, back-1 is already a mental workout.

Form Tips:

  • Keep your landings soft.
  • Swing your arms with the movement — forward when jumping ahead, back for the reverse.
  • Don’t rush the jump back. Regain your balance, then push off.

8. Lateral Shuffle (Two Feet In Each)

This is one of the simplest ladder drills — but don’t sleep on it. Done right, it sharpens your lateral speed and balance. I like using it as a warm-up or reset when other drills get too tricky.

How to Do It:

  • Stand facing down the ladder, with it at your side.
  • Step your left foot into box 1, then your right.
  • Step out with your left, then move your right into box 2, followed by your left.
  • Repeat: two feet in each box, one at a time, moving sideways.

In short:

  • Step in with lead foot,
  • bring the trailing foot in,
  • step the lead foot out,
  • repeat into the next box.

Once you hit the end, face the other way and come back — your opposite foot will lead this time.

9. Single-Leg Hops (Hopscotch Balance)

Okay, now we’re getting serious. This drill is tough. It’s all about control, balance, and single-leg strength — which runners desperately need. Remember: every stride is a one-leg jump. So this is just running, turned up a notch.

When I first tried this, my left leg was a mess. Wobbly, weak, uncoordinated. It exposed a clear imbalance I had been ignoring. So I added it to my drills every week.

After about a month? Huge difference.

This drill hits all the little stabilizer muscles — foot, ankle, glutes. It’s a hidden gem for injury prevention.

How to Do It:

  • Start on one leg — right foot, left foot raised.
  • Hop into the first box.
  • Keep hopping through the entire ladder, staying on that one leg.
  • Switch legs and return hopping on the other foot.

You don’t need to move sideways — just hop forward and zigzag slightly into each box. Control matters more than speed here.

4-Week Agility Ladder Plan (Runner-Tested & At-Home Ready)

When I first added agility ladder drills to my training, I was all clumsy feet and tangled steps.

I mean it. I looked like I was playing Twister on fast-forward.

But over time, that awkward mess turned into smooth, quick steps. And now, it’s one of my favorite ways to wake up my legs and brain.

So if you’re wondering how to fit ladder drills into your running routine, here’s a no-fluff 4-week plan I use with my runners here in Bali.

All you need is about 10–15 minutes, a little space, and some willingness to look silly before you get good. Trust me, it’s worth it.

The Basics

  • Schedule: Start with 2 ladder sessions per week. Move up to 3 in week 3 if you’re feeling good.
  • When to do them: On your easy run or cross-training days. Or tack them on after an easy run as part of your drills.
  • Warm-up: Always jog 5–10 minutes and do dynamic stretches before ladder work.

WEEK 1: Learn the Moves

  • Focus: Nail the basics, stay light on your feet.
  • Sessions: 2 (e.g., Tuesday & Friday)
  • Drills: Ladder Linear Run, High-Knees, Lateral Shuffle, In-and-Out
  • Tip: Walk or jog through drills first. It’s about rhythm, not speed. By the end of the week, you should feel more coordinated.

WEEK 2: Add a Little Spice

  • New Drills: Carioca & Ickey Shuffle
  • Session A: Linear Run (2 rounds, a little quicker), High-Knees (2 rounds), Carioca (2 rounds each way), Lateral Shuffle (2 rounds)
  • Session B: In-and-Out (3 rounds), Ickey Shuffle (3 rounds), Forward/Backward Jumps (2), Single-Leg Hops (start easy)
  • Tip: It’s normal to feel awkward with the new drills. Break them down step-by-step. Rest as needed.

WEEK 3: Turn Up the Volume

  • Sessions: 2–3 (add a third light one if you’re up for it)
  • Session A: High-Knees (3 rounds), Linear Run (3 rounds, last one fast), Lateral Shuffle (3), Carioca (2)
  • Session B: Ickey Shuffle (4), Forward/Backward Jumps (3), In-and-Out (3), Single-Leg Hops (2 each leg)
  • Optional Session C: Focused technique work on your weakest drill
  • Tip: Try going circuit-style: run straight into the next drill, then rest. And yes, hitting a rung happens. Laugh, reset, go again.

WEEK 4: Own It

  • Session A: Create a circuit: Linear Run → High-Knees → Ickey Shuffle → Lateral Shuffle. Repeat 2–3 times.
  • Session B: Power session: In-and-Out (2 rounds fast), Forward/Backward Jumps (2), Single-Leg Hops (2 each leg), finish with your favorite drill
  • Tip: Imagine you’re on a technical trail or dodging crowds. Let your body move freely. Feel the work you’ve put in come together.

After Week 4

By now, these drills should feel familiar. You can:

  • Add more rounds
  • Toss on a light weight vest
  • Use them in your warm-up before interval runs

Just don’t drop them altogether. Keep ladder work in your rotation 1–2 times a week. Your future self will thank you.

Final Thoughts: My Take

I started as the guy who tripped over every rung. Now? The ladder is my secret weapon. It wakes up my coordination and helps me feel fast even on tired legs.

I use this stuff with the runners I coach — beginners and marathoners alike. One runner I worked with used to call herself “awkward and slow.” A few weeks in, she was gliding through the ladder with confidence. That’s what this work does. It builds belief.

Ladder drills are more than physical. They’re a mindset. They teach agility, yes, but also patience and play. Blast some music, smile when you mess up, and high-five yourself when you get it right.

So what’s your move? Have you tried ladder drills before? Got a favorite pattern? Ickey Shuffle still tripping you up? Drop a comment and let’s talk.

And remember: Every fumble is one step closer to feeling fast and free.

Get after it. Your agile, strong self is waiting.

The Ultimate Guide to Sprint Workouts for Explosive Running Performance

Sprint training

Looking to take your running game to the next level? If so, sprint training is your ticket to burning calories, increasing speed, and building muscular endurance.

However, for those who have never tried it before, starting a sprint training program can be intimidating. It’s like signing up for an advanced physics course when you haven’t brushed up on the basics in a while. Except, unlike physics, sprinting can leave you with sore muscles and potential injuries if you’re not careful.

But fear not because I’m here to guide you through the process!

In this post, I’ll be sharing the ultimate beginner’s guide to sprint training.

I’ll cover everything you need to know to get started, from proper warm-ups to the best sprinting workouts.

So, let’s lace up our shoes and get ready to sprint toward a stronger, fitter you!

What is Sprint Training

Sprint training consists of high-intensity, short bursts of running performed at top speed. This workout method helps build muscle, burn fat, and increase metabolism.

There are two basic ways to perform sprint workouts: on flat surfaces or incline surfaces. If you’re just starting out, flat sprints are the way to go. All you need is a safe, open area like a track, jogging path, or sports field. And trust me, and you’ll want to be paying attention to your surroundings – the last thing you want is to be dodging pedestrians or tripping over debris mid-sprint.

Once you’ve built up your base with flat sprints, it’s time to take things up a notch with incline sprints. These are more challenging but also more rewarding. To do incline sprints, find a hill with a steep grade and at least 40 to 60 yards of running space.

For example, you might choose:

Just imagine the satisfaction of conquering a steep hill or powering up a mountain path at top speed.

The Benefits of Sprint Training

Sprint training is not just a workout, it’s a way of life. And the benefits are worth the effort. Science has proven that sprint training is a highly efficient way to provide plenty of benefits.

Of course, don’t take my word for it.

A study published in the Journal of Strength and Conditioning Research shows that sprinting drills can help you build endurance and improve your running performance.

What’s more?

This type of training can improve your VO2 max more than any other form of exercise, according to a meta-analysis published in Sports Medicine.

And the best part? HIIT running burns more calories in half the time of a steady-state workout, as reported by Biology of Sports..

I can go on and on about the importance of HIIT for runners, but that’s another topic for another day.

Here’s more about the history as well as the benefits of a sprint training program:

 Risks of Sprint Workouts

While sprint training has a lot to offer when it comes to improving speed and power, it also has its downsides.

For starters, sprinting puts a lot of stress on your joints, particularly the knees and ankles, so if you’re dealing with any pre-existing joint conditions or injuries, you should proceed with caution.

What’s more?

Sprinting can be challenging for beginners who are overweight or obese, as the extra weight places additional stress on the joints and may increase the risk of injury.

In other words, sprinting is like driving a high-performance sports car. Just like driving a high-performance sports car requires skill and caution, sprinting requires proper form and caution to avoid injury.

If you’re not sure whether sprinting is for you, I’d recommend that you consult with a qualified healthcare professional before beginning any new exercise program.

Running Shoes for Sprinting

Before you lace up your shoes and go for a sprint, you need to choose the right ones. Pro sprinters have different shoes for different tracks and events, and you should too.

Again, don’t take my word for it. A study published in the Journal of Sports Sciences found that track spikes offer better performance than regular running shoes during sprinting. Track spikes are designed to keep you on your toes and offer maximum traction for power and thrust. They also fit snugly, feeling more like an extension of your foot rather than shoes.

Look for a pair of lightweight shoes with a relatively stiff design and an outsole that can grip the track surface for maximum propulsion. Track spikes are a great option, as they offer maximum traction for power and thrust, fitting snugly and feeling like an extension of your foot.

Additionally, consider your running mechanics, training experience, and the field you train in to determine the best type of shoes for your needs.

Additional resource – Bolt top running speed

Recovery and Rest

Recovery is an integral part of any training plan, as it allows your body to rest and repair the muscle tissue that is broken down during exercise. Proper recovery between sprint sessions can help prevent injury, reduce muscle soreness, and improve overall performance.

To promote recovery, do the following:

  • Consume a balanced diet that includes adequate protein, carbohydrates, and healthy fats.
  • Hydrate well by drinking plenty of water before, during, and after your workouts.
  • Try active recovery techniques, such as foam rolling or light stretching, to improve blood flow and reduce muscle tension.
  • Sleep better. Aim to get 7-8 hours of sleep per night, as sleep is essential for muscle recovery and growth.

Dynamic Warm-up

Think of your warm-up as a key that unlocks your body’s potential. Without it, your muscles and joints are stiff and unprepared for intense exercise, leaving you vulnerable to injury and poor performance.

Here’s how to do it.

Start with a 10-minute easy jog to get your blood flowing, and your heart rate up. Then, incorporate some speed drills to fine-tune your mechanics and prevent injury.

Kick your heels up with some butt kicks, drive your knees high with high knees, and practice quick footwork with ankling. Don’t forget to work your calves with heel raises and improve your coordination with A and B skips. And if you’re feeling bold, add some jumping lunges and backward runs to spice things up.

Now that you’re warmed up and feeling limber, it’s time to dive into the sprinting workout. Start with short strideouts, pushing yourself to run at 80 percent of your maximum effort for 40, 50, and 60 meters with 90 seconds of recovery between each burst. Focus on proper form and maximum speed to get the most out of your training.

Once you’ve completed your sets, finish strong with a closing routine. Sprint as fast as you can for 20 seconds, then jog slowly for a minute to allow your heart rate to recover. Repeat this cycle eight to ten times to really push yourself and see results.

Here is what you need to do next…

Short Strideouts

This is the first section of the sprinting workout and involves performing short sprints at 80 percent max effort with 90 seconds of recovery between each burst.

Focus on maximum speed and proper form.

Here is how to proceed:

  • Sprint for 40 meters as fast as possible, then rest for 90 seconds.
  • Sprint for 50 meters as fast as possible, then rest for 90 seconds.
  • Sprint for 60 meters as fast as possible to complete one set.
  • Rest for two to three minutes, then perform four to five sets, pushing your body as hard as you can.

Next, perform this closing routine.

Sprint as fast as you can for 20 seconds.

Jog slowly for one minute, allowing your heart rate to slow down and recover fully before jumping into the next sprint.

Repeat the cycle 8 to 10 times.

Proper Sprint Technique For Beginners

Sprinting is like a dance – a carefully choreographed routine of movements that require technique, grace, and proper form. Without proper form, you might find yourself stumbling on the dance floor or, worse yet, nursing an injury.

Let’s start with your shoulders. Imagine your shoulders as a set of wings ready to take flight. Keep them relaxed, and don’t shrug them up. Instead, use them to power your movement, like a graceful bird soaring through the sky.

Now, let’s move on to your arms. Think of them as pistons, moving rapidly and powerfully. Keep them bent at a 90-degree angle and pump them backward in an open arc behind your body. This motion creates momentum, so avoid crossing them over your body.

Next, your elbows should stay flexed at a 90-degree angle and move in a straight line. Pump them back vigorously in coordination with your legs, driving them back to create forward momentum.

As for your feet, focus on pushing off from the toe as if you’re launching yourself like a rocket. Take short, fast strides instead of long ones, as this will help you generate more power and avoid overstriding.

The key to maintaining proper form is to relax your body. Don’t hold onto tension or waste energy. Instead, keep it relaxed like a lazy Sunday afternoon.

For more, watch the following Youtube Tutorial:

How to Cool Down After Sprinting Workouts

Once you’re done sprinting, don’t forget to cool down properly. Start with a slow jog for 5 to 10 minutes, letting your breathing and heart rate gradually return to normal. Then, take a leisurely walk to let your muscles relax.

To finish off, perform a series of static stretches, holding each pose for 45 to 60 seconds. This will help prevent post-workout soreness and keep you feeling limber and ready for your next sprinting session.

Great post-run stretches include:

The Hamstring Stretch

The Calves Stretch

The Hip Stretch

The Beginner Sprint Workout

If you’re new to sprinting, I’d urge you to kick it off with this beginner routine. This session is perfect for anyone looking to get started with sprinting and improve their overall fitness.

To perform this workout, start with a 15-minute warm-up that includes dynamic stretches and light jogging.

Then, perform three 400m sprints at 90% of your maximum speed, resting for 30 seconds between each sprint.

Next, perform three 200m sprints at 90% of your maximum speed, resting for 15 seconds between each sprint.

Finally, perform five 100m sprints at maximum speed, resting for 15 seconds between each sprint. Finish the workout with a 10-minute slow jog cool down.

Explosive Hill Sprint Workout

If you’re looking for a more challenging workout, try incorporating hill sprints into your routine. Uphill running helps you build explosive strength and power that can improve your speed and running economy. Incline training targets your anaerobic energy system, which is the primary source of quick sprinting energy, helping you improve your power and explosiveness. Additionally, running uphill also targets your quadriceps and can improve strength in your tendons and joints.

Here’s a sample hill sprint workout for beginners:

  • Warm up for 10 to 15 minutes.
  •  Perform your first hill sprints at 80 percent of max power for 30 seconds.
  • Jog down for recovery. Take more recovery time if you need to.
  • Repeat the cycle for 15 to 20 minutes. Give it 100 percent each time
  • Finish your sessions with a 10-minute slow jog on flat ground.

As you get fitter, make this workout more challenging by increasing the number of reps and/or the incline. Keep in mind that hill sprints are pure explosiveness, so they should be quite challenging.

Note – You don’t have to perform these sprints on the steepest hill around—it can also be a gradual incline.

How to Progress Sprint Workouts:

To take your sprint training to the next level, it’s key to gradually increase the intensity, volume, and frequency of your sprints over time. This can be achieved through a process called periodization, which involves dividing your training into distinct phases of increasing intensity and volume.

During the initial phase, focus on building your sprinting power by improving your sprint technique and boosting endurance with shorter sprints and longer rest intervals.

As the months go by, make your workouts more challenging by limiting rest periods and increasing the distance or duration of the sprints. Finally, during the peak phase, perform high-intensity sprints with shorter rest intervals to improve your speed and power.

Cross-Training – Backing up Your Sprint Training Efforts

Do you want to become an explosive sprinter? Then you need to train like one! Sprinting is an anaerobic sport that requires a combination of power and strength to excel. While running intervals and sprints is essential, it’s not enough on its own. To become a top sprinter, you need to strengthen your key sprinting muscles, which is where cross-training comes in.

Let’s start with strength training. I can’t stress enough how important it is for runners. Two to three strength sessions a week will do wonders for your sprinting ability.

When performing your strength exercises, aim for three sets of 8 to 12 reps, pushing yourself to the limit and reaching muscle failure in the last few reps. So what exercises should you be doing? Try barbell squats, front squats, sumo deadlifts, chin-ups, dips, hanging knee raises, jump squats, jump rope, and sled drags.

Power Clean

Begin by standing with your feet shoulder-width apart with a barbell positioned under your shins.

Next, while keeping your back straight and engaging your core, squat down and grab the barbell with an overhand grip a bit wider than shoulder-width.

Please make sure to keep your chest out, shoulder back, and head up the entire time.

Next, while keeping the bar as close to your body as possible, push your knees back, lift your chest up, then start to slowly raise the barbell from the ground to roughly above your knees.

As soon as the bar passes your knees, explosively stand up by first rising up on tiptoes, pulling the bar up higher (leading with the elbows).

Then, once the weight reaches your sternum level, assume a mini-squat position, drop your body under the barbell, flipping your wrists over so that your palms are facing the ceiling, and stand up tall with your upper arms parallel to the ground.

Last up, to lower the bar down, slightly bend your knees then lower the bar to thigh position.

Then slowly lower it to the floor, while keeping the core engaged and back straight the entire time.

Single-Leg Squats

While balancing on your right foot while extending the left straight in front as high as possible with arms extended out, squat down by bending at the knee and sitting your hips back.

Imagine you are going to sit in a chair behind you.

Once you reach at least a 100-degree angle in your right knee, extend your leg back to standing position, repeat for 8 to 10 reps, then switch sides.

If the single-leg squat is too challenging, then perform the chair assist or the TRX version.

For more challenge, rest a dumbbell on your chest.

Please make sure to keep your back flat and the right knee pointing in the same direction as the right foot.

Romanian Deadlift

Start by holding a loaded barbell at the hip level with a pronated grip—with the palms facing down.

keep your knees slightly bent, hips high, and shoulder on top of the barbell.

Next, lower the barbell by moving your butt back and bending your hips as far as you can while keeping the core engaged and back straight throughout the motion.

make sure to keep the barbell as close to your body as possible, with shoulders back and head looking forward the entire time.

Once you reach the bottom of your range of motion (you will be feeling a good stretch in the hamstrings if you are doing it right), slowly return to the starting position then stand up tall, and repeat for the desired reps.

I love to do this in front of the mirror because I can keep my lower back under control.

Keep it straight, don’t let it curved too much.

Plyometric Lunges

Begin by assuming an athletic position, then lunge forward with your right leg.

Next, while keeping the torso straight and core engaged, jump up as high as possible, and switch your leg position in midair, landing with your left leg in a forward lunge.

Then, powerfully jump up and switch legs to land back in a lunge with the left leg out in front.

Keep jump lunging, alternating sides for 45-second to one minute.

Bench Press

Start by laying on your back on a flat bench.

grab the bar with an overhand grip, lift it off the rack, and hold it above your chest with arms fully extended and core engaged.

Next, slowly lower the bar straight down in a controlled and slow motion until it touches the middle of your chest.

Hold for a moment, then press the barbell in a straight line back up to the starting position.

Please focus on using your chest muscles to move the bar throughout the exercise.

Don’t let your shoulder and elbow work alone.

No cheating allowed.

Perform 10 to 12 reps to complete one set.

Box jumps

Stand tall feet hip-width apart, at a comfortable distance from a 60cm high box or an elevated step (or sturdy object).

Next, assume a mini squat, then while engaging your core, extending your hips and swinging your arms, leap onto the box, landing softly on both feet.

Hold for a moment, then jump backward down to starting position and spring quickly back up.

Sprint Training Explained – The Conclusion

Ready to take your running routine to the next level? Sprint workouts are the secret weapon you need!

These quick and effective fitness boosters are perfect for runners who want to improve their athletic power and performance, but don’t have the luxury of long runs.

So, lace up your sneakers and get ready to sprint your way to success!

Speed Training 101: Top 7 Drills for Faster Runners

athlete doing Speed Drills

Do you ever feel the need for speed? If you’re yearning to kick up the tempo and leave a trail of dust in your wake, then you’re in for a treat. Let me introduce you to the game-changer that transformed my running game: running drills for speed.

Picture this: I was in the midst of my Insanity DVD workout program, sweating buckets and pushing my limits. Little did I know that buried within this intense regimen were the secret ingredients to unlock my true athletic potential. Running drills emerged from the shadows and captivated my attention. Curiosity sparked, and I delved into the world of speed-enhancing exercises.

Let me tell you, my friend, the results were nothing short of phenomenal. Not only did my speed skyrocket, but my entire running form underwent a remarkable transformation. It was as if I had unlocked a hidden power within myself, propelling me forward with newfound agility and grace.

Nowadays, I make it a point to incorporate these drills into my regular cross-training routine. And here’s the best part: you don’t need to be a lightning-fast sprinter or spend endless hours on the track to benefit from them. I’m just an average runner with aspirations of becoming better than average, and these drills have become my secret weapon.

Get ready to break free from your limitations and sprint towards greatness. Are you ready to step up your running game? The starting line awaits you. Let’s do this!

The Speed Drills Routine For Runners

Whether you’re craving that extra burst of speed or simply seeking a fresh twist for your training regimen, incorporating a speed drill workout will be the game-changer you’ve been waiting for.

Imagine this: you’re out on the track, feeling the ground beneath your feet, ready to unleash your inner speed demon. As you dive into the world of speed drills, a whole new realm of possibilities opens up before you. And let me tell you, my friend, the benefits are nothing short of extraordinary.

Let’s dive into the advantages that await you when you embrace the power of running drills for speed:

  • Increased Range of Motion: Speed drills work wonders in enhancing the flexibility and range of motion in your joints. Picture your stride becoming more efficient, with each step covering more ground effortlessly.
  • Quick Feet and Explosive Power: We all know that lightning-fast footwork can make all the difference, whether you’re sprinting towards the finish line or evading opponents on the sports field. Speed drills are your secret weapon to developing that explosive power and lightning-quick feet. Trust me, these skills will transcend beyond running and elevate your performance in other sports as well.
  • Perfecting Your Form: Each drill in your speed workout places a special emphasis on specific aspects of proper running form. It’s like fine-tuning the intricate gears of a well-oiled machine. By incorporating these drills into your routine, your body becomes intimately familiar with the movements required for optimal running mechanics.

How Long Do Speed Drills Take?

Now, you might be wondering, “Will I need to carve out hours from my busy schedule for these drills?” Fear not! Most speed drill workouts can be completed in just 30 to 40 minutes.

They are incredibly convenient and require minimal equipment. So whether you find yourself at a local track, a neighborhood park, or even in the comfort of your own home, these drills can be seamlessly incorporated into your routine.

How & When to do Speed Drills

Are you ready to dive into the exhilarating world of speed drills? Let’s talk about how and when to incorporate these drills into your training regimen to maximize their effectiveness and keep you in top form.

First things first, you have a couple of options when it comes to integrating speed drills into your routine. If you’re already engaging in interval training, you can seamlessly weave these drills into your existing workouts. However, if you haven’t explored the world of cross-training (and trust me, you should), then I suggest adding the drills to the end of your running sessions.

Now, timing is everything. As a general rule of thumb, it’s best to perform speed drills after your easier workouts when you’re feeling fresh and still have some pep in your step. You don’t want to attempt these drills after a grueling, energy-draining run when your legs are begging for mercy.

To ensure optimal results, aim to incorporate speed drills into your routine twice a week on a regular basis. Give yourself at least two recovery days between sessions to allow your body to adapt and reap the benefits of the training. Consistency is key here, my friend. Stay committed to this schedule, and you’ll soon witness remarkable progress.

Now, let’s talk about the drills themselves. The recommended sequence consists of seven exercises carefully curated to target various aspects of your speed and running mechanics. I encourage you to go through the entire sequence at least twice to truly benefit from each drill’s unique contribution. If you find yourself with some extra time and a burning desire to push your limits, go ahead and repeat the sequence three times. The choice is yours!

Safety is paramount, my friend. To protect your precious joints and minimize the risk of injury, I strongly advise you to perform these drills on a soft surface. Seek out the infield of a track or a rubberized track if possible. Remember, we want to unleash your speed and power while keeping you safe and sound.

Before you embark on your exhilarating speed drill session, it’s crucial to properly warm up your body. Begin with a slow 5-minute jog to get your blood flowing and your muscles awakened. Then, transition into 10 minutes of dynamic stretches, as demonstrated in the routine provided. This warm-up will prepare your body for the explosive movements to come, priming you for an extraordinary training experience.

Top 7 Drills to Run Faster

1.     Bounding

This drill consists of an exaggerated running movement focusing on foot push-off and airtime.

It’s ideal for both increasing lower body power and single-leg stability during forward running motion.

This drill is essential for keeping proper running form—especially when fatigue starts to set in.

Proper Form

Begin this drill by jogging in one direction while keeping your head level and torso upright.

After progressing a few feet, start bounding by pushing off with one foot and bringing the other one forward.

Focus on achieving an explosive leap and a fast cadence.

Perform at least five to eight 50-meter reps.

2.    Butt Kicks

Butt kicks mainly target the hamstrings and stretch the quads.

This speed drill emphasizes the recovery part of the running gait and can also help you boost leg turnover cadence.

Proper Form

https://youtu.be/UfCH8LMmLH8

While running in place and with your thighs locked in a neutral position, kick your leg up to the butt, letting your heel make contact with the glute on each stride.

If you can’t reach your heels up to your glutes, aim to boost your dynamic range of motion.

To keep good form, keep the rest of your body as steady as possible and focus on a smooth, and fast action.

Perform at least three sets of 25 kicks with each leg.

3.    High Knees

This move improves knee lift by increasing speed and leg drive, targeting the hip flexors.

Adding power and speed to your hip flexor can also help prevent plantar fasciitis, Achilles issues, and other troubles.

Proper Form

Stand straight, with your feet shoulder-width apart, your arms hanging down by your sides and gazing straight ahead.

While keeping a slight forward lean from the ankles, alternate jumping from one foot to the other, aiming to raise your knees as high as possible.

4.    Running Backwards

Running backward strengthens both the glutes and the hamstrings.

This move also activates the muscles of the core and lower back.

Proper Form

Do your best to replicate the typical forward running motion while moving backward.

Maintain a normal running form while keeping your head up and back straight.

Push off with your forefoot and swing your arms to the side.

Increase your speed as you become more skillful.

Do at least five sets of 50 meters.

5.    Grapevines

Also known as karaoke, this exercise increases hip and leg mobility.

It’s also vital for developing footwork, balance, coordination and lateral speed, and strength.

Proper Form

Start by standing upright while facing forward, then step out to your right side on your right foot.

Follow the right leg with the left leg, placing it behind the right.

Repeat this step to the right again, but this time bring the left foot in front of the right one instead of behind.

Alternate crossing the left foot behind and in front of the right foot.

Keeping a fluid movement with your arms is the key to maintaining balance.

Stay on the ball of your foot or the forefoot throughout the entire motion.

Repeat the exercise in the other direction, letting the left leg lead and alternating putting the right foot behind and in front.

6.    Straight-Leg Shuffles

Straight-Leg Shuffles shorten ground contact and reduce the braking effect typically found in runners who overstride.

It also stimulates neuromuscular timing for fast cadence running

Proper Form

Begin bounding forward with a fast cadence, keeping your legs straight, your torso upright, and your ankles dorsiflexed the entire time.

Focus on driving your foot down, then allowing it to spring back up off the ground without lifting the knees.

Do at least three 50-meter reps.

7.    Ankling

Ankling helps develop correct foot-strike mechanics.

This increases coordination, efficiency, and speed.

Proper Form

Stand straight, with your feet shoulder-width apart.

Using a fast, very short stride, move forward taking small steps and landing on the balls of your feet.

As your feet strike the ground, be sure to use the ball of your feet to take your body to the next step.

Keep your steps as short and quick as possible, with a minimum knee lift.

Imagine yourself running on hot coals – the goal is to spend minimal time on the ground.

Running Drills for Speed  – The Conclusion

Add these speed drills to your training program as soon as you can. The speed of implementation will be the key to your success.

Feel free to leave your comments and questions below, and as always, thanks for stopping by. Keep running strong!

David D.