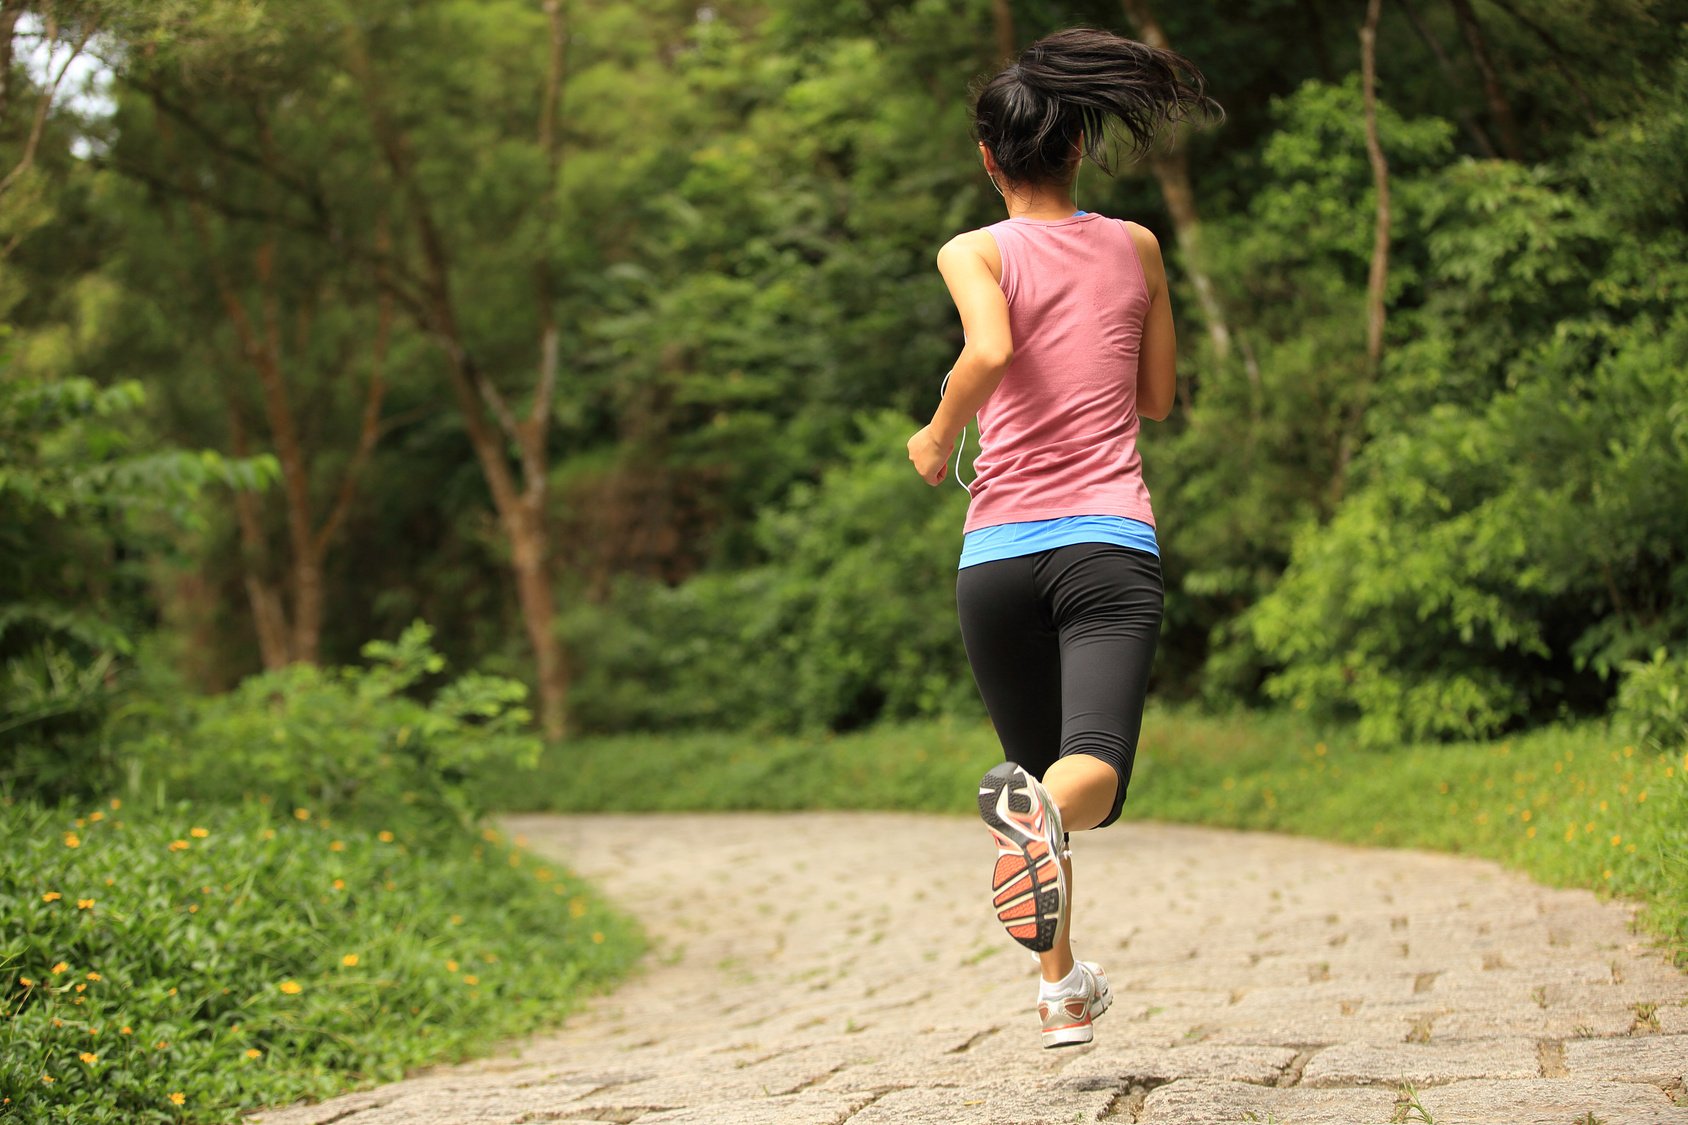
8 Interval Training Running Workouts for Speed

woman doing speedwork running session

If you want to improve your running speed, then interval training running is the way to go.

In fact, interval training (HIIT) has been used by athletes for years to build cardiovascular strength, power, and explosive speed.

Interval running combines short and intense bursts of exercise at maximum ability, with recovery phases, repeated throughout a single workout.

In today’s post, I’m going to share with you five of my favorite interval running workouts to build endurance and speed.

I’ll also share with you the main speed work runs you need to add to your schedule to help take your running to the next level.

The basic sessions include intervals, fartleks, tempo runs, and hill reps.

Sure, these workouts are by no means the most exhaustive list of the speedwork sessions you can do, but they’ll definitely help you on your journey to get faster.

To make these workouts efficient, step out of your comfort zone.

In other words, make sure to push yourself, challenging your body as hard as possible.

Note: Before we proceed, remember that HIIT is super challenging.

So it’s crucial to develop enough fitness (or get a green light from a certified physician) before jumping on the interval training track.

In fact, if you’re a complete beginner runner, none of your workouts should be an interval training workouts.

Instead, focus on building your base, and in a few months, you’ll have what it takes to rock HIIT.

*Disclosure: This post may contain affiliate links that at no additional cost to you. I only recommend products I’d use myself and all opinions expressed here are our own. 

Interval Running Explained

Speedwork is a training methodology used by runners—and athletes from various backgrounds and fields—to increase their stride length, leg turnover, and stride efficiency, resulting in improved overall running speed and training efficiency.

More specifically, speedwork for runners consists, typically, of several running workouts of a mile or less at a race or challenging pace interceded with low to moderate recovery breaks.

These can be completed on the track (traditional sprint workouts), treadmill, or road (a steep hill is also an option).

By doing a couple of speed workouts every week, you’ll improve your running performance, shutter your race times, and have an easier time keeping up with the competition during your next race (if that’s one of your goals).

A few parameters are used to define speed work.

These include (but not limited to) intervals length, the number of reps, the speed, training pace, and how often you do them.

Classic examples of speedwork training include interval workouts, tempo runs, and fartlek sessions.

The Benefits Of Interval Running Workouts

Research shows that alternating between high-intensity intervals and recovery increases VO 2max, which boosts your body’s ability to use oxygen, leading to increased fitness capacity and improved athletic performance.

What’s more,  study also shows that you might continue to burn calories at a higher rate long after you’ve finished your speed workout.

That’s what’s known as EPOC or excess post-exercise oxygen consumption.

Warming up Right

The warm-up sets the tone for your next speed workout.

A good warm-up increases your body temperature boosts blood flow to the muscles and gets you mentally ready for fast running.

So, make sure to get it right.

Otherwise, you’ll be risking, injury, premature fatigue, even burnouts.

And you don’t want that.

Here is how to warm up right:

First, walk, then jog slowly for five to 10 minutes.

Next, perform a set of dynamic mobility and stretching drills.

These include quad tugs, heel walks, butt kicks, scorpions, inchworms, lunges, and high knees. The more, the merrier.

You can also perform some of these speed drills.

Then, complete four to six strides.

These are quick accelerations, typically lasting between 20 to 30 seconds where you’re running at close to 100 percent speed.

The typical distance of striders is about 160 to 220 yards.

Recover fully between each set.

Perform these strides on flat, smooth surface.

Getting started

If you’re just starting out, then you can begin your foray into interval running with a set of six to eight 200-meter at a 5K pace or a bit faster, interceded with an easy 200-m in between each to recover.

Sample Workout

Here is how to proceed with your next (or first) interval run session:

  • Start with a decent 15-minute dynamic warm-up.
  • Run at interval pace—roughly 85 to 95 percent of max speed—for one minute.
  • Jog for a 2-minute recovery break.
  • Repeat the on and off pattern four to six times.
  • Jog for five minutes to cool down, then stretch.

That’s it.

It does not get much simpler than this.

You just have to show up and do the work.

The Pace – How Fast To Perform Interval Runs

Interval training workouts are performed at 85 to 98 percent of maximum heart rate, depending on distance and trainee’s fitness level and goals.

So, for instance, short intervals are performed at a slightly faster than 5K race pace, with relatively longer recovery breaks, typically lasting two to three times as long as the repetition time.

Longer intervals are usually performed at roughly a 5K race pace, with recovery bouts of equal length or slightly less than the fast surge time.

But, all in all, as you long as you’re running faster than your goal race pace, you’re heading in the right direction.

Additional Resource – Here’s your guide to the Yasso 800 Workout

5 Interval Training Running Workouts For Speed

without further ado, here are the Interval training running sessions you need for improving your speed and overall running performance.

Interval Training Running Workout I – The Basic Interval Run

If you have never tried interval training before, start here.

The basic workout is ideal for new initiates as it helps them get their foot in the door without increasing the risk of injury or burnouts.

Interval-style runs are the most basic form of speedwork that there is. Basically, they consist of faster-paced workouts that alternate fast and slow segments for specific distances, often performed on a high school or stadium track.

A typical interval workout features two main parts.

First, they a have a fast-paced segment known as the repeat.

The repeat is run over a specific distance at a targeted pace goal speed.

The typical interval workouts consist of short repeats, lasting no more than 100 to 400 meters, or of longer distances, lasting between 800 to 2000 meters.

Then, the fast surge of effort is followed by a brief recovery.

This can be short—lasting for only 30 to 60 seconds—or of an equal time or distance to the repetition.

For example, a typical interval workout could feature five 800m reps each followed by 400m recovery breaks after each.

Or 8 400m reps with a 200m recovery jog.

interval training running

Interval Running Workout II – The Fartlek Bursts

Standing for speed play in Swedish, Fartlek is a form of training that mixes steady-state running with speed intervals in an unstructured format.

The pace and distance of each acceleration, as well as the recovery, is entirely up to you.

You, basically, jog, run, or sprint for any distance or length of time, and in the order you want.

Doing so, according to most experts, strengthens both the aerobic and anaerobic energy systems—all of which can help turn you into a superb runner.

Here is the routine:

Start your Fartlek workout with a 10 to 15 minutes jog as a warm-up to ensure that your muscles are warmed enough to handle the surges.

Then play with speed by running at faster paces for short periods of time, followed by easy-effort jogging as recovery.

The best way to get on with Fartlek training is to pick out an object or landmark ahead of you, like a parked car, telephone pole, or a house, then run at a fast speed until you reach it.

Next, recover, sight the next object, etc.

So on and so forth.

Be sure to run fast enough to increase your heart rate and breathe harder, but do not push it too hard where you can no longer finish the interval or recover fully in time for the next surge.

Additional resource – How fast can Bolt Run

Interval Training Running Workout III – The Treadmill Interval Routine

Only got 25 minutes?

Then you have enough time to hop on the treadmill and try this HIIT 25-minute routine.

During this routine, you’ll not only alternate between challenging bursts of effort and lighter recovery phases but also change the incline, which pushes your body to work even harder.

Here is the routine

Step 1

Start with a 5-minute jog at a moderate pace to warm up.

Step 2

At the 5-minute mark, pick a “high-intensity speed of 9 mph (or faster) then stick to it for one minute.

Keep in mind that it will take, on average, 10 to 15 seconds for the treadmill to work up to the chosen speed.

Step 3

Recover and rest for one minute.

Step 4

Repeat Step 2 but add a 4.0 incline to mimic outdoor running conditions.

Then walk or jog for one minute to recover.

Step 5

Repeat Step 4 for five or six rounds for a total of 15 minutes, including the high-intensity bursts and recovery.

Step 6

Finish the workout with a 5-minute cool-down.

Interval Training Running Workout IV – The Hill Routine

As the name implies, hill reps are structured interval-style runs that consist of hard bursts up a hill with the down used as the recovery portion before turning and assaulting the hill again.

The Benefits

Hill running is the perfect marriage between faster-paced running and traditional strength training.

Think of hill runs are “speedwork in disguise.”

Although they don’t force you to run at top speed, they still offer many of the same perks of traditional speedwork training.

That said, hill reps are also beneficial on so many levels.

Uphill running promotes good running technique because it forces you to lift your knees, and drive your elbows back and forth to propel you forward.

These are some of the most universal traits of good form.

What goes up must come down.

The downhill repeats work your quads like nothing else and increase strength in your joints and tendons.

Also, building your power to run and downhill can increase your confidence and opens up new territories and places to train.

That’s a good thing if you ask me.

Planning your Hill Workout

When planning your hill workout, pick a hill that it’s at least 100 yards long and not too steep.

Also, make sure to find a gentle slope, preferably traffic free.

The ideal hill should take you about 30 seconds to one minute to climb at 90 percent of your maximum effort.

If you live in a relatively flat, hill-free, region, find a bridge or highway overpass with about 5 percent grade for your hill reps.

The Session

After a thorough warm-up, assault the hill at a 5K effort pace (That’s effort, not speed).

When you reach the end point of the uphill section, walk for 10 to 15 seconds, turn around, and jog slowly down to the start.

Then repeat.

Once you build more endurance, challenge yourself by increasing the length or grade of the hill, the speed of reps, or the number of intervals performed.

Keep The Form

Perform the reps with good form.

Do not lean too much forward.

Instead, focus on maintaining your balance, engaging your core, shortening your leg stride, and lift your knees a little higher than you’re used to when running on flat surfaces

interval running workout

Interval Running Workout V – The 100m Dashes

If you want to feel (and run) like a pro sprinter, then hit the track.

But be careful.

Do this only after interval workouts and fartleks have become a part of your routine.

Before you go full speed, warm up with a 10-minute jog, then perform six to eight strides to get your muscles fired up and ready to do some intense work.

Next, perform eight to ten 100m fast bursts.

Your first interval should include 40 meters at maximum speed.

To recover, walk or jog for half the duration of the faster interval before jumping onto the next one.

Aim for 95 to 99 percent of single max effort.

So, for instance, if your 100-m max effort is 18 seconds, then the slowest you drop to 20 seconds.

As you get used to track training, increase the volume of reps and lengthen reps to 200 meters, sprinting nearly the entire time at top speed.

Interval Running Workout VI –Tempo Runs

Also known as threshold pace running, these are workouts performed at a sustained effort over a preset time or distance.

Classic tempo runs are performed at threshold pace with the purpose of teaching your body how to maintain (comfortably hard) effort over an extended timeframe.

The Benefits

Tempo workout, when done right, can produce some immense benefits.

In fact, according to a Dutch study published in the Journal Medicine and Science in Sports & Exercise, tempo runs can improve your overall running efficiency by up to 10 percent.

That can make the difference in a tight competition.

So, why it’s the case?

Well, it’s believed that tempo training increases the anaerobic threshold levels, the point at which the body switches from aerobic system to its anaerobic system.

At this point, your body produces lactic acid faster than it can clear it.

According to conventional wisdom, lactate acid is believed to be one of the primary causes of post-workout soreness and the not-so comfortable sensations you experience when you’re engaged in intense physical exercise.

Therefore, the higher your threshold at a given pace, the longer you can maintain that given and specific pace.

The Distance

The length of your tempo runs depend, mostly, on your training level and target (race) distance,but, as general guideline, most experts recommend starting with roughly 15 to 20 minutes worth of tempo training.

Once you’ve built enough endurance and power, feel free to extend the tempo portion of your runs.

But do it slowly and gradually.

Sample Workout

After a 10 to 15 minutes slow jog warm-up, pick up your speed to a level you can maintain for the predetermined tempo segment, whether it’s distance or time.

Last up, finish the workout with a five-minute easy jog as cool down.

Do not stop on the spot as doing can lead to dizziness, even loss of consciousness—due to a phenomenon known as blood pooling.

Pace

The ideal tempo pace is roughly 80 to 90 percent of your maximum heart rate or your 10K race pace.

This may translate to about 10 to 15 seconds slower than your current 5K race pace.

The tempo run’s pace is often referred to as comfortably hard.

More specifically, this pace is hard enough to require pushing, but not too challenging to where you can no longer sustain the faster pace over the predetermined distance.

Fartleks

What might sound like a nasty intestinal disorder has nothing to do with your bowel movement.

The fact is, Fartlek is a Swedish term for speed-play—an unstructured form of speedwork in its simplest form.

More specifically, Fartlek runs are a series of faster pickups—roughly 80 to 90 percent max effort—with easy recovery intervals.

The length and speed of each interval is entirely up to you.

The Benefits

Fartlek-style workouts are ideal if you don’t have access to a track, or if you’re just starting out with speed training, and don’t know how to proceed.

What’s more, Fartlek training can also better prepare you to handle the uneven, often unpredictable, paces of a race.

As you might know, most races are typically run fast, then slow, then fast again.

These disparities of pace are often due to the race course and surges employed the competitors—usually known as rabbits in the racing circles—can quickly tire the unprepared.

So, if you’re serious about being competitive, you got to be physically and mentally prepared to handle these variations of pace.

The Sample

After the warm, up, find a target in the near distance, like a tree, a telephone pole, rock, or a house, then run harder than you ordinarily would until you reach it.

Once you reach it, slow down to catch your breath until you sight the next object.

Rinse and repeat for at least 20 to 30 minutes.

Just whatever you do, make sure to listen to your body and re-adjust your fartlek training accordingly.

You decide how fast and how long your faster-paced efforts are and how long should you take for recovery, as well as the number of surges you perform.

You’re in charge.

Pace

Your main goal is to practice running at a brisk effort (typically faster than your current 5K race pace), while keeping good form and getting your body to run anaerobically.

Interval Running Workouts – The Conclusion

There you have it. If you’re looking for some of the best interval running workouts, then today’s post has you covered. The rest is just details.

Thank you for stopping by.

Keep training strong.

Conquer Winter Runs: A Runner’s Guide to Breathing Better in the Cold

How to Breathe When Running in the Cold

Winter running is no easy feat, especially for runners who have breathing problems during cold weather.

In fact, most runners—except for the lucky ones living in moderate climate regions—often experience issues such as a runny nose, restricted breathing, burning lungs, and a dry throat when braving the cold.

For these reasons (and some), many shy away from winter running.

But, that’s no excuse to stop running altogether.

Here are the guidelines you need to keep the cold air from taking your breath away.

By implementing the following tips, you’ll be able to breathe better throughout your outdoor winter workouts.

But before we do that, let’s first look at what happens to your body when exercising outdoors in the cold.

The Difficulty Of Running in Winter

There’s a common belief that running in cold weather can do more harm than good.

Some beginner runners even worry that breathing the cold air will freeze their lungs and lead to immediate disaster.

But here’s the reality: the fear of frozen lungs is somewhat exaggerated. Running in sub-freezing temperatures might be uncomfortable, but it’s not typically dangerous. Severe lung damage due to cold air is only a concern in extreme subfreezing conditions.

In such conditions, which generally occur at temperatures below 4°F (-15°C), outdoor exercise is not advisable. This is because your body may struggle to sufficiently warm the air before it reaches your lungs, among other potential issues that can arise.

However, it’s worth noting that the chances of you running in such extreme freezing conditions are quite slim—unless you happen to live in an exceptionally cold region. So, while running in winter may be a bit uncomfortable at times, it’s generally safe.

The Process of Air “Warm-ups”

Your body’s pulmonary system is pretty impressive when it comes to dealing with cold air. Here’s how it works

When you inhale cold air, whether during exercise or just going about your day in chilly weather, your body’s respiratory system springs into action. Your nose, mouth, throat, and the cells lining your windpipe, or trachea, all play a crucial role in warming up the incoming air.

By the time that cold air travels from your nose or mouth down to the bottom of your trachea, it’s already been warmed significantly and is close to your body’s internal temperature. Your body works diligently to make sure the air you breathe is comfortable for your lungs.

On the exhale, regardless of the temperature and humidity of the surrounding air, you breathe out air that is close to your body temperature. This natural process ensures that your lungs are exposed to air that won’t shock or harm them, even in cold conditions.

How to Breathe While Running in The Cold

Although research shows that exercising in the cold won’t do permanent damage to your lungs—running in the winter is no walk in the park.

That said, before you start thinking about skipping outdoor running altogether, know that the downsides are manageable and are by no means a valid excuse to skip your training.

Without further ado, here is how to breathe right when running in the winter.

Additional resource – Your guide to Runners cough

Use A bandana, Scarf, or Balaclava

Chilly weather and frosty air can really take a toll on your run, especially if it leaves your lungs burning or triggers some serious coughing fits. But fret not, fellow runners, there’s a simple solution: wrap up with a moisture-wicking neck warmer, scarf, or trusty bandana.

Why is this gear so darn helpful, you ask?

Well, picture this: as you venture out into the icy abyss, your bandana or scarf becomes your trusty sidekick, shielding your precious lungs from the frigid air. It’s like a warm, cozy hug for your respiratory system.

But it doesn’t stop there. These nifty accessories do more than just block the chill. They’re like lung superheroes, swooping in to humidify the cold, dry air you inhale and recycle the moisture from your exhales. The result? The air you breathe is not only warmer but also easier on your lungs.

Now, when your lungs feeling extremely cold, consider the merino wool balaclava. This bad boy covers your mouth, nose, ears, and head, providing you with full insulation. It’s not just about staying warm; it’s also your shield against frostbite on those rosy cheeks and kissable lips.

Okay, let’s address the elephant in the room. Sure, you might resemble a mysterious bank robber out of a movie, but hey, you’ll be toasty warm, comfortable, and definitely not hacking up a lung.

And here’s the best part – there’s a whole world of neck-warmers, bandanas, scarfs, and balaclavas out there, sporting designs to match your personal preferences. You can protect your health, stay stylish, and conquer the winter run – all in one fell swoop. So, go ahead, embrace the cold, and keep those lungs happy.

Inhale Through the Nose & Exhale Through the Mouth

When it comes to the art of breathing while running, I’ve usually recommended taking in those sweet lungfuls of air through both your nose and mouth. But hold onto your hats because cooler temperatures might call for a different approach.

In fact, when you’re out there braving the cold, consider this: inhaling solely through your nose could be the winning strategy.

Here’s the scoop on why it works. Breathing in through your nose can actually do a fantastic job of warming up and humidifying the icy air. You see, as that frigid air embarks on its journey to your lungs, it’s got quite a distance to cover. And that’s a good thing. It gives it more time to get toasty and moist as it winds its way through your nasal passages and those nifty little cells lining your windpipe.

Nasal breathing isn’t just about heating things up; it’s a master of maintaining your body temperature too.

Now, here’s the catch – it won’t let you inhale as much oxygen as the mouth can manage. This becomes especially apparent when you crank up the intensity of your run, like when you’re tackling those grueling intervals or conquering hill reps.

So, here’s the game plan for those frosty days. If you find yourself in the midst of an extreme cold snap, consider dialing down the intensity a notch. This will help you avoid those desperate gasps for air. Keep your workouts cruising along at a conversational pace. And when the conditions are just right, and the breathing feels easy, then, my friend, you can crank up the intensity to your heart’s content.

Are You Asthmatic?

Feeling like you’ve tried everything but still finding yourself gasping for breath in the chilly air? Well, it might be time to consider whether you’re dealing with asthma or another pulmonary issue.

You see, when you inhale that dry, icy air, it can be a real irritant to your throat. It might even lead to inflammation and damage, triggering an asthmatic response.

If this sounds like your situation, it’s crucial to consult with your doctor for a thorough check-up. They’ll be able to determine if asthma is the culprit, and, if so, they can prescribe medication and maybe even an inhaler to help you out.

But asthma isn’t the only condition that can put a damper on your cold-weather runs. Here are a few others you should be aware of:

  • Cardiovascular Disease: If you’re dealing with heart issues, it’s best to avoid running in the cold. The extreme temperatures can strain your heart and potentially worsen your condition.
  • Exercise-Induced Bronchitis: This nasty condition can rear its ugly head when you work out in chilly weather. It’s characterized by chest tightness, coughing, and wheezing. Not fun, right?
  • Raynaud’s Disease: This one messes with your blood circulation, leading to numbness and pain in certain parts of your body. Running in the cold can make these symptoms even worse.

So, if any of these health issues sound familiar, it’s time to think twice about those frosty jogs and consider alternative indoor workouts instead.

A Better Alternative

It’s all about making the right choice for your comfort and well-being, my fellow runner!

When you’re standing there, all bundled up, contemplating a chilly run, just remember: you have options! If the cold weather isn’t vibing with you, it’s totally okay to skip that run and live to hit the pavement another day.

Consider shifting your workout indoors to the cozy gym. You don’t have to be a running martyr!

Treadmills, as much as they might get a bad rap from some runners, are actually fantastic machines. They’re like your trusty sidekick for year-round, consistent training. Who wouldn’t want that, right?

So, remember, it’s not about battling the elements; it’s about making smart choices for your fitness journey. Whether you’re out conquering the cold or rocking it indoors on the treadmill, you’re still making strides toward your goals. Keep it up!

The 10 Causes of Hip Pain From Running

hip Pain From Running

Suffering form hip pain from running? This article is ideal for you. In fact, you are about to learn how to deal with hip pain during or after running as well as how to prevent any further damage.

Sure, hip injuries, unlike knee ailments, are not a huge problem in the running world, but a lot could go wrong.

Left unchecked, what started as a mild hip soreness may turn into a debilitating injury, which may bring your running routine to a screeching halt.

In today’s article, I’ll discuss the primary conditions causing hip pain for runners, then share with you a few treatment and prevention guidelines.

Hopefully, by the end of this post, you’ll have a better understanding of how to proceed in the presence of pain in the hip joint and surrounding tissues whether during or after your workouts.

10 Causes of Hip Pain From Running

Formed between the femur and the os coxa, the hip joint is the largest ball-and-socket joint in the body,

Since the hip joint plays a vital role in power, balance, flexibility, and momentum when running, it’s a common source of pain for runners.

But here is the kicker. Diagnosing hip pain when running can be a fickle beast because more than one condition can be present at a given time, and some of these share similar symptoms.

Also, the hip is a very complex joint that’s attached to many muscle groups.

Hip pain can be blamed on a host of reasons. Much of the main causes will depend on when,  where, and how they hurt and got injured. For instance, injury to the upper quads or hamstrings can manifest as pain in the hip region.

For these reasons (then some), the exact cause(s) of a given case will depend on when, where, and how you experience/feel the pain.

Pain can be caused by structures within the hip joint itself or from structures enclosing the hip joint. Pain might be experienced in front of the of the hip (usually as groin pain), the back of the hip in the buttocks, or on the outside of the joint.

To help you clear away confusion, here are some of the most common causes of hip pain from running.

Note—Keep in mind that not all of the below conditions are running/training-induced. Lifestyle decisions and genetics can also contribute to the onset of hip pain.

Hip Pain From Running # 1 – Inflammation of the Bursae

Experiencing pain on the outside of the hip? Then you might have inflammation of the bursae.

Also known as trochanteric bursitis, the condition is an inflammation of the bursae, which consist of small sacs of fluid between the tendon and bone that lubricate your joint, known as the bursae.

This is located between the greater trochanter (bony prominence on the femur) and the muscles and tendons surrounding it.

The bursae function as a gliding surface to limit friction between moving tissues of the body, lubricating the area between muscles, tendons, and bones.

While running, the trochanteric bursa takes a lot of impact, and over time, it can get inflamed. Runners who suffer from bursitis report feeling a dull ache or burn, popping sensation on the outside of the hip during or after a run.

Further, issues like direct trauma, pelvis issues, prolonged sitting, etc. can make the condition worse.

The Solution

Noninfectious cases of bursitis can be treated with enough rest, ice therapy, and anti-inflammatory medications. Reduce your mileage by 30 to 50 percent, steer clear of the hills, stretch your IT band and hamstrings after a run, etc.

That said, infectious bursitis—very rare—call for medical intention. Antibiotics, and even, surgery, is required.

How much time you take off the running road depends on the severity of symptoms.

If you feel pain when putting pressure on the injured limb, then cross train. Opt for activities, such as swimming, aqua jogging, cycling, rowing machines, etc.

Check the following links for more options:

Link 1

Link 2

Link 3

Link 4 

Hip Pain From Running # 2 – Muscle Imbalances

Another common cause of hip pain while running is muscle imbalances. These develop when you have relatively weaker muscles in one area of your body while the opposing muscles are stronger.

This means that any strength/mobility imbalance in the hip flexors, glutes, or core muscles may lead to hip alignment issues, tears, or strains that cause pain.

Hip-related muscular imbalances can be with a proper cross-training exercise program.

The Solution

The best way to prevent muscle imbalances, in general, is by following a well-rounded strength program that’s based on full body compound movements. These include pushups, squats, lunges, deadlifts, turkey getups, bridges, etc.

But, all in all, single leg and balance exercises, such as pistol squats, are especially helpful in dealing with muscular imbalances in runners. Check this routine.

Or visit a certified physician, who, after assessing your unique conditions, can prescribe a set of exercises and drills to fix your issue.

You can also check these stretches for hip pain.

Hip Pain From Running # 3 – Bad Running Form

Proper running form is also really important.

Bad running form may force your hips out of alignment, resulting in wear and tear on the joint surface. This almost always leads to pain.

The Solution

It’s simple: fix your running form.

Here are a few tips:

  • Run tall with a slight forward lean.
  • Keep your body relaxed from head to toe.
  • Keep your core tight and back flat the entire time.
  • Avoid overstriding by improving your running cadence and taking (relatively) shorter steps.
  • Keep your head level, shoulder loose, and arms bent at a 90-degree angle.

For more on proper running form, check these posts:

Hip Pain From Running # 4 – Stress Fractures

If you feel throbbing or stabbing pain on the inside of your hip (or in the groin area), then you might have a stress fracture.

If you experience pain coming more from the inside of your hip—especially if you end to run on hard surfaces like sidewalk or pavement—then you might have a stress fracture.

Stress fractures consist of a break in the bone caused by repetitive strain. A fracture can be partial or a complete break, depending on the severity of the condition.

Hip stress fractures are usually associated with the elderly, but they can happen at any age—especially among endurance athletes who do lots of impactful training.

More specifically, in runners, the excessive impact can cause a small crack to develop in the femoral neck—near the ball at the top of the femur. These fractures can occur in the neck of femur—what’s known as the femoral neck.

Stress usually manifest as a dull ache either in front or behind the hip, especially when exercising. Left unchecked, the pain will gradually increase until it becomes excruciating.

The Solution

If a stress fracture is what you’re dealing with, then running will make it worse. Stop running altogether and talk to a doctor to get the treatment you need.

Treating this notorious injury may take six to eight weeks of rest—read: no running—but you might be able to do some low-impact cross-training.

During the recovery period, feel free to cross train, opting for exercises such as biking or aqua running, but only if your physician clears it first.

Once your doctor gives you green light, ease into running, making sure to train on softer surfaces.

Here some useful links:

Link 1

Link 2

Link 3

Hip Pain From Running # 5 – Hip, Thigh or Hamstring Muscle Injury-Tear

Injuries and tears in the glutes, hamstrings, quadriceps, and groin muscles are common among runners. Some of these conditions may manifest as pain in the hip region,

Hip Flexor Strains

The hip flexors are a group of muscles located in the front portion of the hip that work to lift the thigh upward and assist in a forward motion when walking or running.

If you’re experiencing pain at the front of the hip, especially where your thigh meets your hip near the leg crease, then you might have a hip flexor strain.

A hip flexor strain is the overstretching or tearing of these muscles.

Gluteus Medis Muscle Injury

Since the gluteus medius—one of the three main glute muscles—and the hip joint are located in the same area, inflammation or injury to this muscle may affect the whole hip region and vice versa.

A runner with injured/strained glutes may feel a tender, aching pain on the outside of the hip region

Hamstring Injury/Tear

Made up of three distinct muscles that run down the back of your thighs, hamstring injuries happen when muscle fibers are forced to bear a drastic load while fully or almost fully extended.

Inflammation or injury of the top of the hamstrings can result in pain and tenderness in the top of the back of the thigh and the lower buttocks.

Quadriceps Tears

If you experience pain or tenderness in the front of the thighs, then this may indicate inflammation or injury to the quadriceps muscles.

When you overwork your quads, they can become strained from overuse, especially if they’re relatively weak and/or when doing too much downhill running.

The Solution

Treating muscle injuries is not complicated.  Mild cases can be treated with the RICE protocol.

As a rule, avoid any activities that put weight on the injured hip for the first few days after onset.

Also, stretch and strengthen your critical running muscles, such as the glutes, hamstrings, quads, and calves, on a regular basis.

Here are more useful links:

Link 1

Link 2

Link 3

Hip Pain From Running # 6 – Cartilage Tear

If you’re suffering from intermittent pain in the hip region, accompanied by a clicking or locking sensation, especially following a recent hip fall or twist, then you might blame it on a cartilage tear.

Also known as a labral tear, the condition is a tear of the acetabulum, which is a thick ring of cartilage that cushions the hip joint.

Cartilage tears can be a gradual onset caused by overuse and repetitive strain on the hip.

These tears typically take place where the ball and socket joint insert. Typically, this injury is caused by trauma, as in a sudden fall or twist.

They can also be acute, caused by a traumatic event such as a bad fall, collisions, etc.

Additional resource – How to choose Chiropractor for runners

The Solution

Again, stop running for a few days.

Depending on the severity of the tear, your choice of treatment largely depends on the condition.

In case symptoms didn’t improve, then see a doctor immediately.

Some may recover with simple treatments in a few weeks, whereas serious cases require arthroscopic surgery to repair or remove the torn labrum and clear out a fragment from the joint.

Here are some useful links:

Link 1

Link 2

Link 3

Link 4

Link  5

Hip Pain From Running # 7 – Iliotibial Band Syndrome

If you experience sharp pain on the outside of your knee and/or hip region, you could have iliotibial band syndrome (ITBS). This is especially the case if you tend to run on paved roads or track all season.

ITBS is an inflammation or irritation of the iliotibial band, which is a tough tendon that runs down the outside of the thigh from the hip to the knee, connecting the hip to the shin bone.

Tightness in the band, as well as weak hip and glute muscles, can lead to the onset of the condition.

The Solution

Your first line of defense is to reduce running by 30 to 50 percent or stop altogether if pain interferes with your gait.

Also, strengthen your glutes and hip muscles and correct any muscle imbalances in the area.

Other measures include:

  • Changing your running routes
  • Avoid running on roads that slope laterally
  • Alternating direction on the track
  • Replacing your running shoes
  • Stretching your IT band, hamstrings, and glutes

For the full guide on how to deal with ITBS, check my post here.

Here are more useful links:

Link 1

Link 2

Link 3

Hip Pain From Running # 9 – Avascular Necrosis

Also known as osteonecrosis, this condition occurs when blood supply to the femoral head—the ball of the hip—is limited, resulting in the death of bone tissue.

Avascular necrosis can be brought up by a host of causes, including;

  • Excessive alcohol intake,
  • High-dose steroid medications,
  • Radiotherapy,
  • Sickle cell diseases,

When Ignored the condition can result in tiny breaks in the bone, leading to the bone’s eventual collapse.

female runner suffering from hip injury

The Solution

If you just got diagnosed by your doctor, then it’s crucial that they refer you for an immediate MRI scan to confirm that you have avascular necrosis.

As soon as you the result, start treatment, which may stop the condition from getting worse (and thwart the onset of arthritis).

Check this post for an in-depth overview of how to slow and stop the progression of avascular necrosis.

Here are more useful links:

Link 1

Link 2 

Link  3

Hip Pain From Running # 10 – Running on Cambered roads

This is one of the lesser-known causes of hip pain in runners…something that not a lot of runners are aware of nor are willing to acknowledge—especially us city dweller.

Here’s the truth. If you put safety first by running against traffic on the road, then you’re likely running on a cambered surface—without even realizing it.

Sure, camber is useful. Having the center of the road a bit higher than the sides allows water to drain off, and helps motored vehicles gain better traction.

However, running on inclined structures forces one of your legs to reach down a bit farther than the other, resulting in misalignments in the kinetic chain. Thus, increasing the risks of injury.

Additional resource – Aqua jogging for beginners

The Solution

Run on flat surfaces. When it’s possible, run in the middle of the road or try switching to the other side of the road. Or, stick to the sidewalk.

Furthermore, listen to your body, especially following a run on a sharply inclined road. Also, consider adding some hip and lower back strengthening and stretching exercises into your cross-training routine.

Serious Cases of Hip Pain

If resting and mild stretching didn’t help relieve your hip pain, or the pain got worse, see a doctor for a thorough assessment.

Stubborn hip pain calls for a visit to a doctor or a sports medicine specialist for a thorough assessment.

Other conditions that can cause pain in the hip joint and the surrounding tissues include:

  • Femoral acetabular impingement
  • Sciatica
  • Piriformis syndrome
  • Groin pulls or tears
  • Snapping Hip Syndrome
  • Hip tendonitis
  • Septic Arthritis
  • Hernias
  • Osteoarthritis
  • Slipped Capital Femoral Epiphysis
  • Meralgia Parasthetica

Here are more resources to check out:

Link 1

Link 2

Link 3

Link 4

Link 5

Hip Pain From Running Infographic

New to Running? Start Here…

If you’re serious about running, getting fit, and staying injury free, then make sure to download my Runners Blueprint Guide!

Inside this guide, you’ll learn how to start running and lose weight weight the easy and painless way. This is, in fact, your ultimate manifesto to becoming a faster and a stronger runner. And you want that, don’t you?

Click HERE to check out my Runners Blueprint System today!

Don’t miss out! My awesome running plan is just one click away.


Conclusion

Here you have it!

I hope the above advice will prove useful in helping you deal with and prevent hip pain when running.

In the meantime, thank you for reading my post.

Please stay safe, and run strong.

David D.

The Beginner’s Guide To The Ketogenic Diet

guide to the ketogenic diet

A lot of people suffer from various health problems, such as obesity and diabetes, and the primary culprit is, often than not, the food they eat.

In fact, nutrition has a significant impact on your overall health, period.

As a result, if you eat lots of junk food, then you’ll, eventually, gain weight, become prone to cellular issues, and face a host of trouble.

And you don’t want that.

Enter the Keto Diet

The ketogenic diet is gathering steam like no other diet, and for good reasons.

This nutrition plan has helped lots of people shed weight, improve productivity, get healthier, and so much more.

In today’s post, I’ll explain what the ketogenic diet is, what to eat, what to avoid,  and the best way to get started.

So, are you excited?

Then here we go.

The Beginner’s Guide To The Ketogenic Diet

So, what is the keto diet and why is it taking the world by storm?

Also known as low-carb, high–fat (LCHF), the ketogenic diet is a high-fat, moderate protein, low-carb nutrition plan.

By severely limiting carb intake—usually less than 25 net grams per day—the keto diet forces your body into ketosis, which is the purpose of LHCF.

So, what’s ketosis?

Ketosis is, basically, a metabolic state in which the body heavily relies on fat for energy instead of sugar/glycogen.

Chemically, while in ketosis, your body produces ketones by breaking down fat in the liver, then transforming them into energy instead of relying on carbohydrates to generate fuel for everyday function.

In other words, going keto forces your body to burn fat instead of carbohydrates.

You’re Not Starving Yourself

Just don’t get me wrong.

You don’t enter ketosis by starving your body of calories, but you do so by severely reducing carb intake and replacing it with plenty of dietary fats, and a moderate amount of proteins.

When you eat fewer carbs, glucose levels, go down, which lowers insulin levels.

This triggers the production of ketones that do not rely on insulin to get into and fuel the body’s cells.

ketogenic diet foods

Types of Keto Diets

Since people are different and have different needs and goals, there is also a wide range of keto diets to choose from.

Here are the main ones.

The Standard Ketogenic Diet

Or SKD.

This is the most common keto diet that many dieters are familiar with.

The Standard Ketogenic Diet is simple and very effective, especially when it comes to weight loss.

It focuses on:

  • High intake of healthy dietary fats—70 to 80 percent of total calories,
  • Moderate protein—20 to 25 percent—and,
  • Minimal carbohydrates—5 to 10 percent.

This diet is ideal for recreational runners, fitness enthusiasts, or people looking to lose a lot of weight as soon as possible.

The Cyclical Ketogenic Diet

Or CKD.

This approach consists of cycling between a typical ketogenic diet, followed by a carb-loading period.

During CKD, you, in essence, you cycle between:

(1) Days of keto dieting during which you consume less than 40 grams of carbs— and

(2) Days of carb-loading during which you consume 400 to 500 grams of carbs to help resupply glycogen stores for prolonged or intense exercise.

This phase may last for 24 to 48 hours.

This keto variation is often recommended for serious athletes and bodybuilders.

So, it might not be suitable for everyone.

The Targeted Ketogenic Diet

During the TKT variation, you go keto most of the day, but then consume the total allocated amount of carbohydrates in one sitting, 60 to 90 minutes before a workout.

The targeted ketogenic diet is a compromise between the classic ketogenic diet and a cyclical ketogenic diet, meaning that you can still provide your body with carbs for intense training, but not step out of ketosis.

The purpose of this is to utilize the fuel provided by carbohydrates effectively before it kicks you out of ketosis.

As a general rule, make sure to become keto-adapted first by following a strict ketogenic diet for at least six to eight weeks, before opting for TKD.

This ensures that you don’t throw yourself completely out of ketosis during the first few weeks.

During the loading window, opt for carbs that are easily digestible with a high glycemic index.

Then, post workout, up your protein intake to assist with muscle recovery, then consume nothing but keto foods.

TKD is most suitable for beginner or intermediate fitness runners or for those who cannot be on a cyclical keto diet for personal reasons.

You Decide

So which one should you follow?

The answer depends on you.

Your own needs and fitness goals should dictate which approach to follow.

But, in general, the standard diet is the way to go—especially if you’re a complete beginner and want to become keto-adapted as soon as possible.

Additional resource – Keto marathon training

Benefits of Ketogenic Eating

Once you get on the keto path, you’ll realize that it’s more than just another trendy eating plan.

In fact, ketogenic eating is a healthy lifestyle approach that offers a host of benefits.

Here are a few.

  1. Keto Aids in Weight loss

One of the main perks of the keto diet is the weight loss effect.

Research has found that people who go on low carb diets shed weight faster than those on low-fat diets, even the low-diet group is actively restricting calories.

According to a study published in the British Journal of Nutrition, subjects following a keto diet were able to achieve better long term bodyweight management when compared to their peers who opted for a conventional low-fat diet.

According to another research, low carb diets were specifically effectively for up to six months, compared to a standard weight loss diet.

  1. Increased Energy Levels

It’s quite common during the first few days on the keto diet to go through the keto flu.

This is a short period in which you experience fatigue, headaches, nausea, confusion, and other unwanted symptoms.

These are the telling signs that your body is making the shift from burning carbs (glucose) for energy to burning ketones (fat)—a process known as ketosis.

Think of it as a rite of passage to the keto world.

This transition phase can leave you feeling depleted for a few days—up to a week, but once you become keto-adapted, you may experience a sharp increase in energy and endurance.

There are many reasons, as explained by keto experts following a ketogenic diet.

Some of these include:

  • Reduced inflammation
  • More ATP per molecule of ketone Vs. Glucose
  • Steady blood sugar levels upregulation of mitochondrial biogenesis.
  1. Keto Reduces Appetite

Most of the dreadful hunger pangs are caused by chronic blood sugar instability.

This what could be blamed for the sudden urge to eat and reach for unhealthy food.

To control your cravings, you’d need to regulate your blood sugar levels.

That’s where the keto diet comes in handy.

Getting into ketosis, then maintaining for an extended period, helps regulate blood sugar, drastically reduces cravings, and provides the brain and tissues with stable energy.

Research had regularly revealed that when subjects avoided carbohydrates and eat more fat and protein, they end up consuming far fewer calories.

Another study published in the American Journal of Clinical Nutrition revealed that high fat, low carb diet were more effective at managing hunger than diets with a greater percentage of carbohydrates.

Further study suggests that high-fat low carb eating may suppress hunger hormones more effectively than standard weight-loss regimes.

Additional resource – Best supplements for runners

  1. Increased Levels of Good HDL Cholesterol

Despite being high in fats, the ketogenic diet is unlikely to negatively impact your cholesterol levels.

The reverse happens.

Eating this way may cut the risk of heart disease markers, such as triglycerides and cholesterol.

Research shows that one of the best ways to increase the good HDL level is to consume fat—and the keto diet is roughly 70 to 85 fat.

When you’re applying the keto diet in a healthy way—as in focusing on healthy sources fats, avocadoes instead of pork rinks for instance—you may improve your heart health by reducing cholesterol.

A one-year study found that 22 of 26 cardiovascular risk factors drastically improved with a keto diet.

The subjects reported a reduction of their fasting triglyceride by 24 percent and an 18 percent boost in good HDL cholesterol and drastic reductions in both systolic and diastolic blood pressure.

Another research found that HDL cholesterol—the good one—drastically improved in those following the keto diet while the bad one—the LDL significantly plunged.

  1. Good For Metabolic Syndrome

There is plenty of studies—roughly more than 160 research paper currently on PubMed with the words “ketogenic” “ketosis,” or “diabetes” in the title alone.

A 10-week study found that high fat and low diet can help diabetic subjects maintain a healthy blood glucose level range.

This research assessed 232 obese patients with type II diabetes.

The result: 36 percent of the subjects no longer needed insulin therapy, with over 50 percent drastically lowering their dose.

Research has found a strong link between the metabolic syndrome and increased risk for diabetes and heart disease.

This condition is a mix of symptoms that include:

  • Increased blood pressure
  • Abdominal obesity
  • High triglycerides
  • Low good HDL cholesterol levels

In other words, eating a diet rich in fat and void of carbohydrates, contrary to classic thinking, is actually what might help you reverse cardiovascular diseases symptoms

The keto diet is, again, works very well for treating and alleviating all of these symptoms, research shows.

What’s more?

A body of recent research has looked into the effect of the keto diet on obesity and found that it works very well for not only losing fat but also sparing muscle mass.

  1. Stable Insulin Levels

The high-fat, low carb diet may be very beneficial for people with type II diabetes, which affects hundreds of millions worldwide, especially in the industrialized world.

Why?

When you reduce your intake of carb-rich and high processed food, you’ll be better able to manage your blood sugar levels by eliminating—or significantly reducing—large spikes in your blood sugar, reducing the need for insulin.

Research shows that diabetic patients who get on the low carb path may need to cut their insulin dosage by up 50 percent almost immediately.

In a study, 95 percent of subjects with type II diabetes have significantly reduced or eliminated their glucose-lowering medication within six months.

What’s more?

According to a review published in the European Journal of Clinical Nutrition, XX number of studies proved that a ketogenic diet could drastically improve insulin sensitivity for those with type II diabetes.

Yet be careful.

If you’re already taking blood sugar meds, consult with your doctors before making changes to your carb intake—as your dosage may need to be adjusted to prevent hypoglycemia.

Foods rich in healthy fats for balanced nutrition: raw egg yolk in fresh cut half avocado on gray stone background.

Additional resource – How to combine keto and running

  1. Helpful for Many Brain Disorders

Did you know that the ketogenic diet was first used way back in the 1920s to treat children with epilepsy?

This is something I learned about a few months ago in a Joe Rogan podcast. And I instantly became fascinated with the applications of the keto diet for treating brain disorders.

In research, over 50 percent of the children on the low-carb, high-fat regime had lowered the number of their seizure by up to 50 percent while 16 percent of the participant became seizure-free.

Some research goes as far as to claim that the ketogenic diet provides neuroprotective benefits.

These may help reduce the risks for conditions like Alzheimer’s Parkinson.

How come?

The theory is, drastically reducing glucose levels by opting for high fat and very strict carb diet forces body to produce ketone bodies for fuel.

This shift may help treat and reverse neurological disorders and cognitive issues, such as Alzheimer’s symptoms, epilepsy, and anxiety.

  1. Lowered Blood Pressure

Hypertension, or elevated blood pressure, is a significant risk factor for a host of diseases, such as stroke, heart disease, and kidney failure—the list goes on.

Here’s the good news.

A growing body of research over the past few years shows that eating low-carb diets has a huge positive impact on blood pressure, which could cut your risk of these conditions and help you live a longer, healthier life.

  1. You’ll Sleep Better

Your sleep quality will take a massive hit during the first few days on the ketogenic diet.

That’s typical during the adjustment period—when you reduce your carb intake to no more than 20 net gram per day.

But once your body gets adjusted, you’ll find yourself experiencing more alertness during the day and sleep deeper at night.

Research published in the journal Nutrients revealed hat following a low-carb calorie diet drastically reduce daytime sleepiness in a group of obese participants.

During this phase, you may experience insomnia and a bunch of other issues, but once you go over this initial bump, your sleep quality will improve.

You’ll sleep much deeper and much sounder, and feel more rested and energized when you wake up.

To Conclude

I can go on and on.

For more on that, here are a few sources.

Link 1

Link 2

Link 3

Link 4

Link 5

Who Shouldn’t Be on A Keto Diet?

As with any drastic change in dietary habits, there are a few safety issues you need to be mindful of if you’re serious about making it down the ketogenic path.

So, if one of the following cases applies to you, then be extra careful.

  • People on hypo-causing meds such as Insulin, Sulphonylureas, and Glinides
  • People on medications such as high blood pressure.
  • Breastfeeding women
  • People with gallbladder diseases
  • People who have had bariatric surgery
  • Etc.

Also, be sure to discuss with a doctor or a certified nutritionist any significant changes in your eating habits before making it, especially when it comes to super carb-restricted ketogenic diets.

keto foods plan


One Week Sample

Here how a week of eating looks like on the ketogenic diet.

Monday

  • Breakfast:Eggs, bacon, and tomatoes cooked in coconut oil
  • Lunch:Burger with cheddar cheese, guacamole, and nuts.
  • Dinner:Salmon, egg, and mushroom cooked in coconut oil.

Tuesday

  • Breakfast:Egg, basil, avocado, and cheddar cheese omelet.
  • Lunch:Chicken salad with olive oil and avocado.
  • Dinner:Mackerel with asparagus and spinach cooked in butter.

Wednesday

  • Breakfast: Omelet with peppers, broccoli, salsa, and spices.
  • Lunch:Shrimp salad with feta cheese and olive oil.
  • Dinner: Romaine lettuce with low-carb, high-fat dressing

Thursday

  • Breakfast:Cheese omelet with vegetables and avocados.
  • Lunch:Ham and cheese slices with almonds.
  • Dinner:Salad greens with high-fat dressing

Friday

  • Breakfast:Fried eggs with mushrooms and onions.
  • Lunch: Shrimp salad with feta cheese and olive oil.
  • Dinner:Low Carb Salmon Patties

Saturday

  • Breakfast:Eggs, bacon, and tomatoes.
  • Lunch:Four ounces of baked fish with butter sauce
  • Dinner:Steak and eggs with vegetables.

Sunday

  • Breakfast:Coffee with heavy crème
  • Lunch:Burger with cheddar cheese, guacamole, and nuts.
  • Dinner:Three cups shredded cabbage sautéed in butter and onions

Healthy Ketogenic Snacks

In case hunger strikes before one of the main meals, keep it at bay with any of the following options.

  • Cheese with olives
  • Two hard-boiled eggs
  • Strawberries and cream
  • A handful of almonds and nuts.
  • One avocado with pepper and salt
  • Green bean fries
  • Kale chips
  • String cheese
  • Jerky
  • Celery filled with cream cheese
  • Lettuce or cucumber smeared with peanut butter
  • Radishes smeared with butter

Conclusion

So, should you give the ketogenic diet a try?

I hate to sound like a broken record, but it’s really up to. It depends on you.

So you decided what works the best for you. Just be willing to keep an open mind and experiment.

In the meantime, thank you for reading my post.

Good luck!

Couch To 10K Plan – What’s a 10K In Miles & How To Train for One?

A 10K in miles is about 6.2 miles. This race distance is popular among runners of various experience levels.

But if you’re planning to train for a 10K as a beginner, there are a few other things you’d need to consider.

That’s where today’s post has you covered.

In this lengthy beginner’s guide to 10K training, you’ll discover:

  • How Many Miles Is a 10K Race?
  • How Much Time do you need To Train For your first 10K?
  • The Average 10K Time For beginners
  • 10K Training For Beginners – The Exact Couch to 10K plan
  • 10K Racing Tips For Beginners
  • How to Pace Yourself During Your first 10K
  • How to Take your 10K Results To the next level
  • And so much more.

Sounds great?

Let’s lace up and dig in.

What’s a 10K Race?

Alongside the shorter 5K, the 10K is one of beginner runners’ most popular race distances. This is the longest standard track event and is regularly raced in road and cross country events.

The 10K is a fantastic challenge for newbie runners while appealing to more experienced runners. The 6.2-mile distance hits the sweet spot of being a challenge without needing long months of hard training, as it’s the norm for half or full marathon events.

10K in Miles – The Full Answer

If you’re new to running or have never run a race before, you might be wondering how many miles is a 10K?

Here’s the 10K in miles breakdown.

The ‘K’ stands for kilometers, roughly 0.6 miles or 1093.6 yards. Thus, a 10K distance is ten kilometers or about 6.2 miles.

More specifically, a 10K is 6 miles and 376 yards or 32,808 feet and 5 inches. A 10K is twice the distance of a 5K, which is 5 kilometers, or 3.1 miles.

If a 10K seems too much to handle, keep in mind that a marathon is 26.2 miles long. A 10K sounds like a jog in the park by comparison, doesn’t it?

Putting Things Into Perspective

As a frame of reference, to complete a 10K distance, you’ll have to :

  • Run 25 laps around a standard outdoor track that’s 400 meters long.
  • Run 50 laps around a standard indoor track that’s 200 meters long.
  • Run a football field—(109.73 meters) —including the end zone—91.14 times.
  • Climb the Empire State building (443.2 meters high, including antenna) 26.25 times.
  • Scale the Eiffel Tower (324 meters tall) 31.25 times.

https://www.youtube.com/watch?v=6FR6yhVTWOc

Here are some useful links on the history of the 10K and some interesting facts.

Now that you know what’s a 10K in miles,  let’s move on to the practical stuff.

How Much Time Do I need To Train For my first 10K?

There’s no black and white answer.

As long as you’re healthy, you can go from being a complete couch potato to running a 10K in around 12 weeks.

Wait, What Do I Mean By a Beginner?

In my book, a beginner is anyone with little to no background in the sport but can walk comfortably for one hour or jog for one mile (1.6 km).

Some of you might be passed this point. If it’s the case, the training plan shared below isn’t for you, but the big picture training and guidelines still apply.

Should Complete Beginners Run a 10K?

Again, I don’t have a definite answer as it depends on your current fitness level. If you’re really out of shape and/or dealing with chronic health issues, shooting for a 10K from the get-go might be out of your reach.

If this describes you, a 5K race is a more suitable introduction to road racing. Use some common sense. Don’t try to bite more than you can chew.

The Average 10K Time For Beginners

How long it takes to run a 10K for beginner runners depends on many factors, including fitness level, sex, age, injury history, training frequency, and motivation.

According to a survey, the average United States 10K finish results is roughly 53 minutes for men, whereas women cross the finish line at around 63 minutes.

Wondering the average time for running a mile in a 10K race? The answer is around 9 to 13 minutes for beginner runners.

The average untrained beginner might be able to jog/walk the entire 6.2 miles in about 70 to 90 minutes. After a few months of training, the same runner can finish under 60 minutes. Anything under 40 minutes puts you in the serious athlete category.

What’s The Fastest 10K Time?

According to Wikipedia, the current men’s outdoor world-record holder, at the time of writing this, is Joshua Cheptegiy of Uganda at 26:11:00, set on October 7, 2020. That’s a whooping 4:12 a mile.

The current women’s world record is 29:01:03 and is held by the Ethiopian Letesenbet Gidey on June 8, 2021.

So What 10K Finishing Time Should I Aim for Then?

Aim for what suits your current fitness level on race day.

That’s the best advice I can give.

If this is your first time doing a 10K, don’t start with a too challenging goal.

Sure, it’s good to have a goal that pushes you, but don’t try to bite more than you can chew—or else, you’ll end up injured or burned out.

What I’d consider a good 10K is anything around 45 to 50 minutes. I’ve concluded this number by averaging 10K times across various ages and genders worldwide (check the charts below).

To finish a 10K in around 45 to 50 minutes, you’ll need to average about 8 minutes a mile.

Keep in mind that runners with more experience will be able to cross the finish line in under 40 minutes, an average of less than 7 minutes a mile.

10K Race Pace Chart

Use this 10K pace chart predictor to estimate your 10K finishing time.10K in miles -


Remember – This is only a prediction of your maximum potential—glorified fortune-telling—. It might not be the reality on the ground.

If somehow you can pass it, kudos to you.

But don’t feel discouraged if you miss it.

Additional Resource – Here’s your guide to cross country running

Average 10K Times Based on Age & Gender

Run Repeat completed an interesting study that showed average running speeds and times for men and women divided by age groups. This study reported that age groups, to no one’s surprise, correlated drastically with an average 10K time, with younger age groups tending to have a faster average running pace.

The research also found that the average competitive 10K time is around 58 minutes for men in the U.S., whereas the competitive finish time for women stands at 1 hour and 6 minutes.

Relying on the data from the same study, the following charts show averages of 10K times by sex and age in the standard format of hours:minute:seconds.


The Couch To 10K Training Plan You Need

Medical Note: The training plan below is quite challenging, and you might not be ready to tackle a 10K, even after six months of training.

This is especially the case if you’re over 40, dealing with comorbid conditions like obesity, heart condition, or have chronic injuries with physical limitations.

Walk First

You should only give my couch to 10K plan a try once you can briskly walk without trouble for one hour or longer. If not, build up your walking endurance and then get on the plan.

As a rough guideline, walk three to four times per week, gradually building your sessions up to longer than 60 to 90 minutes each.

Once you find your rhythm, you’re ready to take on the next level of the 10K training plan described below.

Walk Run

The walk/run method helps your body adapt to the high impact of running without risking injury or overtraining. This mix helps reduce the risks of pain, injury, and burnout while improving your training enjoyment and cardiovascular conditioning.

The walk/run method consists of performing intervals of low intensity running—or jogging—and walking, building your endurance and confidence, and steadily improving your fitness and conditioning.

Remember to perform the running intervals slow enough at the beginning of every run.

Yes, you’ll feel tired after running but not completely exhausted or even give up at the end.

Take More Weeks

The 10K plan isn’t written in stone.

If you feel like the plan is advancing too quickly for you, slow down and repeat a week or two.

Or simply take some more days to rest and recover.

The key is to find your own pace first before adding up more.

It’s so much better to slow down than to let yourself get hurt or discouraged, which could force you to stop training altogether.

Additional resource – Additional resource – How to train for an 8K

Find The Right Intensity

Another thing you can do to stay injury-free is to stick to a conversational pace. 

This means being able to maintain a conversation while you’re doing it.

Already panting? Then you must be doing too much. Slow down and let yourself recover.

As a rule, exercise within 65 to 75 percent of your maximum heart rate, which translates to a 6 to 7 on an exertion scale of 1 to 10.

Rest or Cross Train During 10K Plan

Getting injured isn’t the worst thing that can happen to you as a runner. You can also get burned out, which is a real bummer. To steer out of this danger, recover properly between your workouts.

As a rule of thumb, take one day off every week. For most people, that’s usually Sunday, but different strokes for different folks.

During your non-running days, feel free to take more rest days or, if you heed my advice, cross-train.

Cross-training the right way can help you improve your cardiovascular health and strength without the added impact of running.

Ideal cross-training exercises include biking, swimming, strength training, and yoga.

All of these will help you build your endurance and stamina further.

But if I had to choose, I’ll always go with strength training as it helps. Improve running economy and prevent injury.

Do plenty of exercises to strengthen your glutes, hips, hamstrings, quadriceps, and calves to make the most out of it.

Additional resource – When to skip a run

The 10K Training Plan For Beginners

Now that you know how many miles is a 10K and how to prepare for it, let’s get to the practical stuff.

My couch to 10K training plan incorporates a mix of low-intensity running—or jogging, walking, and resting.

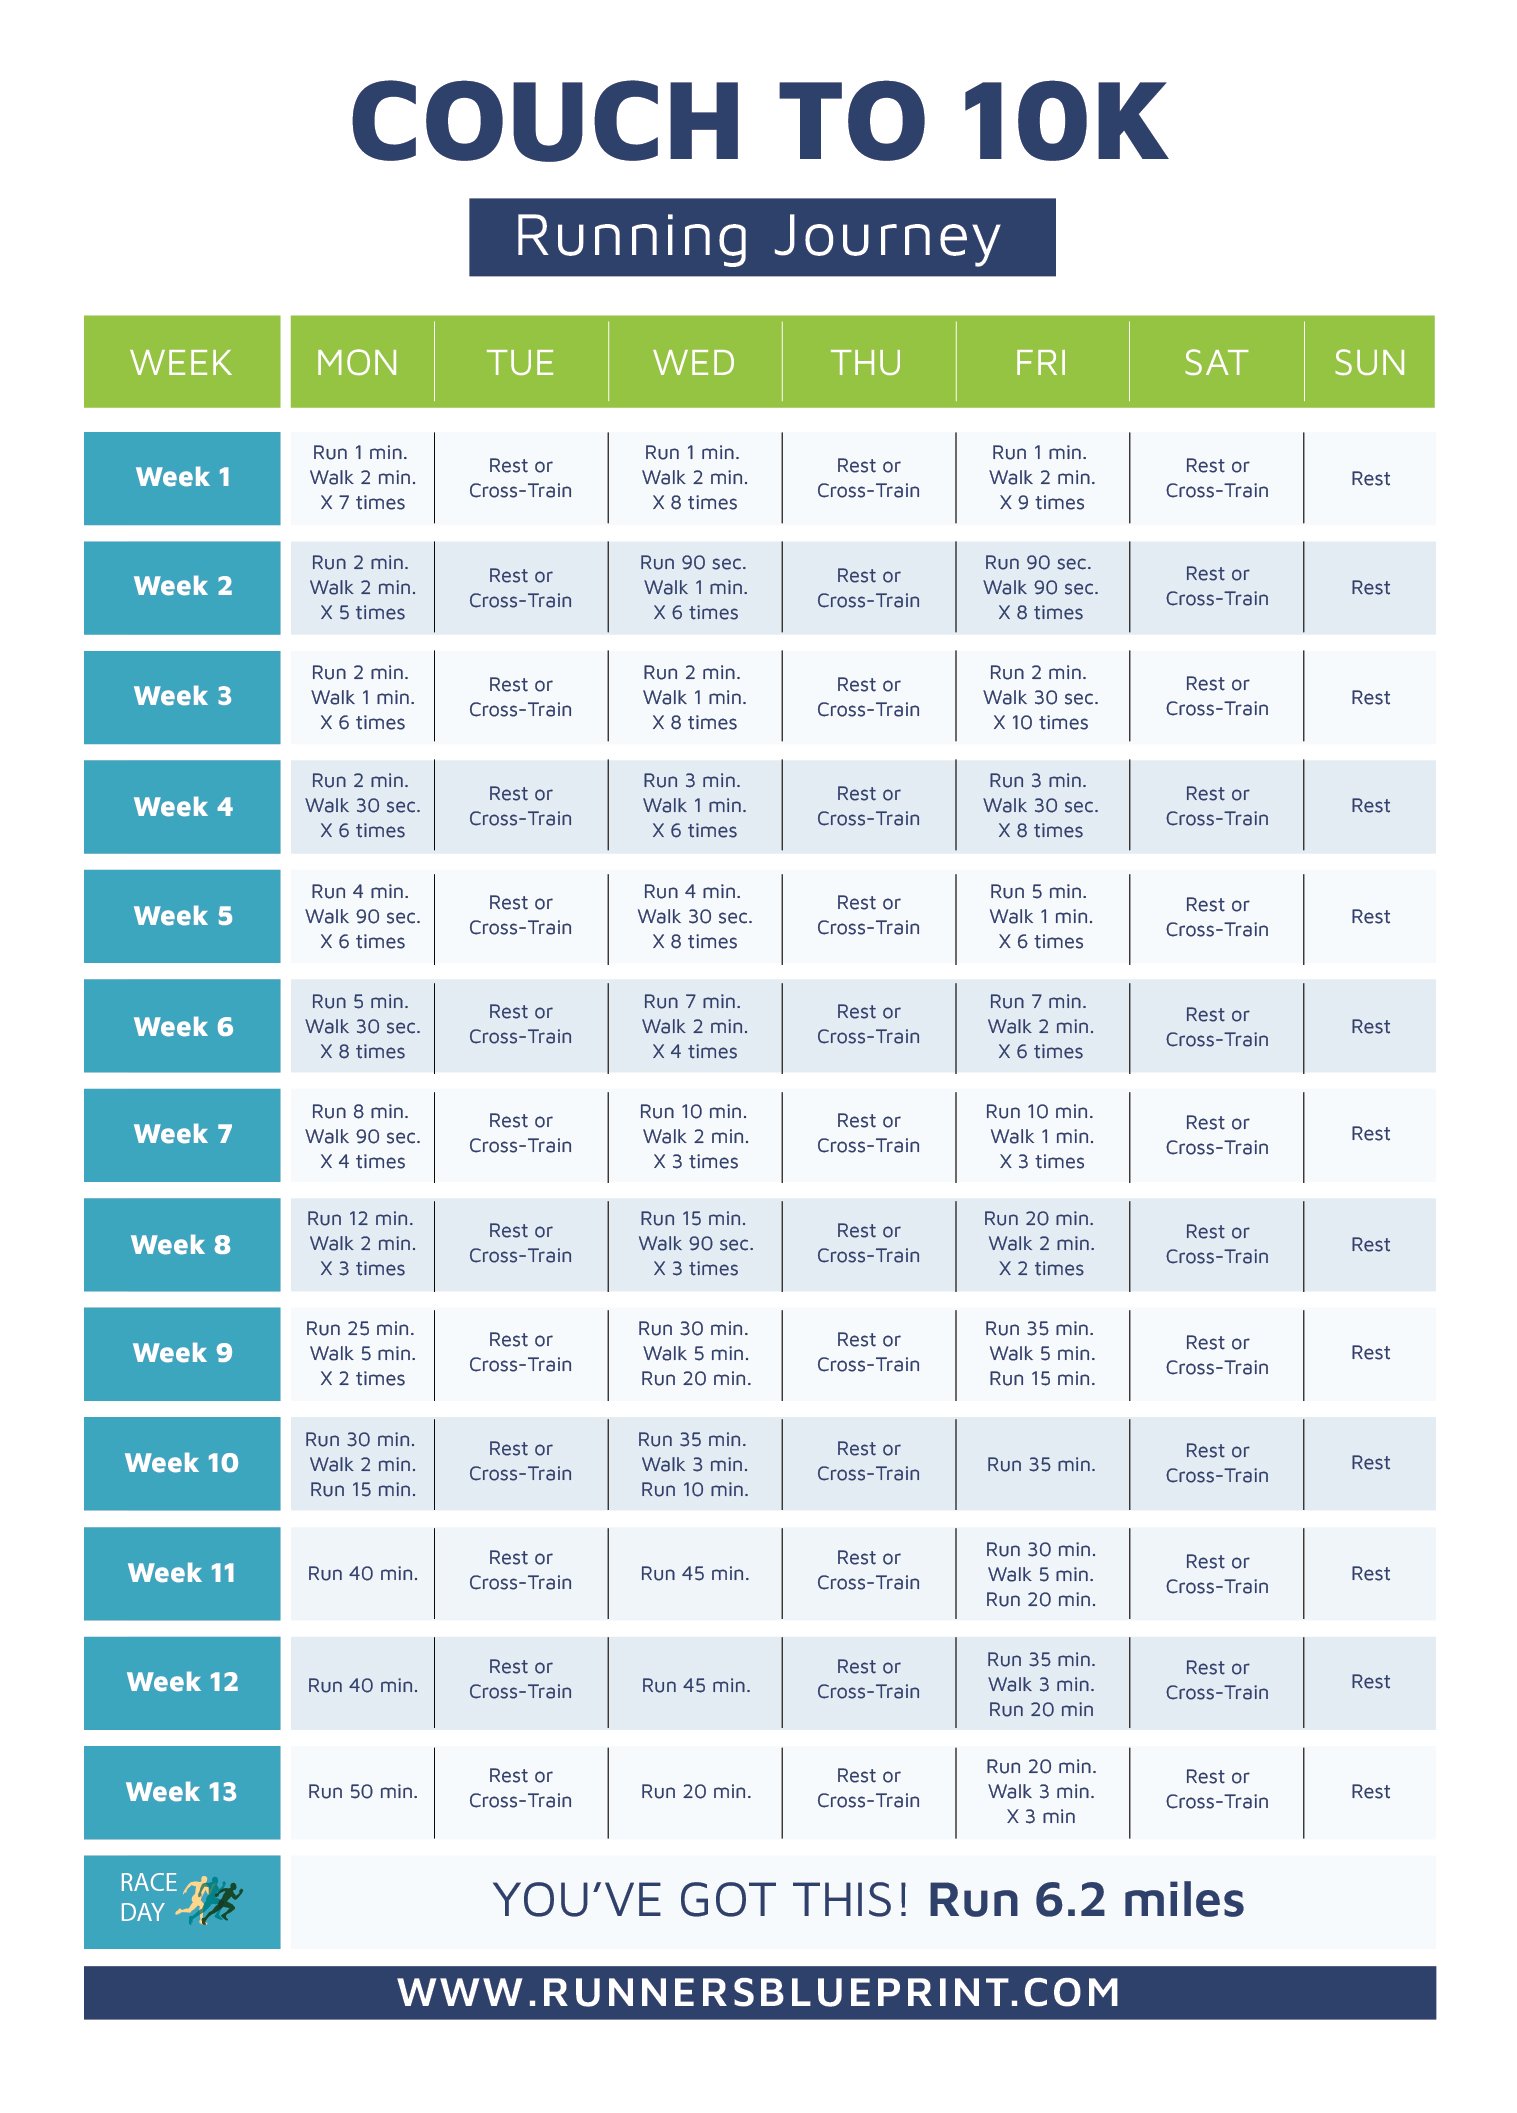
During the three months of training, you’ll gradually build your running time from 5 to 10 minutes in the first week to 40 to 50 minutes in the last week.

Each week includes one day of complete rest and 3 (optional) days for walking or cross-training, which can help you on your feet without risking burnout.

10K in miles

Note – If this 10K plan is too much for you, try my couch to 5K schedule instead.

10K Racing Tips For Beginners

More 10K beginner tips?

Why not.

You can prepare everything right during your training months only to blow it on race because of a stupid mistake.

Before jumping into the 10K race, keep the following guidelines in mind.

Recover Well

The last week before the big day, do your 50-minute long run.

But in the two to three days before the race, rest and let your body recover.

Sign Up Early

To keep training consistent, sign up for a race as early as possible.

That way, you’ll have a clear goal to work toward.

It’s like giving yourself a commitment contract to stick to your training plan.

There’s no turning back.

Once you’ve picked an event, then build your training volume gradually and slowly

Get Ready The Night Before

To keep your mind focused on the race instead of everything else, lay your running gear out the night before the race.

Then, try to get as much sleep as possible, aiming for 8 to 9 hours of high-quality, nonstop sleep.

I know some of you can get too excited and can’t sleep well before the due date.

Remember, recovery is vital for a good racing experience.

A sleepy runner is a lousy racer.

Pace Yourself During Your first 10K

During your first 10K, try to run the whole distance evenly. If you start off too fast, you’ll regret it in the end—assuming you’ll be able to make it up to the finish line.

The key is to start slow…really slow and gradually add your speed.

For example, if you plan to finish the 10K race in 60 minutes (a realistic goal if you ask me), plan to clear each kilometer marker at 6-minute intervals.

If you still feel you have more energy in the end, pick up the pace as you near the finish line.

You can also do a negative split.

Run the first 5K at an easy, very easy pace.

Then, once you’re past the 5K mark, gradually increase your speed and make each mile a bit faster so that once you reach the final stretch, you’re definitely at your Max.

Eat For Performance

Don’t starve nor stuff yourself.

On Race day, eat something that provides you with enough energy without upsetting your stomach.

For this reason, you’d have to test out different eating strategies during your regular weekday runs.

That’s how you’d know what works and what doesn’t.

There are a lot of meal plans, but you have to find what works best for you.

Listen to Your Body

This is the most important advice –whether you end up racing or not.

If you’re experiencing acute pain while racing, stop running immediately and seek medical help, but if you’re mildly sore, rest for a day and see how you feel.

If you just got a classic, not-so-serious running injuries such as blisters or chafing, then consider it a badge of honor and just push through.

Take your 10k training plan To the next level?

Already snatched a few medals or recorded a good timing and want to take things to the next level?

The following tips can help.

  • Train consistently. Real growth happens when you stick with your training for a long time. Training for a few months and then calling it quick after running your first 10K is a waste of timel. Instead, think bigger. I’m done with 10k, how about the half marathon or even marathon later?
  • Perform drills – instead of simply focusing on logging more miles, do speed drills that help boost your speed and endurance. This may involve performing interval training, hill reps, or temp workouts. Maybe you can finish faster on the next race? You never know your potential until you push yourself to your limits.
  • Improve your cadence. This refers to the number of steps you can take during one minute of running. Improving your cadence helps you run much faster with less risk for injury.

Bonus Tip: How Do I Become a Better Runner?

The answer to that question lies within my Runners Blueprint System.

Why?

My system was specially designed for beginners who either want to start running or take their training to the next level, but have little clue on how to do it.

And don’t worry, my ebook is written in a conversational, jargon-free, style. All you need to do is download it, follow the simple instructions, then start seeing results ASAP.

Here’s what it includes :

  • How to quickly and easily get started running (it’s indeed is easier than you’d think!)
  • How fast (or slow) should you go on your first sessions
  • The exact 13 questions you need to answer before you a buy a running shoe
  • The seven most common running injuries….how to deal with them before they progress into major ones!
  • The quick standing stretching routine that keeps you flexible even if you’re busy as hell
  • The 10-minute warm-up you must do before any session to get the most of your training
  • And much, much more.

 Click HERE to get started with The Runners Blueprint System today!

Conclusion

Now that you’ve crossed the finish line of this article, let me sum up the main points explained:

  • The 10K in miles is 6.2 miles.
  • You can train for a 10K whether you’re a beginner or a more advanced runner
  • The average finish time for 10K for beginners is around 50 to 80 minutes.
  • Following proper 10K training strategies is the best way to get you to the finish line.

Now not only that you know what’s a 10K in miles, but you actually have a practical 10K training plan.

That’s awesome.

But without following through and taking action, nothing will change.

So please start training now, and never deviate.

The rest is just details, as the saying goes.

Feel free to leave your comments and questions in the section below.

In the meantime, thank you for dropping by.

Compression Socks For Running – The Full Guide

how to choose Running Compression Socks

Are you thinking about suiting up in compression socks for your runs? Well, lace up your shoes and join the conversation!

Compression gear, once reserved for medical needs and long-haul flights, has taken a stride into the running world. Nowadays, it seems like every running aisle is stocked with compression socks, all boasting impressive benefits—increased power, turbocharged recovery, and race-ready performance.

But are these claims backed by science?

In this article, we’re going to unravel the science (if there is any) behind compression socks and how they might just give your running game a boost. Plus, we’ll throw in some practical tips on how to make the most of these snug companions if you decide to bring them into your running squad.

So, shall we get the compression conversation started?

What Are Compression Socks For Running?

Compression socks are specialized, snug-fitting socks designed to provide various benefits for athletes, especially runners.

Here’s a breakdown of what compression socks are and how they work:

Gradual Pressure: Compression socks are typically worn up to the knee and are designed to apply gradual pressure to different areas of the lower legs, including the veins on the surface, arteries, and muscles. The pressure is tighter at the extremities (like the calf) and gradually decreases as it moves toward the heart.

Enhanced Blood Flow: The compression from these socks is believed to improve blood circulation in the legs. By gently squeezing the veins and muscles, they assist in promoting blood flow back to the heart. This can be particularly beneficial during and after strenuous activities like running.

Reduced Lactic Acid Build-Up: Improved circulation may help reduce the build-up of lactic acid in the muscles. Lactic acid is a byproduct of intense physical activity and can contribute to muscle fatigue and soreness.

Faster Recovery: Many athletes wear compression socks during and after workouts to potentially speed up post-exercise recovery. The enhanced circulation and reduced muscle vibration (due to the snug fit) could contribute to reduced muscle soreness and faster healing.

Variety of Compression Gear: Compression technology is not limited to socks; it’s available in various forms, including shorts, arm sleeves, tights, tops, and more. The level of compression can vary based on factors like material, design, size, and individual preferences.

Availability: You can purchase compression socks and other gear over the counter at sporting goods stores or online retailers. In some cases, a doctor may prescribe them, and health insurance may cover the cost.

Compression Sleeves: If you prefer not to wear full socks, you can opt for compression sleeves, which cover the lower leg without including the foot portion.

What Are Compression Socks for Running Made Of

Compression socks designed for running are typically made of specialized materials that provide a balance between compression, comfort, and moisture-wicking properties. Here’s a breakdown of what these socks are commonly made of:

  • Nylon: The primary component of compression socks is nylon, making up the majority of the fabric (usually around 80%). Nylon is known for its durability and ability to retain its shape, crucial for maintaining consistent compression over time.
  • Spandex: Spandex (or elastane) makes up the remaining portion of the fabric, typically around 20%. Spandex is responsible for the elasticity and stretchiness of the sock, allowing it to fit snugly around the calf and foot while providing the desired compression.
  • Other Synthetic Fibers: In some cases, compression sock manufacturers may incorporate other synthetic fibers, such as polyester or Coolmax, to enhance moisture-wicking properties. These fibers help manage sweat and keep the feet dry during workouts.
  • Rubber: Some compression socks may include rubber components, such as silicone grip dots or bands at the top of the sock, to prevent slipping or rolling down during activity.

The Science Behind Compression

The science behind compression socks involves several key principles:

  1. Improved Blood Flow: Compression socks apply graduated pressure to the legs, with the highest pressure at the ankle and gradually decreasing as it moves upward. This design helps improve blood circulation, enhancing the return of deoxygenated blood to the heart and reducing the risk of blood pooling in the legs.
  2. Reduced Muscle Oscillation: The compression also serves to minimize muscle oscillation or vibration during physical activity. This can lead to reduced muscle fatigue and potentially lower the risk of muscle damage.
  3. Enhanced Recovery: Post-exercise compression socks may aid in the removal of waste products like lactic acid from muscles, which can help reduce muscle soreness and accelerate the recovery process.
  4. Maintaining Alignment: Compression gear can help maintain proper alignment of muscles and tissues, potentially reducing the risk of injury and improving overall performance.

Let’s delve deeper into the athletic gains.

How to Choose the Correct Compression Socks For Running

By now, you’ve likely made your decision about whether compression socks are worth considering for your running needs. These socks aren’t exactly cheap, with prices ranging from $40 to $120 for a quality pair.

Given the price tag, it’s essential to choose the right compression socks that meet your specific requirements. If you’re eager to head to the nearest sports goods store and pick up a pair, here are some tips to help you make an informed choice:

Gradual Compression

Let’s talk about “Gradual Compression.” Remember, we’re discussing compression socks here, not superhero costumes!

So, these socks are built with something called “gradient compression.” Fancy term, right? But here’s the deal: it means they’re smartly designed to give your legs the squeeze they need where it matters most – around your ankles, where the action’s happening.

But, they’re not playing favorites. Your feet get a break – no compression there! It’s like they’re saying, “Hey feet, we’ve got this.” So your dogs won’t feel like they’re in a vise.

Now, these socks come in different levels of compression, measured in mmHg. Don’t worry; it’s not a secret code. It’s just a way to tell you how much pressure you’re getting.

The golden rule here is to make sure your compression socks feel snug but not like they’re out to get you. We’re talking comfy snugness, not painful pinching. They’re here to support you, not to turn your legs into sausages.

How Tight Should Compression Socks Be?

Well, the secret code here is mmHg, which stands for millimeters of Mercury. Don’t worry; you won’t need a barometer. It’s just a fancy way to measure pressure – the kind you’ll feel on your legs when you put on those socks.

Think of it like this: the higher the mmHg number, the more they’re going to squeeze. It’s the same principle your doc uses to check your blood pressure, but on your legs!

Now, when you’re shopping for compression socks, you’ll see these numbers, like 8 mmHg, 15-20 mmHg, 30-40 mmHg, and so on. It’s like a secret language of squeezing!

Here’s the deal: for most folks, a sweet spot to aim for is around 18 to 24 mmHg. It’s like Goldilocks – not too tight, not too loose, just right.

Some smart researchers found that 20 mmHg at your ankles is just the right pressure to boost blood flow and max out the recovery perks. So, you see, there’s science behind all this squeezing!

Get The Right Size

The ideal fit for your compression socks is a snug one, just like your favorite pair of running shoes. If they’re too big, you might end up with some painful blisters, and if they’re too small, they could cramp your style – and your blood flow!

So, how do you find the perfect size? Easy peasy! Just match it up with your shoe size. If you’re not sure how to measure that, don’t sweat it; there are plenty of handy YouTube tutorials out there to guide you.

Length

Your compression socks should be like those trusty superheroes’ capes – long enough to cover your entire calf and shin, stopping just shy of the knee joint.

Too short, and they won’t give you the compression you need. Too long, and they might just decide to have a little showdown with the back of your knee while you’re out on a run!

To measure this correctly, kick off your shoes, and let’s get to it. Measure from the back of your knee’s bend to the floor behind your heel – this will give you the perfect length. And remember, accuracy is the name of the game here.

Ankle

Measuring your ankle, calf, and arch length is essential when selecting the right size and fit for compression stockings or socks. Here’s a step-by-step guide on how to measure these areas accurately:

Ankle Measurement:

  • Sit down and relax, with your feet flat on the floor.
  • Locate the narrowest part of your ankle, just above the ankle bone (medial malleolus).
  • Use a flexible measuring tape to measure the circumference of your ankle at this point.
  • Make sure the tape is snug but not too tight, ensuring an accurate measurement.

Calf Measurement:

  • While seated with your feet flat on the floor, find the widest part of your calf.
  • Measure the circumference of your calf at this point, using the measuring tape.
  • Similar to the ankle measurement, ensure the tape is comfortably snug for an accurate reading.

Arch Length Measurement:

  • Sit down and place your barefoot flat on the floor.
  • Identify the highest point in your foot arch, which is usually located in the center of your foot.
  • Measure the length from the point on top of your foot (where the arch begins) to the highest point in your foot arch.
  • Ensure the measuring tape follows the contours of your foot for an accurate arch length measurement.

Assessing Your Results

It’s crucial to use the manufacturer’s sizing chart specific to the brand you’re interested in when selecting compression stockings or socks. Each brand may have its own sizing guidelines and variations in sizing, so relying on a universal size (e.g., medium) can lead to improper fit and ineffective compression.

Here’s a summary of the steps to ensure you choose the correct size for compression stockings:

  • Measure your ankle, calf, and arch length accurately using a flexible measuring tape.
  • Refer to the sizing chart provided by the specific brand you’re interested in. Most compression wear brands offer their own sizing charts.
  • Compare your measurements to the sizing chart to determine the appropriate size for your compression stockings.

Selecting the right size is essential for achieving the desired therapeutic benefits of compression wear and ensuring comfort during wear. If you have any doubts or questions about sizing, don’t hesitate to seek guidance from the manufacturer or a healthcare professional.

The Right Materials

Look for compression socks made from technical, moisture-wicking fabrics. Common materials used in compression socks include nylon, polyester, spandex, and Coolmax. These fabrics help wick moisture away from your skin, keeping your feet dry during exercise.

Breathable materials allow air circulation, preventing excessive heat buildup and moisture retention. This is crucial to avoid discomfort and blisters.

What’s more?

Choose socks with a texture that you find comfortable against your skin. Some compression socks have cushioning in specific areas, which can be beneficial for runners.

Proper moisture management is essential to prevent chafing and blisters. Moisture-wicking materials move sweat away from your skin, promoting a dry and comfortable environment.

You should also be wary with color selection. While white compression socks are available, they can show dirt quickly. Opting for darker colors like black, beige, or navy can help keep your socks looking cleaner for longer.

how to choose compression socks for running


Compression Socks For Running  – The Conclusion

If you get anything from today’s post is that you should serious consider trying compression socks while running.

Are they the magic pill for improving performance? I don’t think so.

Do they help with recovery? Yes. As research suggests and experience dictates, yes of course. The rest is really up to you.

Please feel free to leave your comments and questions in the section below.

In the meantime thank you for reading my post.

Keep Running Strong

David D.

How to Get Rid of Shin Splints – The Ultimate Guide

Shin Splints pain

Looking for the best strategies on how to get rid of shin splints?

Then you’ve come to the right place.

Shin splints is a common overuse injury. According to the National Institute of Health, this condition is widespread among runners but also afflicts dancers, gymnasts, and military recruits.

Fortunately, this insidious injury is both curable and preventable.

In today’s comprehensive guide, I’ll dive into everything you need to know about shin splints, and that includes:

  • What are shinsplints
  • Shin splints symptoms
  • The mechanism behind the injury
  • What causes shin splints
  • Warning signs of shin splints
  • How to diagnose shin splints
  • How to treat shin splints
  • How to get rid of shin splints
  • And so much, so much, more.

Sounds great?

Let’s dig in.

The Anatomy Of Shin Splints

Shin splints is caused, in short, by a mechanical malfunction of one—or more—of the structures that make up the lower leg. That’s why understanding the anatomical makeup of the lower legs may improve your understanding of these causative variables.

In other words, it’s time for anatomy 101.

As you can see in the picture, the lower legs comprise many muscles, bones, and tendons. The primary structures of the lower leg affected by the pain caused by shin splints are:

The Tibia and Fibula

These are the two primary bones that make up the lower leg. The tibia is found on the inside of, the medial part, whereas the fibula is located on the outside, the lateral part, of the lower leg. The main function of these bones to support your knees, hips, and pelvis.

The Lower Leg Muscles

These include:

  • Soleus (Lower calf),
  • Gastrocnemius (Upper calf);
  • Plantaris (Upper calf);
  • Tibialis posterior (Upper calf), and
  • Tibialis anterior (Shin).

Together, the muscles move your lower leg as well as stabilize your foot and ankle. They’re all also associated—in one way or the other—with shin splints pain. Overuse of these muscles can cause a pull on the fibula and tibia bones, causing shin-splints-related pain.

The Definition Of Shin Splints

Shin splints can hinder your training whether you just took up running or are a seasoned marathoner. The pain is nagging, stubborn, and really, really, annoying.

So what are they all about?

Shin splints are the “all–catch” term commonly used to describe a wide range of lower-leg injuries and lower-leg exercise-induced pain.

More specifically, and also known as medial tibial stress syndrome, shin splints is an overuse injury infamous for nagging pain along the front—anterior—portion of the shin, usually toward the inside of the tibia bone.

In most cases, shin splints occur as a direct result of the repeated impact on the bone tissue, tendons, and muscles surrounding the tibia, leading to inflammation of the connective tissue. This tissue is known as fascia and it’s what covers and joins the muscles of the lower leg to the shin bone.

The injury is also pretty common. According to a survey, shin splints account for 10 percent of injuries in male runners and roughly 16 percent in female runners.

The good news is that shin splints are not a serious injury and can be treated with simple measures—provided that you pay heed to the condition early on before it gets any worse.

What’s more?

You can also do a few things to guard your lower legs against this condition, helping you prevent it in the long term (more on this later).


Symptoms Of Shin Splints

The main symptom of shin splints is a dull or aching pain in the front of the shins, usually felt in an area measuring roughly 5 inches in length on either side of the shinbone or in the muscles surrounding it. The pain may radiate from the tops of the feet up toward and through the knee.

In mild shin splints, you might feel pain at the first few minutes of a run but subsides after your muscles have warmed up. You may also experience discomfort if you press along the length of the bone. The condition can also be present in one or both legs.

In most cases, the pain is worse in the morning—especially right after stepping out of bed—since muscle tissue tends to tighten up overnight—with extreme inflammation and tenderness.

The shin bone might be painful on contact, and you might also feel actual bumps and lumps along the affected area..

In severe cases of the condition, this connective tissue can be under so much stress that it’s forced to split and separate from the shin bone, which is very painful and sometimes excruciating, involving a slow and long healing process.

Ignore shin splints can progress to a more insidious injury: tibial stress fracture.

Shin Pain is not Always A Shin Splint

As mentioned in the definition section, shin pain is not always a case of shin splints.

A host of other ailments and injuries plague the lower legs other than MTSS.

For example, pain and tenderness on the outside part of the lower leg might be blamed on compartment syndrome, which occurs when excessive pressure builds up within a “closed compartment,” leading to swelling and pain.

Another common injury that plagues the lower leg is what’s known as stress fractures—which are tiny cracks in the bones. This injury happens to have far more serious ramifications (and requires a longer recovery time) than shin splints.

How Are Shin Splints Diagnosed?

The best way to diagnose shin splints—as is the case with any other condition—is to consult a physical therapist or a sports medicine doctor and then perform a thorough physical examination, including an assessment of your training volume and physiology and training risk factors.

At least the basics have to be covered before you make any decision.

If you’ve been experiencing pain for long periods, you might need additional testing to rule out other conditions.

The most common method is a simple scan to help rule out a larger tear in the local tendons or a tibia stress fracture. A compartment pressure test can also be conducted to rule out chronic exertional compartments syndrome

Testing At Home

To check yourself for the condition, squeeze the lower two-thirds of your lower leg, including the shin bone and the surrounding muscular structure.

You’re positive if you feel pain, bumps, or lumps all along the bone.

In extreme cases, shin splints can become so bad that’s impossible to even stand or walk on the injured limb without experiencing excruciating pain.

Causes of Shin Splints

It’s hard to pinpoint the exact cause of shin splints, but, like most overuse injuries, it always goes back to doing too much too soon.

Specifically, beginners who take up running for the first time or those returning to the sport from a break or injury who increase their mileage too fast are at risk of developing shin splints.

Here’s the truth.

Your body needs time—and a lot of it—to adapt to the high-impact stresses of running.

Running, as well as other forms of high-impact exercise, causes micro-tears in your muscles. These are harmless when you take plenty of recovery since muscle fiber heals between workouts.  That’s one reason I always say that recovery is as important as the training itslef. There’s no way around that.

But, when you increase your training load too quickly—whether it’s ramping up speed, mileage, or both—you’ll cause more drastic tears in the muscle fiber or postpone recovery of the normal micro-tears in the tibialis anterior.

Subsequently, you accumulate more damage, leading to more weakness and inflammation. This, as you can already tell, sets the stage for injury.

Here are some of the main factors that can lead to the overload of the muscles in the lower legs:

Weak lower body muscles, especially hips and calves. Research has found a link between shin splints and weak hip abductors.

Poor running form, e.i. Overstriding, too much heel striking, etc.

Downhill running. It’s believed that too much downhill running can put a lot of stress on the muscles of the front of the tibia.

  • Running in improper footwear
  • Running on hard or unstable surfaces, like concrete, sidewalks, or snow.
  • Biomechanic issues, such as being flat-footed.
  • Runners with lower bone density—especially female runners.
  • A high body mass index
  • A history of overuse injury

How To Treat Shin Splints

Treating shin splints—as well as other overuse injuries—should start with the RICE method.

Although shin splints are not serious, treating them before they become a chronic, debilitating injury is vital.

The moment you come down with symptoms, do the following:

Rest

Rest is key since shin splints result from repetitive stress being applied to the lower legs, so any more high-impact activity will only exacerbate the condition.

As a rule, avoid doing any type of running (and any other high-impact exercise) until you can do it pain-free.

Instead, stop running altogether, or, at least, drastically reduce your weekly mileage as long as there is pain.

Ice Therapy

Ice the affected area for 15 to 20 minutes three to four times daily to reduce pain and swelling.

And keep icing it daily until the injured area is no longer inflamed or/and painful to touch.

Medication

In cases of severe pain, consider taking Nonsteroidal anti-inflammatory drugs ( NSAIDs), like aspirin or ibuprofen, to soothe the pain and speed up recovery.

But be careful not to overdo it.

Research shows that these over-the-counter pills have side effects, like ulcers. That’s why you should only take them for a short period, preferably under the guidance of a certified physician.

How Long Does It Take To Recovery From Shin Splints

I don’t have the exact answer since recovery time depends on how long and severe you’ve had the symptoms.

But overall, expect the following recovery periods:

  • Symptoms for less than a month – Expect three to four months to fully recover.
  • Symptoms for one to three months – Expect four to six months for a full recovery.
  • Symptoms for more than three months – Expect more than six months for a full recovery.

During the downtime, you might opt for an alternative, low-impact exercises such as spinning, swimming, pool running, elliptical machine, weight lifting, or yoga to keep your fitness in check.

If the pain persists and symptoms fail to improve (despite taking the right RICE measures), seek immediate medical assessment to check for other causes for your stubborn shin pain.

As you can already tell, shin splints do not heal that fat, but the earlier you get the right treatment, the quicker your recovery will be. The rest is just details.

Scoring a Running Comeback

As a rule of thumb, you must slowly re-start your running engines.

In other words, avoid rushing back into training. If you start to exercise before your shin completely heals, you may risk a flare-up, and you don’t want that.

Once you return to training, avoid hard surfaces or steep hills until you are sure that the shin pain has gone away completely and you have fully recovered.

How to Get Rid of Shin Splints

My motto when dealing with a running injury is “prevention is better than cure.”

Hence, prevention should always be your first objective. Preventing shin splints should involve following sound training strategies such as progressive mileage increase, strengthening the muscles of the lower legs, and using proper running footwear.

Let’s discuss a few.

Start Slow

The first rule to prevent all sorts of sports injuries is to avoid the “three too’s” trap—doing too much, too soon, too fast.

Sudden increases in training volume/distance/intensity can overwork your lower legs, making you more prone to various injuries.

So, instead of falling into this classic trap, increase your distance and speed gradually and slowly over time.

For the complete beginner, start with the walk/run method. This consists of 20 to 30 minutes alternating between jogging and walking every other day.

For the full guide on this method, check my post here. But what if you’re already a regular runner? Then stick with the 10 percent rule.

That’s the golden principle to abide by whenever you want to increase training duration and intensity.

And it’s quite simple.

The 10 percent rule states that you should never increase your weekly training load by more than 10 percent from one week to the next.

Strength Train

Strengthening your lower leg muscles may help prevent this common injury by making them stronger, increasing their ability to handle the impact. Your main goal is to increase your calf muscles’ localized muscular capacity and your tibia’s bone load capacity.

So what kind of exercises you should be doing to prevent shin splints?

Simple. Strengthen your feet, ankles, calves, and hips, which support your shins.

The following exercises are exactly what you need.

Not only will they help you prevent future flare-ups, but they are also effective at relieving pain if you’re already afflicted.

You can perform the following exercises as either a part of your warm-up sequence or as a routine in itself two to three times per week.

Perform 12 to 15 repetitions of each exercise in sets of two to three.

Straight-leg Calf Raise

Toe Raises

Eccentric Calf Raises

Heel Walking

Stretching

Although the science is still hazy on the effectiveness of stretching in preventing injury, I’d still recommend it as a part of a proactive injury prevention protocol.

According to theory, stretching the posterior leg muscles (especially the calves) along and the muscles surrounding the shin bone (especially the anterior tibialis) may be effective at keeping shin pain at bay.

Here are a few of the stretches

Standing Shin Stretch

The anterior Shin Muscle Stretch

The Toe Alphabet Stretch

Trace the alphabet with your toes.

The Calf Stretch

Fix Your Form

Improper running form is often blamed for shin splints. Bad form can disrupt your kinetic chain, triggering biomechanical dysfunctions that may cause symptoms to recur even if you resume running slowly.

Here’s how to improve your running technique.

Here are two measures to take:

The first thing you need to do is to avoid heel striking—or landing heels first when running.

According to theory, the heel strike places excessive stress on the lower leg.

Heel striking causes the foot to slap down on the pavement, forcing the lower leg muscles to work harder than usual.

This may place excessive stress on the lower legs, increasing the risks of shin splints and other running-related injuries.

Also, heel striking often leads to overstriding.This may increase injury risk and reduce running efficiency.

Here is an awesome YouTube tutorial explaining the difference between heel striking and midfoot running.

Next, shorten your stride. If you have a terrible history of shin splints, then consider slightly shortening your normal stride—roughly 10 percent.

Research has revealed that subjects who shorten their stride by 10 percent reduced the risks of tibial stress injury by three to six percent.

The Reason?

By shortening your stride, you’ll be landing softer with each foot strike, thus, experiencing reduced impact.

So, invest at least a couple of weeks purposely running with a relatively short stride.

Lastly, improve your cadence, which is the number of steps you take per minute.

It’s also known as leg turnover.

To determine your cadence, count your foot strikes on one side for one minute, then multiply that by two.

A good number is 170 to 180 strikes per minute—depending, of course, on your biomechanics and training speed/intensity.

For the full guide on cadence, check my post here.

Wear The Right Shoes

Training in ill-fitting or worn-out shoes are a leading cause of injury. Proper foot wear helps reduce running-related high-impact stresses, whereas a worn-out or ill-fitting pair won’t.

Choose stable, supportive, running shoes that suits your individual needs. A good pair should have the right mix of shock absorption and support for your running needs and anatomy.

Rather than buying your shoes online or at a sporting goods store, head to a running specialty store.

The expert staff will assess your unique biomechanical and gait type and make the most appropriate recommendations.

Also, replace your sneakers every 400 to 500 miles—or at least every year if you do not log serious miles weekly.

Try Compression Socks

According to research, compression garments may help limit inflammation and swelling around damaged muscles, tissues, or bone.

Not only that, but research has also found that it reduces muscle damage and may speed up recovery following a hard workout.

For these reasons, compression gear, especially compression socks, might effectively treat and prevent shin pain.

Of course, no conclusive research has proved that compression socks are effective at preventing shin splints.

But I believe it’s worth considering—especially if you don’t mind investing a $50 to $70 per pair.

Just get the right compression socks. Make sure they fit well, giving your calves a tight squeeze while promoting blood flow to the region and not feeling too constrictive.

Also, get a pair with the right amount of compression per sock.

According to research, shooting for 20 to 24 mmHg at the ankle is ideal.

Plus, make sure they are made with technical, high-performance fabrics that are breathable and look good.

Foam Roll or Massage

According to many experts, foam rolling is one of the simplest yet effective ways of dealing with shin pain (and other overuse injuries).

How does it Help?

In essence, foam rolling is a form of self-myofascial release or self-massage that removes adhesions in the muscles and connective tissue.

Left unchecked, these adhesions can create points of weakness in the tissue, leading to susceptibility to pain and injury.

And you don’t want that.

Further, foam rolling also reduces muscle tension, promotes blood circulation, and increases mobility, which are key to faster recovery and injury prevention.

Of course, foam rolling might feel tight or painful at first, but this is a good sign.

Be sure to roll your shins and calves for 30 to 60 seconds, then take breaks of an equal period.

Repeat the process four to five times, at least five times per week.

Check out this YouTube tutorial:

Try Acupuncture

Another possible way to get rid of shin splints is Acupuncture.

Based on the principles of traditional Chinese medicine, Acupuncture involves sticking thin needles into particular energy points, releasing a variety of substances, including serotonin, endorphins, etc.

This can help alleviate pain and inflammation.

Research published in the Journal of Chinese Medicine revealed that Acupuncture could be quite effective in treating symptoms associated with shin splints, especially during the early stages of onset.

The researchers found that acupuncture treatment—twice weekly for three weeks—is more effective at treating shin splints than physiotherapy and the use of anti-inflammatories when treating this condition.

Rest and Recovery

As I have stated, the leading cause of shin splints—and most overuse running injuries for that matter—is overuse. As a runner, you should have already realized the time between runs is as important as the training itself. There’s no way around that.

Your body repairs itself and returns stronger during this recovery time. However, skipping on it can result in musculoskeletal issues, which, in turn, can become very painful and take much longer to heal properly.

As a result, sometimes, the best course of action to take in the presence of shin splints is to stop running altogether.

Just don’t get me wrong.

This does not mean giving up all physical exercise altogether either.

Just because you’re dealing with shin splints does not mean the end of your training.

Instead, do plenty of cross-training exercises, opting for activities that do not put excessive stress on the injured limb, such as cycling, swimming, etc.

Then, once your symptoms subside—likely in a matter of a couple of weeks— slowly reintroduce, running into your training program.

Just make sure to listen to your body the entire time, paying attention to any signs of pain or tenderness during and after training.

Seek out Professional Help

If the above measures prove futile in your quest to get rid of shin splints, then you SHOULD seek the help of a professional health provider.

Biomechanics can contribute to shin splints, whether you’ve severe muscle imbalances, tend to overstride, or have poor posture.

These are not the issues you can solve on your own, especially if you don’t know what type of underlying issues you’re dealing with in the first place.

Hence, you require outside help—not from a blog or a magazine article—but from a real certified professional.

I recommend visiting a podiatrist or physical therapist with experience helping out runners.

They should assess your running form and biomechanics and see if it’s possible to single out what might be contributing to or causing your pain.

Then, once a clear conclusion is reached, prescribe specific drills, stretches, and strengthening exercises to help fix the underlying issue(s).

You can also experiment with treating your shin pain with electrotherapy methods, such as electronic muscle stimulation, therapeutic ultrasound, or microcurrent.

In addition, consider taping the injured limb with medical-grade tape. Research has shown that it can decrease swelling, increase the range of motion, and provide support for the muscles of the lower leg.

Conclusion

There you have it! If you’re dealing right now – or have a history of – shin splints, then today’s article should get you started on the right foot when it comes to treating and preventing the condition. The rest is just details.

Please feel free to leave your comments and questions in the section below.

In the meantime thank you for dropping by.

Keep running strong.

David D.

8 Ways to Increase Lung Capacity For Running

runner tyring to improve Lung Capacity

Are you ready to take your running to the next level? Then you need to understand the importance of lung capacity.

Think of your lungs as the engine of your body, powering you through every step of your run.

Your lung capacity determines how much oxygen you can take in and how much carbon dioxide you can expel.

Without strong lungs, your body can’t perform at its best, and your running goals may seem out of reach. But don’t worry, with the right strategies, you can boost your lung capacity and achieve your running dreams.

In this post, I’ll dive into the many strategies that can help you increase your lung capacity for running. I’ll provide you with research-backed advice to guide you toward running farther, faster, and with less fatigue.

Whether you’re a seasoned runner or just starting, increasing your lung capacity is a great way to boost your performance and feel more powerful and stronger. So, let’s get started!

What is Lung Capacity?

Imagine your lungs as two balloons. The bigger the balloons, the more air they can hold. This is exactly how your lungs work.

Lung capacity is the amount of air your lungs can hold, and it’s a vital factor in determining how well you perform in cardiovascular activities, particularly running. The larger your lung capacity, the more oxygen your bloodstream can receive, and the more efficient your body becomes at converting that oxygen into energy.

Unfortunately, just like any other organ, our lungs start to deteriorate with age, and our lung capacity typically begins to decrease after we hit our 30s. If you have a preexisting health condition like chronic obstructive pulmonary disease (COPD), this process can happen even faster. But don’t worry, there are many things you can do to improve your lung capacity and, ultimately, your overall health and well-being.

8 Ways to Increase Lung Capacity For Running

Without further ado, here are eight strategies to help you improve lung capacity for running.

Start Slow

Have you ever found yourself gasping for air while running, even with perfect technique? It turns out that lack of conditioning is often the culprit, especially if you’re new to running.

When you run, your muscles require more oxygen, and the more you push your body, the more oxygen you need. This can cause you to become exhausted earlier than you’d like.

So, what can you do to improve your lung capacity for running? The key is to start slow and keep it at a conversational pace. You should be able to speak in full sentences without gasping for air. Once you can do this for 30 minutes straight, work your way up to more challenging sessions.

Here are a few effective strategies to help you increase your lung capacity for running over time:

  • Run a longer distance at a slower pace. This approach can help increase your red blood cell count, grow more capillaries, and strengthen your heart, which is a muscle, after all. By gradually increasing the distance you run, you can gradually build up your endurance and improve your lung capacity.
  • Run more frequently each week. When you run more frequently, you provide your body with enough stimulus to build more cell mitochondria and capillaries. This, in turn, allows more oxygen to course through your bloodstream, ultimately improving your lung capacity and endurance.
  • Consider cross-training. Engaging in cardiovascular activities like cycling, swimming, and skiing can help push your endurance without putting too much stress on your body. This can help you improve your lung capacity without risking injury or burnout from running too much.

Learn Deep Breathing

Breathing is an essential part of running. Deep breathing, in particular, can help you increase your lung capacity and improve your endurance. But did you know that most runners breathe from their chest instead of their bellies? It’s like trying to fill a balloon by blowing air into the nozzle instead of using your whole mouth!

To fully engage your lungs and diaphragm, practice deep breathing. The diaphragm is a muscle shaped like a jellyfish or a parachute that sits below the lungs and helps you breathe. When you take a deep breath, your diaphragm pulls down on the abdominal cavity, inflating your lungs with maximum air. On the exhale, it deflates, squeezing the air out.

Belly Vs. Chest Breathing

Most runners tend to breathe from their chest instead of the belly.

Don’t you believe me? Go run a mile at a challenging pace, then place your hand on your belly and the other one your chest, then watch.

You’re breathing right if the upper hand stays relatively still while the lower hand is moving on each breath, which is more than often not the case.

Also known as shallow or thoracic breathing, chest breathing occurs when the act of respiration originates from the top lobes of the lungs.

When breathing this way, you expand and contract the chest but without engaging the diaphragm, which in turn, draws in minimal air into the lungs.

Here’s how to practice deep breathing in the comfort of your own home.

1 –  Start out lying flat on your back, chest open, and shoulders relaxed. Keep one hand resting on your chest and the other on your belly.

2 – Breathe in slowly, spending about ten seconds on your inhale. Visualize your lungs filling up with air. Feel the air moving into your chest, stomach, and abdomen.

3 – Once your lungs are full of air (you might feel mild discomfort in the solar plexus middle of your torso), hold your breath for a count of ten, then exhale slowly for ten seconds through pursed lips while pulling your belly button to your spine.

And that’s it! By repeating the exercise over and over again, you’ll teach your body how to rely more on the diaphragm for the act of respiration. This, in turn, should help you increase lung capacity for running.

Breathing Exercises

Looking for more breathing exercises? I’ve got you covered.

The breathing exercises described below can increase strength in your respiratory muscles and help build endurance.

That, in turn, will improve lung function.

Long-term result?

Improved running performance.

Winner winner, chicken dinner!

These breathing exercises are simple and can be done anywhere.

Feel free to do them at home, at work, during your commute, or, preferably, as a part of your warm-up routine.

Repeat each exercise three to five times.

Bhastrika Pranayama (bellows breath)

Rib Stretch

Abdominal Breathing

The 4/7/8 Technique

Kapalbhati Pranayama (Breath of Fire)

Pilates Exercises

Breaking away from chest breathing is easier said than done, especially when you’re busy running, trying to keep pace.

But it’s not all doom and gloom.

One thing you can do to help you practice deep breathing while exercising is doing Pilates.

Pilates exercises are a form of cross-training that improves endurance without putting too much stress on your body.

They are also ideal for improving lung capacity.

Pilate exercises focus on isometric exercise.

It deliberate breathing patterns to increase muscle strength, build mobility, and improve posture.

More specifically, Pilates exercises to strengthen all the muscles of the core—including the diaphragm and the intercostal muscles, which are super useful for your breathing.

Practice the exercises below two to three times a week, either as a part of your cool down or as a stand-alone routine.

You might find some similar positions in yoga but with different names.

  • The Swan
  • The Standing Chest Expansion
  • Spine Twist

Breathing While Running

“Should I breathe through my nose, my mouth, or both?” This is a common question in the running world.

My answer makes everybody happy: use both pathways.

When you’re running, you should focus on getting as much air as possible into your lungs so that the oxygenated blood can meet your muscle’s needs.

Don’t know how to make that happen? Try the following:

Open your mouth—preferably in a “dead fish” position.

The mouth is larger than the nostrils, so it’s more effective at drawing in oxygen and expelling carbon dioxide.

Rhythmic Breathing

If you want to run like a pro, try rhythmic breathing, which is the practice of coordinating your inhales and exhales to your foot strikes.

It’s not as complicated as pranayama.

For example, a 2:1 breathing ratio means taking two steps on the inhale and one step while breathing out.

The exact ratio to follow depends largely on your training intensity, fitness level, speed, and personal preference.

The rhythmic patterns I recommend for beginners are 2:2 and 2:3.

These work well for training at slow to moderate intensity.

To take your breathing power to the next level, I’d recommend taking up yoga.

To get started on the right foot, try a paid subscription service that can cost you up $10 to $15 a month (but worth it).

Additional resource – Your guide to Runners cough

Advanced Tactics For Expanding Lung Power For Running

By now, you have all the tools you need to increase lung capacity for running.

But if you still want more, check out the following.

Altitude Training

Altitude training is a technique used by elite athletes from different sports for a reason – it works. At higher elevations, the air contains less oxygen, forcing your body to compensate by triggering red blood cell and hemoglobin production. This increase in oxygen-carrying capacity and your body’s ability to use oxygen can improve your running performance. Once you return to lower elevations, your body maintains this increased level of red blood cells and hemoglobin for up to two weeks.

But be careful! Altitude training can be dangerous if you don’t give your body enough time to adjust to the thinner mixture of oxygen in the air. You may experience symptoms of altitude sickness, such as gasping, fatigue, and dizziness. If you can’t go on, don’t force it. Overdoing it can damage your respiratory tract.

Respiratory Training Equipment

Another strategy is respiratory training equipment, which partially blocks airways, simulating high-altitude training. While it can be effective, it’s neither easy nor cheap to access some of these tools. Overuse of these tools can also lead to overtraining, which is why it’s not recommended unless you’re a pro athlete.

Some tools include:

  • Hyperbaric sleeping chambers
  • Low-oxygen tents
  • Swimming while using a snorkel with restricted airflow
  • Working out with a hypoxic air generator
  • Portable hypoxic machines

There’s one important caveat.

It’s neither easy nor cheap to get access to some of these tools.

A good hypoxic mask may be within your budget—they retail for under $100.

You also risk overtraining when you overuse them.

That’s why, unless you’re a pro athlete making a living out of running, I don’t see any reason to turn to hypoxia training.

Additional Resource – Running and pollution

Keep Your Lungs Healthy

All of these tips will be of no use if you neglect your lung health. The best thing you can do to improve your lung function is to simply take good care of your lungs.

The following tips will help keep your lungs as healthy as possible.

  • Stop smoking. Unless you’ve been living under a rock for the last 40 years, you already know that smoking is bad for your health.  Research has shown that smoking is a major cause of lung cancer, lung diseases, and chronic obstructive pulmonary disease (COPD).
  • Eat healthily. Choose foods rich in antioxidants, such as leafy green and cruciferous vegetables. They contain many healthy compounds that can help rid your body of harmful toxins. Broccoli, cabbage, and cauliflower are good examples.
  • Get vaccinated. I’m not going to argue about vaccines’ pros and cons, but we didn’t get rid of polio by accident. Shots like the pneumonia vaccine and the flu vaccine can go a long way in preventing lung-related issues and promoting overall health. Make sure to contact your GP before deciding.
  • Improve air quality. By keeping your home well-ventilated, reducing pollutants like artificial fragrances, using a humidifier, and getting rid of mold.

Additional resource – Guide to Urban running

Don’t Hesitate to Seek Medical Help

If you’re dealing with symptoms of poor lung health, such as pain when breathing, shortness of breath during daily activity, or persistent coughs, contact your doctor.

The earlier you receive treatment for your lung problems, the sooner you’ll heal, and the better the outcomes are likely to be.

Remember that your lung consists of pocketed air sacs, so be careful.

Don’t dismiss everything as simple as a common cold.

What’s more?

It’s always a good idea to consult your doctor before trying any new exercise, especially running.

This is especially the case for beginner runners with underlying health conditions, such as COPD , asthma, or other obstruction diseases.

Increasing Lung Capacity for Runners – The Conclusion

In conclusion, increasing your lung capacity is crucial for taking your running to the next level. Your lungs are like the engine of your body, supplying the necessary oxygen for optimal performance. By understanding the importance of lung capacity, you can work towards achieving your running goals and surpassing your limits.

Remember, before embarking on any new exercise or training regimen, especially if you have underlying health conditions, it is advisable to consult with your doctor. Additionally, if you experience symptoms of poor lung health, seek medical help to receive proper diagnosis and treatment.

By implementing these strategies and caring for your lungs, you can expand your lung capacity and unlock your full running potential. Embrace the journey of improving your lung capacity, and enjoy the benefits of increased endurance, improved performance, and overall well-being in your running endeavors.

Thank you for dropping by.

Keep training strong

David D.

Running Cadence – What’s The Ideal Stride Turnover

do you want to improve running cadence?

If you want to improve your running speed while cutting injury risk, increase your running cadence.

That’s why stride cadence has become one of the key things to monitor and improve on among both elite and recreational runners.

There’s plenty of ways you can improve running cadence, but I’ve found seven that are simple, effective, and easy to implement.

But first things first, let’s delve a little deeper into cadence itself and why it matters so much.

Let’s get this ball rolling.

What Is Running Cadence?

Also known as stride rate, or leg turnover, cadence is the number of steps you take during a given period, typically measured per minute (SPM).

Running cadence is one of the most common metrics used to assess running form and remains crucial for several reasons (some of which I’ll discuss in today’s post).

Swimmers and cyclists have tracked their RPMs for decades, but the practice of monitoring running cadence only became a thing in the last few years.

Factors that determine stride rate include height, weight, fitness level, leg and stride length, etc.

What’s The Average Stride Turover?

In general, recreational runners take roughly 160 to 170 steps per mine, whereas elite athletes have cadences of 180 per minute or higher (with some reaching 200spm at their fastest speeds, when sprinting for instance).

Factors that determine your running cadence include height, weight, fitness level, leg, and stride length.

Cadence as a Sign of Good Form

One of the most common running form mistakes I see in many runners is the overstriding. When you overstride, you’ll tend to lock your knees and slam your heel hard on the ground on every foot strike.

Get this: overstriding won’t make you go faster. Instead, it’ll slow you down, creating a choppy, bouncy gait, and places additional pressure on muscles and bones, increasing the risk of injury.

Here is the good news

One way to fix overstriding is to increase your running cadence. By doing so, you’ll be taking smaller steps, with each foot landing underneath your hips, thus, within your center of gravity.

Increasing cadence can also result in more efficient running as you translate that energy into forward momentum.

Don’t get me wrong. This is not just anecdotal evidence nor simply my own observation. The fact is, science backs this up.

Prevent Running Injury—The Research

There’s plenty of research that has been devoted to running cadence, some of which have found strong links between leg turnover and injuries.

Let’s look at some of them.

A study published in Medicine & Science in Sports & Exercise has provided evidence that subtle increases in cadence can reduce the energy absorbed by a runner’s weight-bearing joints.

The researchers recruited a group of young athletes to run on the treadmill at different step frequencies using a metronome.

runner improving Running Cadence
The Ideal Running Cadence

The subjects were told to run as their usual cadence, faster than their usual cadence, and slower than their usual cadence, and then, while using three-dimensional kinematics, the researchers looked at the impact forces going through the hips, knees, and ankle joints.

The Conclusion?

When the participants adopted a running cadence around 15 percent faster than their preferred step frequency, the load on their weight-bearing joints significantly decreased.

This, as the researchers hypothesized, may help prevent common overuse running injuries.

What’s more?

Researchers out of the University of Wisconsin-Madison have reached a similar conclusion.

They examined the link between running cadence and impact concluded that mild increases in running cadence could drastically lessen the stress shock to the knee and hip joint during running. This may work very well in the treatment and prevention of common running overuse injury.

Here are more links to further research.

Link 1

Link 2

Link 3

Link 4

Link 5

What is the Ideal Running Cadence?

According to conventional thinking, a good running cadence is roughly 180 steps per minute.

But here is the truth. Contrary to popular belief in most running circles, there is no such a thing as an ideal, universal, running cadence.

The Origins Of The 180spm Myth

According to conventional thinking, the magic number when it comes to cadence is 180-or so, but is it true? Where does that number come from?

Certainly, it didn’t come out of thin air. The 180- rule was first observed at the 1984 Los Angeles Olympic Game by Jack Daniels.

During these Olympics, the world-renowned exercise scientist looked at the total stride rate of Olympic runners and found that the fastest and most efficient runners took at least 180 steps per minutes, with some reaching as high as 200 SPM, regardless of their size or gender.

Unfortunately, as far as I can tell both from my personal experience and the research, most of Daniel’s work has been taken out of context whenever his work is cited to back up the  180 SPM rule.

The 180-SPM Debunked

Jack Daniel’s conclusion isn’t a universal rule. It doesn’t mean that every runner, especially recreation runners, MUST have a 180spm cadence.

Here’s the truth. The 180-SPM rule represents the statistical average of an efficient running cadence. You may take slightly fewer or more steps per minute, and you won’t be breaking any “running commandments.”

What most recent studies found is that cadence is not a one-size-fits-all. It, in reality, hinges on many factors, such as pace, etc.

These differences mean that works the best for one runner (or a bunch of elite Olympic runners for that matter) may not necessarily work for all.

What you should do instead, according to scientists in the field of biomechanics,  is to measure your cadence and set a goal to increase by five to ten percent—even if it doesn’t result in a 180 SPM number.

Running Cadence – What’s The Ideal StrideTurnover & How to Improve it

Now that you have a clear understanding of what cadence is as well as the many factors that affect it, you can work on improving it (if need be).

Here are a few guidelines that can help.

Find Your Running Cadence

The first step to improve your running cadence is to first figure out your current leg turnover.

As previously stated, the exact number will vary, mainly, according to the type of run you’re performing. During faster-pace training, chances are your cadence will be quicker and faster than during long or recovery runs.

For instance, your racing/speed training cadence will be faster than your basic training level. Your leg turnover will also be different up or downhill sections.

For that reason, you’d need first to set your cadence zones up by determining your leg turnover for various paces, including recovery runs, 5K training, tempo running, marathon, etc.

The Basic Run Cadence Test

Find a smooth, flat surface to perform the test. I recommend a long stretch of road or track. Next, after a thorough warm-up, get in your usual running pace. Then, count the number of foot strikes you take per minute with both feet.

To make it easier, pick either your right or left foot, then count the number it hits the ground in a minute. Next, multiply that by two to get the total number of steps.

Example. Let’s imagine yours was 77. Double that to get the total steps taken by both feet, which is 154. That’s your cadence for that specific running speed.

The Multi-Pace Cadence Test

Hop on a treadmill, then after a 10-minute warm-up, increase your speed by 30-second per mile until you reach your easy training pace.

Next, give yourself two to three minutes to adjust to the speed, then count your steps for one full minute.

Record the number, then speed up to your next pace.

You can also do this on a track, but doing it in the controlled environment of a treadmill is more accurate—especially if you already know your average pace.

Increase Your Leg Turnover By 5 to 10 Percent

Now that you have a number, you can gradually work on improving your current cadence for various types of runs.

I hate to sound like a broken record but, just like anything training related, it’s essential to take it slow.

According to a University of Wisconsin-Madison research, the safest and most efficient way to improve cadence is to increase it by 5 to 10 percent at a time.

For example, if your easy runs cadence is 156spm, your goal cadence should be between 163 and 169.

Add “Faster Cadence” Segments

To make a smooth transition into your goal cadence(s), add short segments into your runs. During these segments, try to keep your new leg turnover for a predetermined time/distance.

For example, one minute of slightly quicker cadence followed by three to five minutes of your base rhythm. You can also do it by distance, running every third mile or so at a relatively faster leg turnover while maintaining the same effort level.

After a while, you’ll be able to do this without consciously thinking about it.

Your first session at this improved cadence might look as follows:

  • 10 minutes warm-up
  • One minute easy running at a cadence of 164
  • Five minute easy running at base cadence
  • One minute easy running at a cadence of 165
  • Five minute easy running at base cadence
  • One minute easy running at a cadence of 166
  • 5-minute cool-down.

Take Small Steps

Form also matters when trying to increase cadence.

Get this. You’ll not be able to increase your running cadence by running faster, but by reducing your stride length. That’s why one little form tweak I’d recommend is to focus on taking smaller steps.

Keep your feet close to the ground. Think shuffling motion. Your feet should barely leave the ground (but be careful on trails and rugged terrains). This might feel awkward at first, but as training progresses, it will become second nature.

Additional source – Here’s the full guide to average stride length.

Use a Cadence Metronome

According to my own experience, the simplest way to speed u your leg turnover is to run with a metronome (and yes, of course, there’s an app for that)

The metronome is a device that produces a predetermined number of clicks or beat per minute that sets the pace for you. This device is great because with its help you’ll no longer have to count the number of steps you take per minute.

Instead, you run to the rhythm of the metronome where each click or beat equals a step.

Of course, certain running watches (such as Garmin 735XT) have a metronome feature built in. You can also use an app, like Audiostep, Cadence Trainer, or BeatRun.

Use the 180 Beats Songs

Another smart tactic to help you accelerate the transition to a faster cadence is to download 10 to 12 songs around 180bmp (or near your goal cadence), so your foot strike can sync in with the music.

For that, you’ll either need an online recommendation or get a program that analyzes songs and provides the beats per minute.

Use a website, like JogTunes, to find songs with beats that match your desired running cadence. These websites have long lists of music playlists that meet a variety of cadences. Perfect for a music lover.

Just remember to keep a steady pace by making sure your feet always strike the ground on the beat.

Practice Fast Cadence Drills

Having trouble increasing your cadence? Then you might need some drill training to “drill” faster leg turnover.

These simple drills can help your feet to move quick and light, which in turn helps your body get used to a faster leg turnover.

Here is one exercise to try.

Start by standing tall while assuming an athletic stance with your feet shoulder width apart, core engaged, and back straight. Next, while positioning your arms as if you were running, begin marching in place and swinging your arms.

Once you nail the form, speed it up to a jog, lifting up your knees and driving your arms across your body. Then, run in place as fast you can.

As you pick up the pace, keep a good posture, and gaze forward rather than looking down at your feet.

Your knees should be pointing straight ahead, and heels are touching the floor.

Here are three more drills that I believe to be super helpful.

Drum Major


Butt Kicks

https://www.youtube.com/watch?v=UfCH8LMmLH8

High Knees

Just whatever you do, make sure you’re moving as fast as possible during the drills. That’s how you imprint faster leg motion.

Do Workouts That Require Faster Leg Turnover

Workouts like strides and downhill sprints train your muscles to react and move quicker, helping improve stride rate naturally.

Just be careful when performing these workouts since they can increase injury risk if you run with bad form or if you’re out of shape.

Strides

Strides consist of fast acceleration of running at 80 to 90 percent of maximum effort. One stride should take you about 20 to 30 seconds.

Here is how to add them to your training routine.

At the end of your workout, run hard for 20 to 30 seconds—or the equivalent of 100 meters—while keeping the focus on fast leg turnover and strong arm drive.

Next, give yourself two minutes to fully recover, then repeat.

Start with four strides a couple of times per week, then after three to four weeks, increase that to six or eight.

Downhill Sprints

Downhill sprint is ideal for improving your technique and increase your leg turnover.

After a thorough warm-up on a flat surface, find a hill with a 4 to 6 percent gradient incline. Speed up on the descent, reaching maximum speed velocity at the end of the hill. Jog slowly or walk back to the top, then repeat.

Whatever you do, don’t overstride. Instead, reduce your stride length, focusing on a fast and light turnover.

Then jog back do to recover. Rinse and repeat for 15 to 20 minutes. Here are five hill workouts to try.

Take Your Time

Like anything with exercise, it’s important to take it slow. Don’t try to chew more than you can swallow. Otherwise, you’re going to regret it.

Improving running cadence is not rocket science, but it does take time. You cannot (nor should you try) to increase it overnight. If you do so, you’ll get hurt.

As a rule, give yourself a couple of months for your body to adapt to your new cadence. The full transition and adaptation can take six to eight week before you start feeling comfortable with the faster cadence.

It’s going to take you a lot of focus and commitment over that week to stay in turn your stride rate, focusing not only on your cadence but also knee drive and landing midfoot under your body.

New to Running? Start Here…

If you’re serious about running, getting fit, and staying injury free, then make sure to download my Runners Blueprint Guide!

Inside this guide, you’ll learn how to start running and lose weight weight the easy and painless way. This is, in fact, your ultimate manifesto to becoming a faster and a stronger runner. And you want that, don’t you?

 Click HERE to check out my Runners Blueprint System today!

Don’t miss out! My awesome running plan is just one click away.

The Conclusion

What I like about cadence is that it’s a straightforward concept.

Regardless of your current fitness level or training goals, you can always benefit from increasing your cadence.

Of course, it might feel odd during the first few sessions, but with practice and patience you can find your ideal training cadence and reap the benefits of increased running speed and reduced injury.

Feel free to leave your comments and questions in the section below.

Thank you for reading my post

David D.

How To Choose The Best Running Shoes for Flat Feet

how to run with Flat Feet

Looking for the best running shoes for flat feet? Then you’ve come to the right place.

Being a flat-footed runner can be challenging.

But it does not inherently preclude you from running.

In fact, just because you’ve flat feet, it doesn’t inherently mean that you are bound for trouble.

As we are going to see in today’s article, having flat feet shouldn’t discourage you from running, even if you find it difficult to pound the pavement on a daily basis.

So what does it mean to be a flat-footed runner?

Are there any special precautions that should be taken?

what are the best running shoes for flat feet?

These are some of the questions I’ll answer in today’s post.

So, are you excited?

Then here we go.

What You Should Know About Running With Flat Feet

Before I get into how to choose the best running shoes for flat feet, let’s first explain what being flat footed is all about.

Also known as “fallen” or “low” arches, and medically referred to as “Pes Planus,” flat feet are viewed as a postural deformity condition in most fitness circles.

The condition occurs when the tendons, ligaments, and the tiny bones in the foot’s underside collapse, forcing the arch to sit low or completely flat against the ground.

According to conventional thinking, having flat feet is cause for alarm for most adults, and for some, it can cause serious issues.

These include foot pain, leg pain, muscle soreness, back pain, limited athletic ability, overuse injuries, etc.

For these reasons, as a runner, if you’ve trouble with your flat feet, then you must do something about it.

Otherwise, you may succumb to pain.

Surveys show that out of the general population, roughly 20 to 25 have flat feet, so it’s not really an “abnormality,” nor is it uncommon.

The Foot Arch Explained

For us runners, this condition affects one of the most critical components of our physiology: the foot arch.

Made up mostly of tendons, ligaments, and bones, and supported by muscles in the foot, the foot arch has three main arches:

Two longitudinal (medial and lateral) arches that run from front to back, with one on each side.

One anterior transverse arch that runs across the middle of the foot.

All of these three arches play a crucial role in promoting and maintaining all forms of movement, running included.

Most importantly, the foot arch act as a natural shock absorber, helping to reduce impact during the running gait cyle.

In fact, it can bear around 200,000 to 300,000 pounds of stress each mile we walk.

Without sufficient arch support, the impact stresses of a foot strike travel unhindered up the feet and legs, increasing the risk of injury.

Additional resource – How to measure foot size for running shoes

How To Choose The Best Running Shoes for Flat Feet

How to Determine Your Arch Height – The Wet Test

A podiatrist can determine your arch height, but you can also easily do it at home using the wet test.

Here is how

Start by dipping the sole of one of your feet in water, then step onto a piece of paper towel on a flat surface where your footprint will show.

Make sure to put sufficient weight on that foot to leave an imprint behind.

Last up, step away and assess the mark your feet leave.

If you can see nearly the entire bottom of your feet on the surface, then likely have flat feet.

See Image.

How Do Flat Feet Form?

Flat feet do not develop overnight to the overworked or overweight folks of the world.

Most people get it during the course of their lives as they get older without even realizing it.

Only a small percentage of the flat-footed populace is affected by hereditary flat foot.

Sure, flat feet can happen at birth (in cases of rheumatoid arthritis as one example), but any of the following reasons might contribute:

  • Wearing improper shoes,
  • Pregnancy,
  • Aging,
  • Injury,
  • Obesity,
  • Diabetes,
  • Improper training form,

Additional resource – Running shoes for plantar fasciitis

Brace For Pain

According to conventional wisdom, having flat feet can lead to severe injuries, especially when running in the wrong pair.

Examples include plantar fasciitis, Achilles tendinitis, Shin splints, tibialis posterior tendinopathy, etc.

But that’s not a universal rule.

Injuries are prevalent among all runners, regardless of their foot type and/or pronation style.

Even runners with regular arch heights get injured.

So, do you REALLY need special running footwear?

Well, the answer isn’t black and white.

First, let’s look at the theory.

Additional resource – How to recycle used running shoes

Flat Feet and Overpronation

Often than not, having flat feet causes overpronation.

Surveys show that roughly 90 percent of people with flat feet develop this abnormal inward turning of the feet upon foot impact.

Just don’t get me wrong.

Pronation is part of the regular movement of the foot that occurs upon foot strike when walking or running.

This allows the foot to mould to the surface and reduce shock impact.

That said, overpronation occurs when there is excessive pronation following the foot strike.

This places undue stress on the ankle, knee, hips, lower back, increasing injury risk.

Therefore, and according to most experts, flat-footed runners may need special footwear that help stabilize the feet when running.

These will be either stability or motion control shoes that have a steady medial post.

But is there any research backing up these claims?

I don’t think so.

Additional Resource – Overpronation vs Underpronation

The Research

As far as I know, when it comes to injury, flat-footed runners are subject to the same injuries as the rest of us.

There is no conclusive research with a significant sample size and consistent methodology that provides irrefutable evidence that flat-footed runners get injured more than runners with high or neutral arch heights.

Here a few studies to check out.

Research by Lees and Klenerman has found no conclusive correlation between foot type and running injuries, especially with a flat foot “deformity.”

Another research published in the Journal of Sports & Medicine found no direct association between increased running injury risk among beginner runners using a neutral shoe.

And that’s just not the case in the running world.

In fact, little scientific data suggest a link between pes planus and sports injuries to the lower extremities.

I can go on and on about this subject, but a simple Google search will satisfy your curiosity if you want to learn more.

Additional resource – Running Shoes Vs. Cross Trainers

The Bottom Line

As long as you’re not experiencing any pain or issues while running in neutral shoes, there is probably no need for a stability or motion control shoe, even if you’ve incredibly flat feet.

In fact, by simply taking the right training, injury and footwear precautions (like any other smart runner), you’d still manage to run relatively injury free.

Yes, this goes against conventional advice, but just keep mind that shoe producers have a vested interest in you buying their products.

So please don’t be a dumb costumer.

Before you decide on a given pair, take into consideration your personal preferences, running conditions, shoe history, budget, etc.

In the end, the best pair for you could or could not turn out to a shoe from the stability, or motion control category.

Additional Resource – Here’s how to dry running shoes.

Neutral Shoes Cause you Pain?

If you’ve chronic arch or heel pain (and are pretty sure that your neutral shoes are to blame), then consider changing your footwear.

Here is what you need to know about the so-called “flat feet” running shoes.

The Best Shoes For Runners With Flat Feet

If you have flat feet and overpronate, then get a pair that reduces over-pronation and provides more support throughout the running gait.

This is especially the case if you tend to exhibit moderate-to-severe overpronation and/or have had issues running in a neutral pair.

Major running footwear brands have developed specific shoe models over the last few decades catered toward runners with flat feet.

As previously stated, trainers that serve this purpose are commonly known as stability and motion control shoes.

These shoes are designed with a firmer midsole that limits excessive pronation.

Additional resource – Guide to insoles for running shoes

How To Choose The Best Running Shoes for Flat Feet

If you don’t know how to pick the right running shoes, then head to a specialty running store and consult the expert staff in there.

They can analyze your running mechanics, determine your foot type, then suggest the appropriate recommendations.

Just keep in mind that what works for someone else may not work for you and vice versa.

So do you research and be willing to experiment with different models to find the most suitable pair.

Stability Shoes Demystified

Stability shoes are made with layers of polyurethane materials in the arch to provide more stability and support for arches that may collapse upon foot strike.

The primary technology used in stability shoes is a medial post of dual density foam.

This is the gray and firmer piece of foam located on the inner side of the midsole, usually under the heel or midfoot regions—an area highly impacted by overpronation.

Further, these shoes have plenty of cushioning.

Every major shoe manufacturer has their own collection of stability running shoes.

It’s up to you to choose what brand appeals the best.

Just keep in mind that stability shoes are not a ‘one size that fits all.’

They may not work for everyone since not all stability shoes are the same.

The best stability shoes are Adidas Adistar Boost, etc.

Motion Control Demystified

If you’re a severe overpronator, motion control shoes might help.

These are usually the heaviest and most rigid shoes available in the running footwear market.

Motion control shoes are designed with more support in the arch of the foot, provide features such as stiffer heels, and a relatively straight shape/last to counter overpronation.

The best motion control shoes include the Mizuno Wave Inspire 9, Brooks Ravenna 4, etc.

Additional Tips

Keep on reading if you have issues with your flat feet.

Experiment with Barefoot Running

Barefoot running encourages a mid-foot or forefoot strike.

According to research, this may help strengthen your foot’s muscles and tendons, which can improve shock absorption.

So, if it’s all possible, add a few barefoot runs to your running program, preferably on a softer surface, such as grass or a beach.


Massage With a Tennis Ball

Having chronic arch pain?

Then try massaging with a tennis ball.

This exercise stretches the plantar fascia ligament and comes highly recommended by podiatrists and sports experts.

How?

Just place a tennis ball under your foot, then roll it back and forth under the arch for 90 to 120 seconds.

Check this YouTube Tutorial.

Lose Weight

Being overweight can put excessive stress on the ligaments of your feet, resulting in pain.

In fact, the more extra pounds you’re carrying around, the more pressure you exert on your arches.

This is especially the case if you engage in high impact exercise, such as running, on a regular basis.

Having trouble losing weight?

Then these resources can help.

Post 1

Post 2

Post 3

Hot Water Foot Baths

Heat therapy is effective at relieving arch pain and soreness—as long as your feet are not cut, bruised, or injured in any way.

You can either soak your feet for 15 to 20 minutes in a bath of warm water and Epsom salt or simply wet two towels with warm water then wrap them around your feet.

Additional resource – Running shoes for overpronators

Consider orthotics

Orthotics are custom-designed arch supports that may help you reduce pain by relieving pressure from the arch by limiting the rate of pronation, thus, reduce injury risk as related to excessive motion.

There are plenty of options to pick from, but as a rule of thumb, opt for insoles with substantial arch support, allow for enough wiggle room (so you don’t get blisters), and have a flexible sole.

Just keep in mind that not every runner with flat feet is an overpronator, and having a normal arch height does not make you injury proof.

New to Running? Start Here…

If you’re serious about running, getting fit, and staying injury free, then make sure to download my Runners Blueprint Guide!

Inside this guide, you’ll learn how to start running and lose weight weight the easy and painless way. This is, in fact, your ultimate manifesto to becoming a faster and a stronger runner. And you want that, don’t you?

 Click HERE to check out my Runners Blueprint System today!

Don’t miss out! My awesome running plan is just one click away.

Running Shoes for Flat Feet – The Conclusion

There you have it! If you’re looking for advice on how to choose the best running shoes for flat feet then today’s article should get you started on the right foot. The rest is just details.

Thank you for dropping by

Keep Training Strong