Running is an awesome way to stay fit and enjoy the outdoors, but pounding the pavement can be tough on your body.
Each step on hard concrete sends a jolt up through your legs, and if you’re not careful, those repetitive impacts can lead to aches and injuries.
In fact, a person running around 20 miles per week could rack up over 1.3 million foot strikes in a year, so it pays to protect your body!
But that’s no reason ditch the pavement for good.
I can promise you.
With some smart tweaks, good gear, and a sensible routine, you can keep those miles coming without sidelining injuries. Here are some friendly, science-backed tips to help you run pain-free on pavement.
Let’s get to it.
Why the Hard Surface Might Be Your Worst Enemy
Okay, let’s break this down.
I hate to say it, but we’ve all heard the classic line: “Pavement’s hard!” We roll our eyes, but… it’s true, right?
So, what does that really mean for your body?
Let me explain: running on pavement isn’t just about pounding the ground.
It’s about the wear and tear that happens over time.
Every time your foot hits the pavement, it absorbs forces that can be three times your body weight—or even more.
Sounds pretty intense.
So, if you’re around 160 pounds, every step you take could send a 480-pound shock through your joints, tendons, and bones. That’s a lot of impact for your body to handle.
The problem isn’t just that you’re slamming your feet down—it’s the constant repetition.
Sure, one stride won’t break you, but after thousands of steps, those small impacts start to add up. Think of it like chiseling away at your body—gradually, but surely.
After a while, that constant impact breaks down the soft tissues in your knees, hips, and ankles. Overuse injuries don’t just pop up overnight; they build up over time.
And I’m not just saying this for dramatic effect—studies back this up. Runners who stick to hard surfaces are more likely to develop things like Achilles tendinitis, runner’s knee, and IT band syndrome because of the constant pounding.
In fact, a study in The British Journal of Sports Medicine found that running on hard surfaces increases the risk of overuse injuries like tendinitis by more than 30%. That’s no joke.
Another study published in Sports Health found that the force from these hard surfaces, combined with poor running form, can cause ligament injuries. If your ligaments aren’t strong enough to handle the shock, you’ll end up dealing with knee pain, ankle sprains, or worse—stress fractures.
A 2017 study in The Journal of Orthopedic & Sports Physical Therapy found that runners on hard surfaces face a 35% higher risk of developing stress fractures compared to those running on softer surfaces like trails or grass.
And why is that? It’s simple—your body just wasn’t built to handle all that constant, repetitive pounding on concrete or asphalt. Over time, those tiny cracks in your bones can turn into major issues.
Calgary First Aid and CPR training can be incredibly useful for runners, as it prepares you to handle any injuries that might occur while out on your runs.
Mixing Running Surfaces
Alright, so it’s not all doom and gloom.
Don’t get me wrong, I’m not asking you to completely ditch your favorite pavement route—but here’s the good news: You don’t have to stick to pavement 100% of the time to stay healthy.
Mixing it up with softer surfaces—like grass, dirt trails, or even woodchip paths—can give your joints the break they need without taking away your run.
Here’s why this works:
- Reduced Impact. A study from the American Journal of Sports Medicine found that running on grass or dirt reduces knee impact forces by 15-20% compared to pavement. That’s a big deal in the long run. When your foot sinks just a little bit into the softer surface, it helps absorb some of the shock that would normally travel up to your knees and hips.
-
Muscle Activation. Trail running forces you to engage more muscles than running on flat pavement. The uneven terrain requires you to adjust your stride constantly, which activates your legs, core, and even your feet. This helps improve your balance and stability.
-
Mental Break. Let’s face it—running on the same stretch of pavement every day can get monotonous. Running on a dirt trail or through a park full of green grass is a mental reset. You get a nice break from staring at the same old asphalt, and honestly, that fresh scenery keeps you motivated.
I could go on and on about the benefits of mixing up your running routes, but I think you get the idea—it’s good for you.
Period.

How to Start Mixing It Up
Now, I know this all sounds great, but how do you actually start mixing it up without throwing yourself into an unfamiliar trail immediately?
Let’s talk about how to ease into it.
If you’re wondering how to start adding variety to your running routine, I’ve got you covered. Here’s how I personally mix it up, and trust me, it works:
Strategy 1: Start with One Trail Run a Week
If you’re used to running on pavement 4-5 days a week, start with one trail run a week. It could be as simple as running on grass or a dirt path at a park. The goal is to give your body a break from the hard surfaces, and trust me, your joints will thank you for it.
Strategy 2: Find Some Local Tracks
Running tracks (made of synthetic rubber) are a fantastic alternative to pavement. They offer a flat surface like pavement but with much less impact on your joints. If you’re planning on doing speedwork, this is your go-to.
Strategy 3: Gradually Increase Your Trail or Soft Surface Mileage
If you’re transitioning from pavement to trails, don’t just jump straight into long trail runs. That’s a recipe for disaster. Start by adding just 10% more trail or grass running each week. Your body will gradually adjust, and you’ll feel the difference without overdoing it.
Strategy 4: Don’t Overdo It
I’m not anti-pavement, and I’m definitely not telling you to give it up entirely—let’s be real, pavement is still part of the running game. But it’s all about balance. Pavement gives you speed, and softer surfaces give you recovery. You need both.
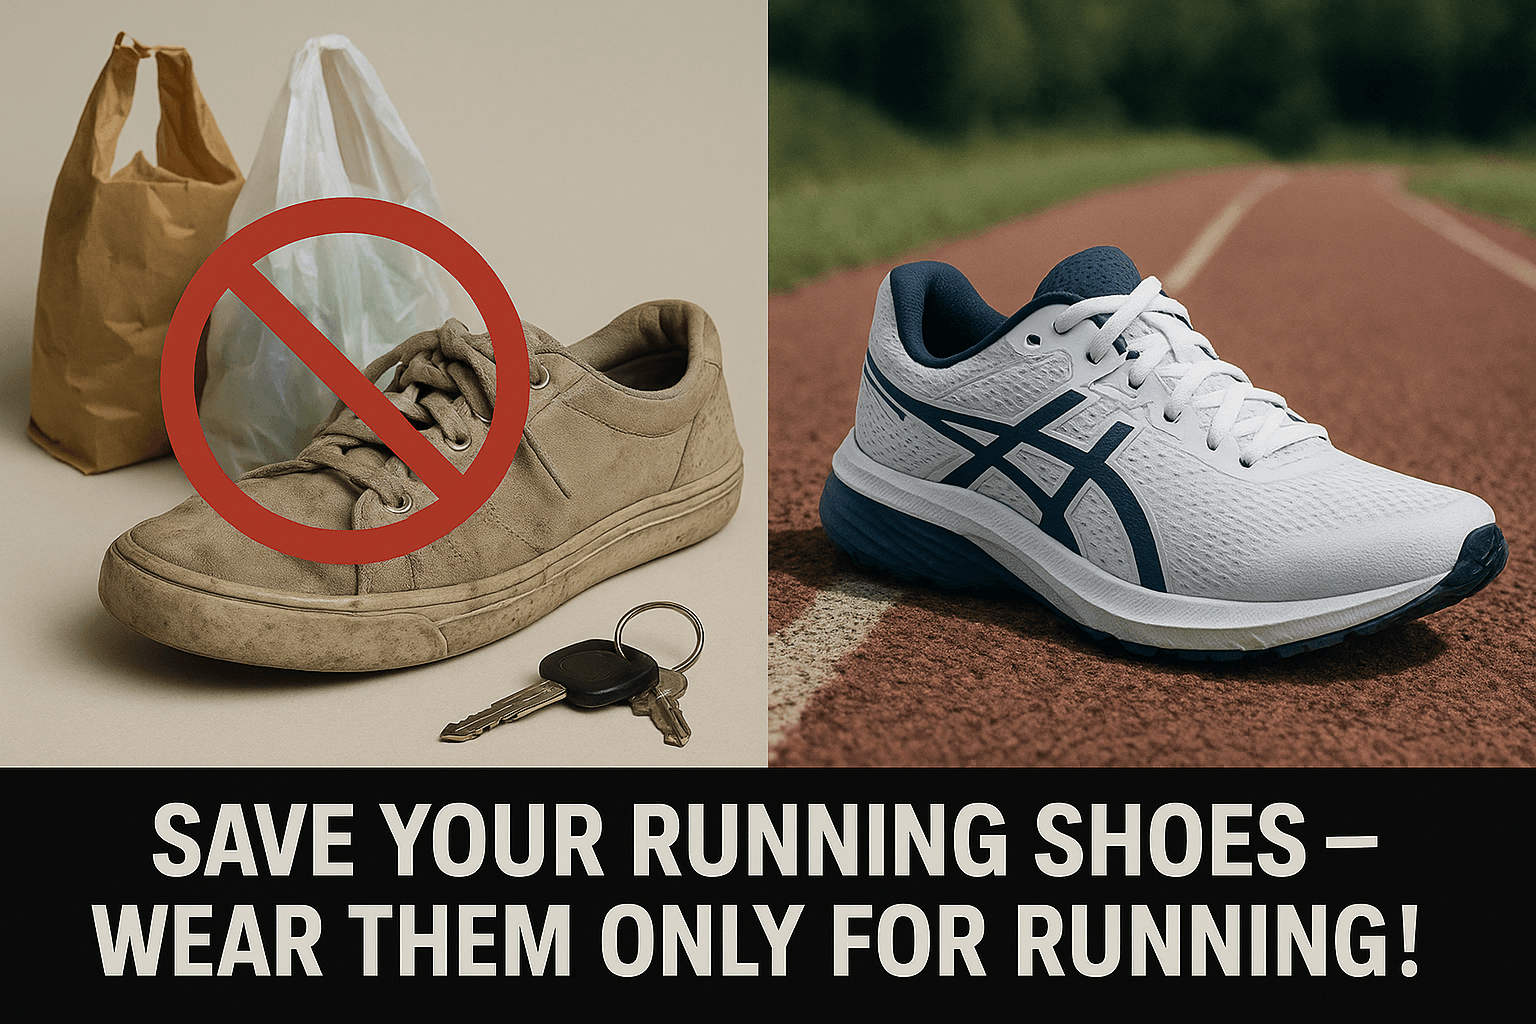
Choose the Best Shoes for Running on Pavement
Okay, we’re not done yet. Mixing up your routes is just one piece of the puzzle. One of the most important things you can do to stay injury-free is choose the right shoes.
And I’m speaking from experience here. I can’t even count how many times I grabbed shoes that just looked cool or were on sale, only to regret it later.
But when it comes to running on pavement, you need more than just shoes that look good. You need the right amount of cushioning—not too soft (because you’re not jumping on a trampoline) and not too stiff (you don’t want to feel like you’re stomping on concrete with every step).
If you’ve got flat feet, high arches, or any other foot issues, regular shoes might not cut it. That’s where custom orthotics can help. Get fitted by a specialist, and you’ll save yourself a lot of pain down the road.

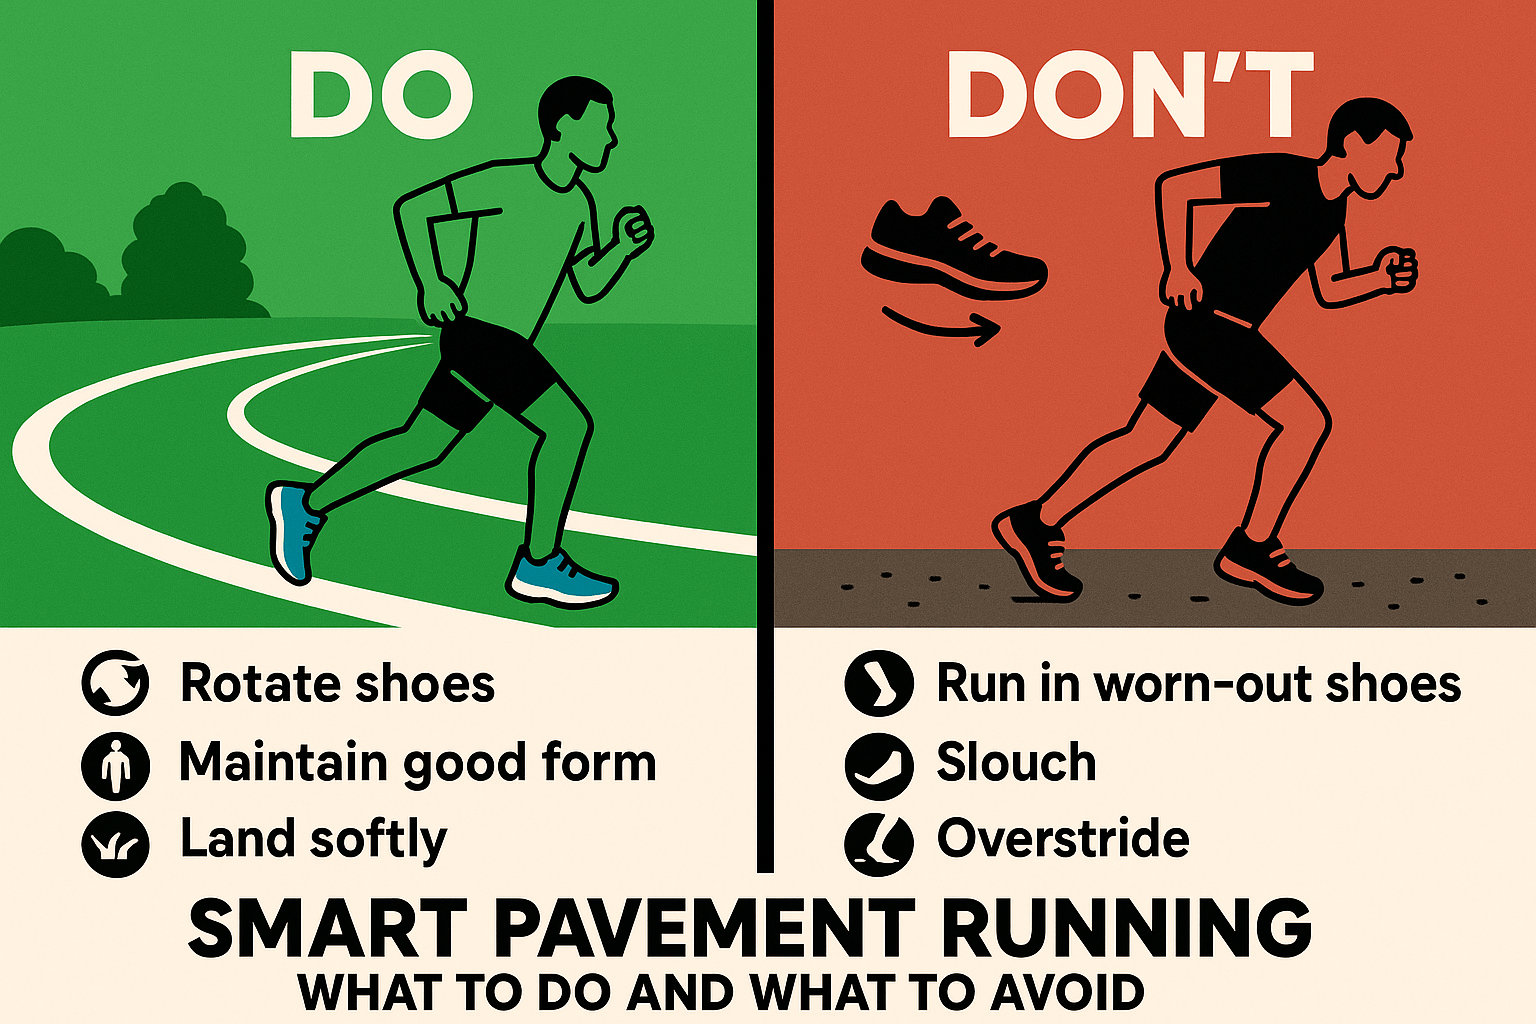
Focus on Proper Running Technique
Let’s talk about form. This is where a lot of runners go wrong—and I’m guilty of it too.
I used to think I could get away with poor form. Turns out, I was wrong.
Proper running form is key to saving your joints from all that pavement impact. Here’s a quick checklist:
- Keep your posture tall—like someone’s pulling you from the top of your head.
- Don’t lean forward at the waist—that’s a killer. Lean forward from your ankles instead.
- Keep your steps shorter and quicker—aim to land with your foot directly under your body. Overstriding adds unnecessary impact.
- Aim to land on your midfoot, not your heels or toes. This spreads out the impact and keeps your joints happy.
Strengthen That Core and Those Legs
I can’t stress this enough—core strength is EVERYTHING. Without a strong core, you’ll set yourself up for back pain, bad posture, and muscle imbalances.
So, make planks, side crunches, and leg lifts a regular part of your routine.
But it’s not just about the core—your legs matter too. Your glutes, hamstrings, and quads are critical for absorbing the shock from all that pounding on the pavement. Strong legs will help you handle the stress without injury.
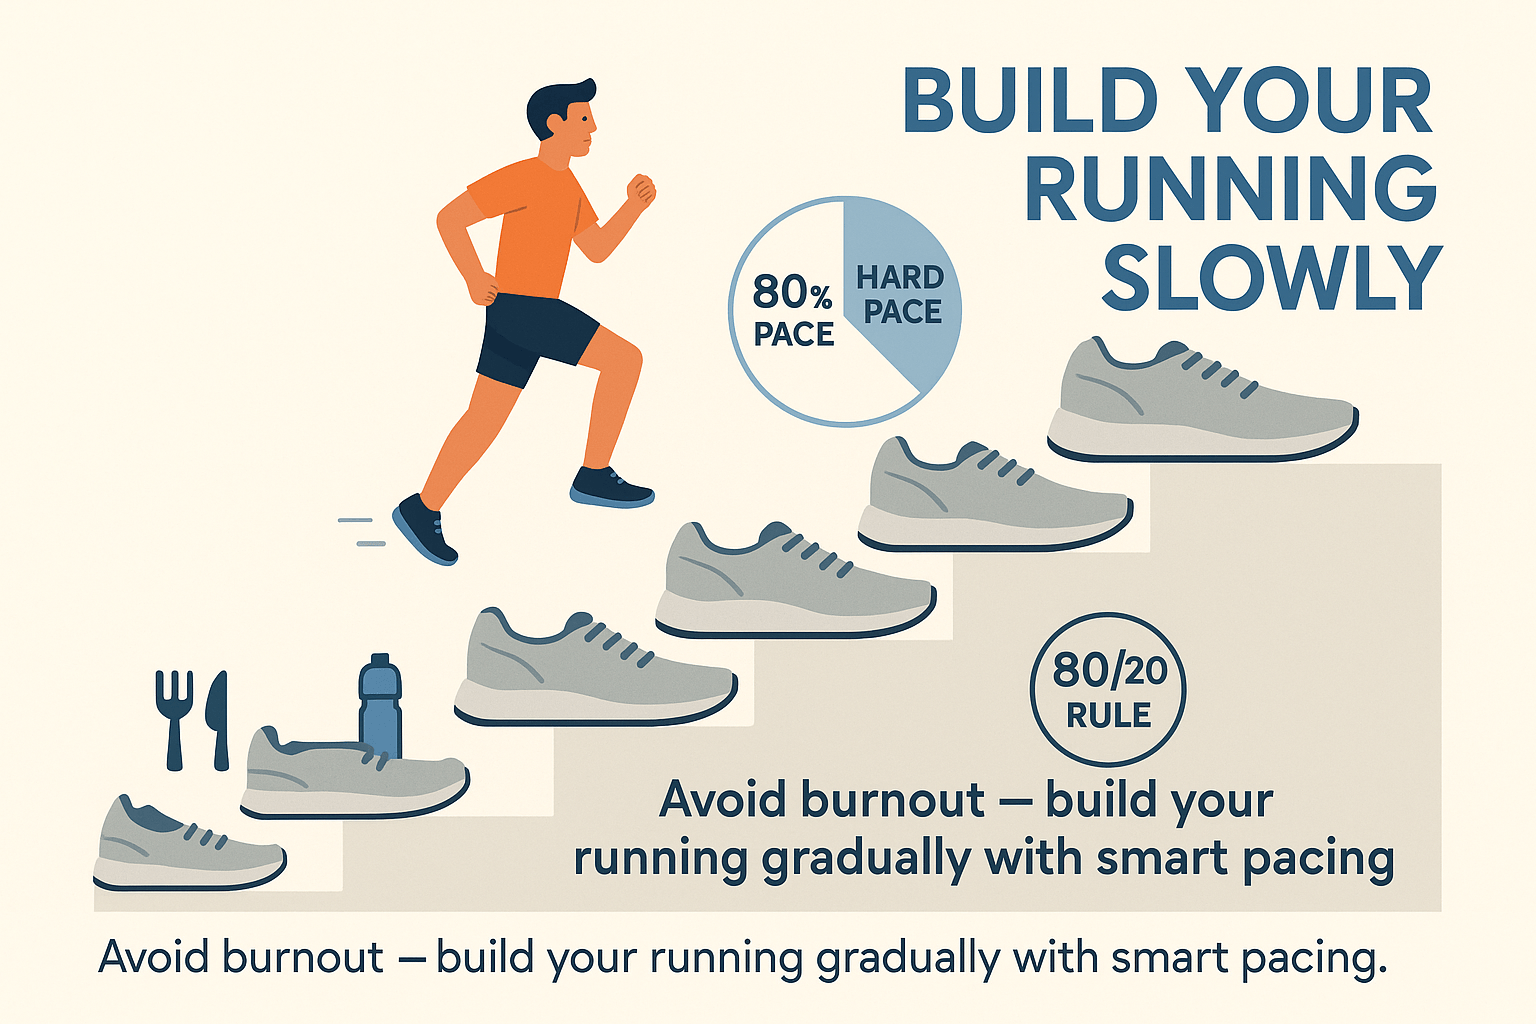
Increase Mileage Slowly, Or You’ll Pay for It
This is one of those rules that needs repeating: Don’t jump up in distance too quickly. I’ve seen runners do it, and it never ends well.
You’ll get that one solid run and then think, “Hey, I’m feeling good, let’s push it.” But if you try to add too much too soon, you’ll pay for it. Either your body will shut down from overuse, or you’ll injure yourself.
Stick to the 10% rule—don’t increase your mileage by more than 10% each week. I ignored this once, and it ended with shin splints and a lot of time off. I learned the hard way, and I don’t want you to make the same mistake.
It’s not about running harder—it’s about running smarter.
Mind the Weather and Pavement Conditions
Not all pavement is created equal. In hot weather, pavement can be like a frying pan for your feet. Even if the air feels cool, the ground might be scorching. If you’re running in heat, get out early or late to avoid the worst of it.
And when it’s wet? Be extra careful. Slippery pavement is no joke, and I’ve slipped more than once. If you’re running in the rain, slow your pace and adjust your shoes for better traction.
Sometimes, I even switch to my trail shoes if I know I’m going to be running on wet pavement. It’s a small change, but it makes a huge difference.
Conclusion
Pavement can be tough on your body, but it doesn’t have to be your enemy. By choosing the right shoes, maintaining good form, and giving your body the recovery it needs, you can keep running injury-free.
Cross-training is your secret weapon—mix in softer surfaces, take care of your tendons, and you’ll be running strong for years to come.
Key Takeaways:
- Repetitive pavement running increases the risk of tendonitis, stress fractures, and runner’s knee.
- Tendons don’t heal quickly—give them recovery time with cross-training and foam rolling.
- Cross-training reduces stress on your body and helps prevent overuse injuries.
Now, go out there and run smart. Your body will thank you later.
What’s your favorite surface to run on, and why?
Have you experienced any injuries from sticking to one surface too much? Let’s chat in the comments below!