Are you ready to unlock the secrets to shedding those stubborn 10 pounds? Well, you’ve come to the right place! Losing weight doesn’t have to be a mysterious puzzle; it’s all about finding the right pieces and putting them together to create your masterpiece.
First things first, let’s talk about numbers. Weight loss is indeed a numbers game, but it’s not about deprivation. It’s about finding the right balance between exercise and eating. A little more movement, a little less food, and you’ll be on your way to success!
But wait, I know the weight loss landscape can be a maze of confusion, with contradictory advice lurking around every corner. Fear not! I’ve got your back, and I’ve sifted through countless studies and research papers to bring you the cream of the crop.
So, are you ready to embark on this exciting journey with me? Let’s conquer those 10 pounds with a blend of science, determination, and a dash of adventure! Together, we’ll unravel the mysteries of weight loss and create a masterpiece that’s uniquely yours.
Let’s do this

Drink Water Before Your Meals
This may surprise you but water can work wonders for our weight loss journey. According to some fascinating research presented at the annual meeting of the American Chemical Society, the simple act of drinking two glasses of water before a main meal can make all the difference. And hey, cutting back on portions is an added bonus!
You won’t believe the numbers—they found that dieters who followed this water-sipping strategy lost a whopping 44 percent more weight than their counterparts who didn’t adopt this habit. Now, that’s some serious progress! But the best part is, they were able to keep those pesky pounds off for at least a whole year. Talk about a lasting impact!
But wait, there’s more evidence to back this up! Across the pond, the University of Birmingham in the UK conducted a study with 84 obese adult volunteers under the watchful eyes of their doctors. The results were eye-opening. Those who pre-loaded with two glasses of plain tap water lost an average of 10 pounds over a 12-week period. Impressive, right?
And it’s not just a one-off finding either. The Journal of Obesity decided to put water to the test, and guess what? They came to the same delightful conclusion. Drinking water before meals is like a secret weapon in the weight loss arsenal.
So, why does water work its magic? Well, when you gulp down those two glasses before a meal, it helps fill up your stomach, making you feel more satisfied with smaller portions. Plus, it’s calorie-free, so you’re not adding any extra baggage to your plate—literally!
Isn’t it amazing how something as simple as water can have such a profound impact on our weight loss journey? No fancy pills, no complicated diets—just good old H2O doing its thing. It’s like nature’s weight loss elixir!
Drink Black Coffee
Coffee lovers, rejoice! Here’s some good news that’ll put an extra pep in your step. That delightful cup of joe you savor every morning might just be your secret weapon in the battle against those stubborn pounds.
You see, research has shown that caffeine, the beloved buzz-inducing compound in coffee, is not only a great pick-me-up but also a powerful metabolism booster. It can rev up your metabolic rate by a cool 3 to 10 percent, and if that wasn’t impressive enough, it can even kickstart fat burning by 10 to 25 percent. Now that’s what I call a double shot of goodness!
But here’s the kicker—those magical polyphenols, a group of plant-based antioxidants, are the real heroes behind this fat-blasting phenomenon. And to get the full dose of these wonderful compounds, you’ll want to indulge in the best coffee money can buy—Kenyan or Ethiopian coffee. Trust me; your taste buds will thank you for it!
Now, I know what you’re thinking—how much coffee is enough to get that metabolism-boosting magic going? Well, here’s the scoop. According to the experts, you need not down more than one cup a day to reap the benefits of black coffee. So, go ahead and savor that cup like it’s a precious elixir from the coffee gods!
But, and this is a big but, there’s a catch. If you’re looking to shed those extra pounds, you need to steer clear of the sugar, creamer, and flavorings in your coffee. I hate to break it to you, but that Venti Mocha Frappuccino Blended Coffee with whipped cream might taste heavenly, but it packs a hefty 500 calories. Yikes! That’s definitely not what you signed up for in your weight loss journey.
So, here’s the golden rule—keep your coffee calorie-free and let it work its magic on your metabolism. That way, you can enjoy the full benefits without any guilt or extra baggage.
Drink Green Tea
Move over, coffee; there’s another invigorating elixir that’s making waves in the world of weight loss—green tea! Don’t be fooled by its mild appearance; this humble drink packs a powerful punch when it comes to shedding those extra pounds.
Green tea, with its caffeine and flavonoids, has been turning heads in the scientific community for its potential to turbocharge your metabolism, boost insulin activity, and ramp up fat oxidation. It’s like having a secret weapon in your weight loss arsenal!
You might be wondering, “Is there any proof to back up these claims?” You bet! One study revealed that participants who took green tea extract lost an average of seven pounds and burned an extra 180 calories over three months—without even changing their eating habits. Talk about a helping hand from nature!
Here’s what sets green tea apart from its counterparts—its catechin-rich goodness. Catechins are powerful antioxidants that take center stage in green tea, making it a nutritional powerhouse. Oolong and black tea might be popular, but when it comes to catechins, green tea steals the show.
So, how much green tea should you be sipping to reap these fantastic benefits? According to the experts at the University of Maryland Medical Center, two to three cups a day is the sweet spot. And let me tell you, each cup is brimming with about 100 to 300 milligrams of those potent catechins and up to 10 to 50 milligrams of caffeine, depending on how you brew it.
Eat More Fiber
Fiber is the unsung hero of the weight loss world! While it’s true that fiber is a type of carbohydrate found in plant-based foods, don’t be quick to dismiss it as just another carb. This little gem is the key to filling you up and helping you shed those pesky pounds.
Let’s talk science, shall we? A study published in the Annals of Internal Medicine had 240 adults with the metabolic syndrome consume 30 grams of fiber daily, while keeping the rest of their diet unchanged. Guess what happened? They lost more weight than the control group! It’s like fiber waved its magic wand and made those pounds disappear.
But wait, there’s more! Fiber doesn’t stop at just weight loss. It’s a multitasker, working wonders on your metabolic markers like blood sugar, blood pressure, and cholesterol levels. Talk about a superhero in disguise!
So, how much fiber is enough to set you on your weight loss journey? The dietary guidelines suggest 20 to 30 grams per day. Not bad, but if you’re looking to kick things up a notch, listen to this pro tip: aim for around 40 to 50 grams per 1,000 calories you consume. That means more minimally processed plant foods in your diet, and trust me, your body will thank you for it.
Now, let me spill the beans on some precious sources of fiber that you can fill your plate with:
- Beans and legumes: These little powerhouses are packed with fiber, making them an excellent addition to your meals.
- Flax seeds: Don’t underestimate these tiny wonders—they’re fiber-rich and can easily be sprinkled on top of your dishes for that extra boost.
- Asparagus: Not only does it taste delicious, but asparagus also delivers a healthy dose of fiber to keep you feeling full and satisfied.
- Oats: Starting your day with a bowl of hearty oats not only fuels you up but also keeps your fiber intake in check.
- Brussel sprouts: These little green marvels may not be everyone’s favorite, but they sure are a fantastic source of fiber.
Eat More Protein
Protein is another powerful ally for your quest to losing 10 pounds. You won’t believe what this research from McMaster University in Canada uncovered! They found that a low-calorie, high-protein diet, coupled with exercise, is a match made in weight loss heaven. Not only will you shed those pounds faster, but you’ll also gain some fabulous muscle mass. Talk about a win-win situation!
But that’s not all. The Rowlett Research Institute in Aberdeen chimed in with its findings, revealing that a high-protein, low-carb diet is a true champion at taming those hunger pangs and aiding in weight loss, at least in the short term. It’s like protein is your trusty sidekick on this weight loss adventure, keeping you on track and satisfied.
Now, let’s talk numbers. How much protein should you be loading up on? Aim for a delightful 20 to 30 grams of protein with every meal. It’s like a magic formula, helping you lose those 10 pounds and gain some lean muscle along the way. Who knew eating could be this powerful?
So, what’s on the menu for your protein-packed feast? Oh, just the most delicious choices like grass-fed meat, eggs, chicken breast, fish, beans, tofu, and nuts. Your taste buds will be dancing with joy!
And don’t you worry, my vegetarian friends—there’s a whole world of plant-based protein sources waiting for you to explore. Whether it’s quinoa, lentils, chickpeas, or tempeh, the options are endless, and they deliver on the protein punch.
Feeling like you’re not getting enough protein in your life? No problem! You can consider supplementing with whey protein. Research has shown that substituting some of your calorie intake with whey protein can help you shed about 8 pounds while gaining that coveted lean muscle mass.

Don’t Drink Your Calories
Liquid calories are the ultimate diet saboteurs.
You won’t believe the numbers—hold on to your seat! The average American chugs down a whopping 250 calories a day from soft drinks alone. Can you imagine? That’s like carrying around an extra 25 pounds of sugary baggage every year!
And guess what? The so-called “diet” drinks aren’t the weight loss wonders we hoped they’d be. Research from the Imperial College in London pulled the curtains back on this illusion and revealed that these seemingly innocent diet beverages are just as harmful and weight gain-friendly as their sugary counterparts. Oh, the disappointment!
But fret not—we’ve got a plan to curb those sugary cravings and make a healthy switch. Step one, wean yourself off any sugary drink that’s not plain water, black coffee, or the mighty green tea. These three will become your trusty sidekicks in your battle against sugar!
Next up, always have an alternative. You know, stock up on plenty of non-soda drinks, so when the sugary temptation comes knocking, you have a whole army of better choices to reach for. Convenience is key here!
And here’s a nifty trick—take a closer look at the sugar content of your favorite drinks. Knowledge is power, my friend! Once you’re aware of the hidden sugar traps, you’ll be able to make smarter choices and keep those pesky pounds at bay.
This image can help.
Use Contrasting Plate Colors
Isn’t it fascinating how something as simple as the color of our plate can trick our minds and lead us to consume more calories? It’s like a sneaky optical illusion that our brain falls for without even realizing it! Let me tell you about this intriguing study published in the International Journal Of Obesity.
Picture this: you’re serving yourself a delicious meal, and unknowingly, you reach for a plate that perfectly matches the color of your food. Well, guess what? According to this research, when your meal blends in with the plate, you’re likely to serve yourself a whopping 20 percent more food compared to when you serve it on a plate of contrasting color. Who would have thought that the color of our plate could have such an impact on our portion sizes?
But hey, it’s not our fault—we’re naturally drawn to things that look visually appealing. And the food industry knows this little secret too. Just take a look at fast-food chains! They use bold and eye-catching colors in their packaging and décor to entice us into indulging a bit more. Clever, right?
Now, how do we outsmart this sneaky illusion and keep our portion sizes in check? Well, here’s a nifty trick for you. Get yourself a variety of low-cost plates in different colors? This way, you can ensure that your dishes always contrast with the meal you’re serving, and you won’t be tricked into piling on those extra calories unknowingly.
And here’s a fun twist! Research suggests that eating your food on the bluest plate you have in your cupboard might just do the trick. Why, you ask? Well, blue foods are quite rare in nature, making them the least appealing blend with the food you’re eating
Try Intermittent Fasting
Intermittent fasting, or IF as it’s commonly known, has been making waves in the world of weight loss, and it’s backed by some serious scientific evidence! Multiple reviews and randomized clinical trials have shown that IF can be a powerful tool for shedding those extra pounds, especially for overweight and obese individuals.
Now, let’s be clear right from the start—intermittent fasting is NOT your typical diet. It’s more like an eating schedule that works wonders in speeding up fat loss and muscle growth. Instead of focusing on what you eat, IF focuses on when you eat.
Here’s the deal: during the fasting period, you simply skip meals, which naturally reduces your calorie intake. But don’t worry, you won’t be starving yourself! The magic lies in limiting your “feeding” to a specific window of time. So, while you may not eat during certain hours, you get to enjoy your delicious meals within a designated period.
And let me tell you, the results can be impressive! Studies have shown that IF can lead to a weight reduction of three to eight percent over a period of three to 20 weeks. Not bad for simply adjusting your eating schedule, right?
The key to making IF work for you is to stay hydrated during the fasting period. Drink plenty of water and zero-calorie beverages to keep your body nourished and happy. Just steer clear of anything with caloric content to maintain the fasting benefits.
Now, here are the main IF protocols to consider:
- The 16/8 Method: This one is quite popular. You simply skip breakfast every day and enjoy your meals during an 8-hour feeding window. Imagine having your scrumptious dishes from 2 pm to 10 pm—it’s like having a food festival in the afternoon!
- Eat-Stop-Eat: Here’s a daring option for the adventurous folks. You go on one to two 24-hour fasts each week. It’s like challenging yourself to see how well you can handle the fasting game!
- The 5:2 Diet: This one adds a bit of variety to your week. You get to consume no more than 500 calories two days per week while enjoying your regular meals the rest of the week. It’s like having a mini challenge to tackle!
Go Low Carb
If you’ve been remotely connected to the world of health and fitness, you’ve probably heard that carb-restricted diets are the way to go for achieving lasting weight loss. So, let’s dive right into the delicious details of this nutritional regime.
Low carb diets are all about cutting down on carbohydrate consumption while indulging in plenty of high-quality proteins and healthy dietary fats. And guess what? Science is backing it up with a treasure trove of studies and research papers that reveal the true power of these diets.
Picture this—eating fewer sugars and starches is a critical factor in your weight loss journey. On the flip side, consuming more carbs is linked to weight gain, obesity, and a whole host of health troubles. Ouch! But don’t worry, I’ve got your back with some solid evidence to prove it.
In one eye-opening study published in the prestigious New England Journal Of Medicine, they randomly assigned 63 subjects to either a low-carb group or a low-fat, calorie-restricted group for a full year. And what happened? Drumroll, please! The low-carb group triumphed, shedding around 7 percent of their total body weight, while the low-fat group could only manage about 4 percent. Way to go, low-carb superheroes!
But wait, there’s more! The brilliant minds at Brigham and Women’s Hospital and the Harvard T.H. Chan School of Public Health conducted further research, comparing low-carb diets to other approaches. And guess what? Low carb emerged as the heavyweight champion of weight loss for the long haul. Knockout!
For the full list of modern scientific studies that show the importance of low carb eating for weight loss, check this link.
And here’s a little bonus—low carb diets aren’t just about weight loss. They’re like superheroes, protecting you from life-threatening conditions like cancer! Talk about having your cake and eating it too—except it’s a low-carb cake!
Now, here’s the plan of action—limit your daily carb intake to a tantalizing range of 20 to 50 grams per day. That’s the equivalent of 80 to 200 calories provided by carbohydrates. And remember, balance is the key! Severely cutting it down to 20 grams or less can leave you feeling drained and not-so-super. So, let’s avoid any fatigue, dizziness, weakness, or headaches, shall we?
To make things easier and safer, you might consider taking advantage of low carb meals sent to your door.
Remove Distractions
Alright, foodies, listen up! You may think eating on the go is a smart time-saving strategy, but guess what? Research from the University of Surrey spills the beans—dieters who munch on the move end up packing on the pounds later in the day. Yikes!
But don’t worry, we’ve got more tasty nuggets of research to share. Another study in the Journal Appetite reveals that those who gobble up lunch while glued to their screens or lost in games tend to snack more later. The struggle is real, folks!
And here’s a head-scratcher—multitasking while munching can be a recipe for overeating, as proven by a study in the American Journal of Clinical Nutrition. Eating while texting, talking on the phone, watching TV, or strolling around triggers our inner overeater. Oh no!
Believe it or not, even walking while wolfing down your meal is a sneaky culprit. Those who eat while walking consume more calories than those who sit down to savor their food. The researchers suggest that when we eat on the go, we don’t treat it as a “real meal,” so we subconsciously snack more later. Oops!
But fear not, my mindful eaters! We have a solution for you to savor each bite and stay on track. Ready? Here are some deliciously simple tips to become a “mindful eater”:
First off, treat your mealtime as a sacred moment. Sit down and savor your food with intention. No more munching while multitasking!
Next, let’s slow things down. Chew slowly, focusing on the flavors and textures of your food. Say goodbye to distractions and hello to chopsticks if you want to add a little fun to your dining experience.
And remember, good things take time! Aim to take 15 to 20 minutes to enjoy an average-sized meal. Trust us, the longer you linger, the more satisfied you’ll feel.
Eat a Big Breakfast
Breakfast, the most delicious and important meal of the day! And guess what? It’s not just about satisfying your morning hunger pangs, it can actually help you shed those stubborn pounds. So, rise and shine, because we’ve got some breakfast wisdom to share!
Now, picture this: you start your day with a scrumptious breakfast, and what happens? You feel satisfied and energized, right? Well, that’s because by fueling up in the morning, you’re less likely to go overboard during your next meal. Smart move, huh?
But don’t just take our word for it! Let’s dive into some juicy research, shall we? In a study published in the Journal Obesity, two groups of obese women with metabolic syndrome were put to the test. Group I had a hearty 700-calorie breakfast, while Group II settled for a paltry 200 calories. And guess what happened? Group I lost a whopping 18 pounds and three inches from their waist, while Group II only managed to shed 8 pounds and 1.4 inches. Talk about a breakfast victory!
But wait, there’s more! Researchers at the Imperial College of London took things a step further. They scanned the brains of breakfast skippers using MRI, and guess what they found? When shown pictures of tempting treats like cake, chocolate, and pizza, the “orbitofrontal cortex” in their brains lit up like fireworks! And it gets even juicier—when offered lunch, these breakfast skippers chowed down 20 percent more calories than the breakfast eaters. Not a great way to kickstart your day, right?
So, here’s the bottom line: skipping breakfast might prime your brain to go on a calorie-hunting spree later in the day. Not cool at all! But fear not, breakfast believers! We’ve got your back.
And just when you thought we were done, here’s some more food for thought! Researchers from the Loma Linda University School of Public Health in California found that one of the keys to a drop in body mass index was having a substantial breakfast. So, if you want to make those pounds say “bye-bye,” make sure to enjoy a satisfying morning meal.
Have Eggs for Breakfast
I’d like to recommend one tasty food for anyone looking to lose 10 pounds or more; I won’t be recommending eggs enough.
Let me fill you in on the details.
A mind-blowing study published in the International Journal of Obesity spilled the beans on the egg-cellent benefits of starting your day with two eggs. Brace yourself for this—those who had the egg-tastic breakfast experienced a 65 percent greater weight loss, a 61 percent reduction in body mass index, and a 34 percent smaller waist circumference compared to the bagel munchers! Talk about egg-ceptional results!
Why do eggs pack such a powerful punch? Well, it’s simple. They’re incredibly nutrient-dense and low in calories, making them a weight loss warrior. Packed with top-notch proteins, essential vitamins, and healthy fats, eggs have everything you need to power through your day with gusto.
And guess what? If you’re not a fan of eggs, fear not! There are plenty of other high-quality protein options that can do the trick. Take a page out of the Pennington Biochemical Research Center’s book, where they found that a protein-rich breakfast left subjects feeling less hungry and munching on less food come lunchtime.
So, what are some egg-cellent choices besides eggs? How about some smoked salmon, mackerel, plain yogurt, or a tantalizing omelet? Oh, and let’s not forget about the raw muesli with nuts—yum!
Here are 25 delicious egg recipes to try.
Cook Your Own Food
Cooking at home isn’t just a delightful hobby; it’s actually a secret weapon for a healthier and more balanced diet. Don’t believe me? Well, let me dish out some juicy research findings that’ll make your taste buds tingle!
Researchers from the University of Washington School of Public Health unveiled the magic of home-cooked meals. Those who don their chef hats at home are more likely to whip up a well-balanced, nutritious feast without blowing up their food budget. It’s a win-win situation!
But wait, there’s more! A study published in the esteemed journal Public Health Nutrition served up some eye-opening numbers. Dieters who savored their meals at home were gobbling down a whopping 200 fewer calories per day compared to their restaurant-hopping counterparts. Can you believe that? It adds up to over 60,000 calories in a year—a staggering 16 pounds of fat! Now that’s a pretty compelling reason to grab that apron and get cooking!
Cooking at home empowers you with unrivaled control over every little ingredient that goes into your masterpiece. You’re the mastermind behind your meals, deciding just how much fat, sugar, and salt make it onto your plate. It’s like having the superpower of wholesome eating!
And here’s the secret to making it even better—focus on healthier and more wholesome ingredients while giving those refined and processed ingredients the boot. Your taste buds will thank you, and your waistline will too!
Here is the beginner’s guide to cooking
Next, start small by making one of these healthy meals recipes in just 15 minutes or less.
Consume Coconut Oil
Research shows that consuming medium chain triglycerides can increase metabolism by 120 calories per day, and lessen appetite so that you consume about 250 fewer calories per day.
Here is how to add coconut oil the healthy way into your daily menu
Use Smaller Plates
Picture this: You switch from using larger plates to smaller ones at home, and suddenly, you find yourself naturally eating less. It’s like your brain plays a little trick on you, but it’s all in your favor!
You see, a study published in the Journal of The Association for Consumer Research unraveled the secret. When you serve your meals on smaller plates, your brain associates any white space on the plate with less food. So, even though you’re eating a smaller portion, your brain tricks you into believing it’s the same amount of food. How clever is that?
And it gets even better! This nifty strategy works like a charm when it’s time to control your portions. By using an eight to 10-inch plate instead of a larger, 12-inch one, you’ll be serving yourself just the right amount, and you won’t even notice the difference.
Exercise Portion Control
Portion control, my friend, is the secret sauce to conquering those pesky pounds! Research has unmasked the culprit behind the obesity epidemic in the U.S.—increased portion sizes. But fear not, for science also unveils the magical solution: portion-controlled meals!
Imagine this: You opt for those pre-packaged, portion-controlled delights, and like a charm, you witness higher weight loss than with a self-selected diet. The evidence is undeniable, with studies like the one in the Journal Obesity showcasing how these meals work wonders for shedding weight.
Even a humble smaller plate can wield its power! Researchers from Cambridge University discovered that using a smaller plate reduced calorie intake by a whopping 160 calories. Talk about portion size becoming your secret weapon in the battle against those extra pounds!
Now, let’s get practical with portion control:
Embrace those single-serving packaged meals, loaded with nutritious goodness in just the right proportions. They’re like little weight-loss superheroes!
Your hands can be your trusty guide—two handfuls of veggies, one fistful of good carbs, a palm of lean protein, and a thumb of healthy fats at every meal. Voilà! The perfect portion awaits.
When dining out, think small, my friend. Instead of going for the colossal seven-inch sandwich, go for the charm of a small salad, a petite hamburger, or any other delightful mini portion.
Eat Spicy Foods
Capsaicin, the active ingredient in chili peppers, has been linked to an increased ability to burn energy, according to a study from US Arizona University and reported by China’s Xinhua news agency.
Additionally, research published in the Journal Obesity Open Access found that supplementing with capsicum extracts can boost resting energy expenditure in healthy adults. Another study from Purdue University suggests that consuming spicy food can help reduce appetite and calorie intake.
The secret lies in capsaicin’s potential to stimulate brown fat, which can increase metabolism by up to five percent and enhance fat burning by up to 15 percent.
To incorporate this spicy goodness into your diet, consider adding small amounts of crushed ground cayenne or red pepper to your meals three to four times a week.
Sprinkle cayenne pepper on sandwiches or eggs, use fresh pepper slices to accompany your dishes, or mix it into salads, soups, or dips.
However, remember not to go overboard, as not everyone may be accustomed to the spiciness.
Here are 40 awesome spicy food recipes to try.
Use A bigger Fork
Fork size matters. A study published in the Journal of Consumer Research suggests that using a bigger fork could actually help you consume fewer calories.
In a unique experiment, researchers took over an Italian restaurant and randomly assigned tables to receive either unusually large forks (20 percent larger than average) or unusually small forks (20 percent smaller).
The results were surprising. Customers who received the bigger forks ended up eating less food. When they finished their meals, they left roughly 7.9 ounces of food on their plates, compared to 4.4 ounces for the other group. The researchers theorized that people with the bigger forks may have felt fuller with less food because they were eating larger mouthfuls, which created the impression of consuming more food.
Walk After Your Meals
Walking is a fantastic low-impact exercise with numerous health benefits, but did you know that taking a brisk walk right after a meal can actually enhance its effectiveness for weight loss? According to Japanese research, participants who went for a 30-minute walk immediately after eating lost more weight compared to those who skipped the walk.
And it’s not just about weight loss. Another study published in the International Journal of General Medicine found that walking after any meal, including dinner, can lead to significant health improvements. These benefits include reducing blood sugar levels, speeding up digestion, curbing triglyceride levels, and increasing calorie burn—all contributing to weight loss.
Moreover, research conducted at the Lawrence Berkeley National Laboratory in California discovered that brisk walking can lower the risk of diabetes, high cholesterol, and high blood pressure just as effectively as running.
Take up Running
When it comes to losing weight and maintaining a healthy lifestyle, running takes the crown as one of the most effective exercises out there. Despite being a high-impact sport, running has the incredible ability to torch calories at an impressive rate—around 100 calories per mile, although the exact number may vary based on factors like training intensity and fitness level.
The scientific community stands in agreement with the weight loss potential of running, and numerous studies have highlighted its benefits. For instance, there’s a compelling body of research supporting its effectiveness in shedding pounds and improving overall health.
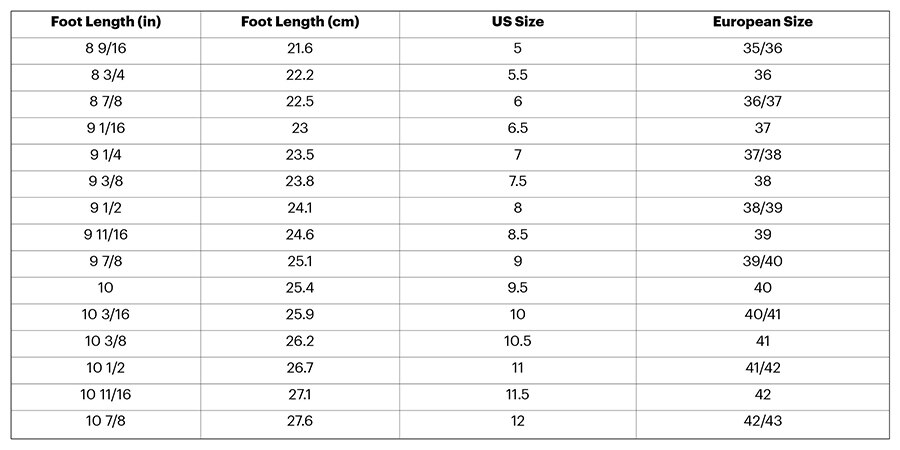
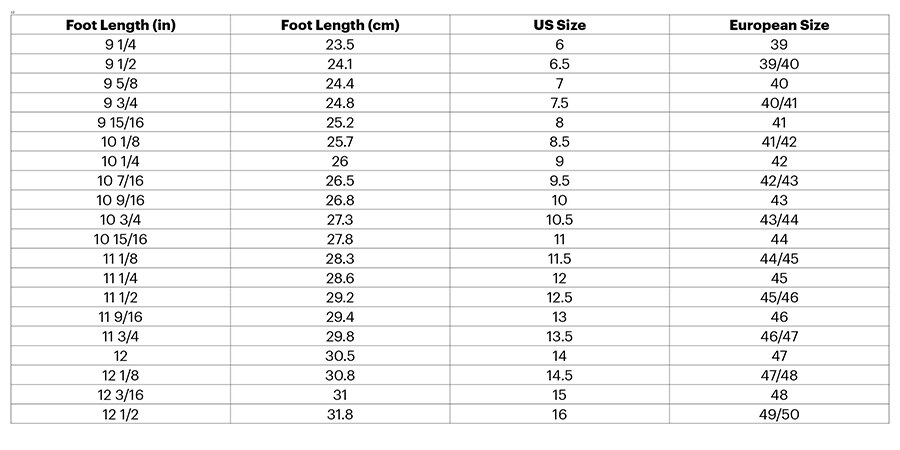
The best part is, you don’t need fancy equipment or a gym membership to get started. All you require is a good pair of running shoes, and you’re ready to hit the ground running, quite literally!
Here are the resources you need to get started running.
Top 9 Weight Loss Rules For Runners
Absolute Beginner’s Guide to Running
The 8-Week Beginner Running Program
The 30-Minute Treadmill Workout for Beginners
Join a Yoga Class
Regular yoga practice has been linked to mindful eating, which, in turn, may help curb binge eating, as per research conducted at the Fred Hutchinson Cancer Research Center.
Another study published in the Journal of Alternative and Complementary Medicine found that regular short yoga training led to weight loss and reduced cardiovascular disease risk in overweight men.
Additionally, a study in Menopause, the journal of The North American Menopause Society (NAMS), reported that six months of yoga significantly reduced body weight, lean body mass, and waist circumference in obese post-menopausal women.
One reason why yoga is effective for weight loss might be its ability to lower cortisol levels—a hormone that tends to rise during periods of high stress and is known to increase abdominal fat. Beyond its potential impact on weight, yoga offers a wide array of physical, emotional, and psychological benefits, making it a holistic approach to improving overall well-being.
Here is a YouTube Tutorial to help you get started on the yoga path.
Lift Weights
If you’re a regular reader of Runners Blueprint, you already know that I’m a huge advocate of strength training, and for a good reason—it works wonders! Not only can regular resistance training enhance your running performance, but it also has numerous other benefits.
By incorporating strength training into your routine, you can build muscle mass, increase your resting metabolic rate, and safeguard your precious muscle from wasting away.
But here’s the real kicker—some studies even suggest that weightlifting might be more effective for weight loss than traditional cardio-based exercises.
Yes, you heard that right!
According to research published in the International Journal of Cardiology, high-intensity strength training could be the secret weapon to help you shed that stubborn belly fat, outperforming cardio exercises alone.
So, if you’re ready to get started with strength training, don’t worry—it’s simpler than you think. Begin with the basics and progress gradually, making sure to hit the weight room at least three times a week. Focus on compound movements like squats, deadlifts, pushups, pull-ups, burpees, lunges, and other full-body exercises that engage multiple muscle groups simultaneously.
This way, you’ll get the most bang for your buck and set yourself on the path to a stronger, leaner, and more resilient body.
High-Intensity Interval Training
While extended steady-state cardio can certainly burn calories, if you want to maximize the effectiveness of your workouts and boost your metabolism, high-intensity interval training (HIIT) is the way to go.
HIIT involves alternating intervals of high-intensity effort with periods of low-to-moderate effort for recovery. This type of training has been shown to be highly effective for burning calories and increasing metabolism for a prolonged period after the workout—much more so than steady-state training of even longer duration.
Research has consistently shown that HIIT can help you achieve better results in a shorter amount of time compared to traditional steady-state cardio. Not only does HIIT burn more calories during the workout, but it also triggers an “afterburn” effect known as excess post-exercise oxygen consumption (EPOC). This means that your body continues to burn calories at an elevated rate even after you’ve finished your workout.
Here are three HIIT routines to try:
Exercise First Thing in the Morning
Exercising first thing in the morning can be a game-changer when it comes to burning calories and achieving weight loss.
Research from Northumbria University indicates that working out on an empty stomach in the morning can lead to a whopping 20 percent more fat loss compared to exercising after breakfast.
If you want to become a morning exerciser, here are some tips to help you get started:
- Plan your workout the night before: Decide on the type of exercise you’ll do, whether it’s a morning jog, yoga session, or a home workout routine.
- Lay out your workout gear: Set your exercise clothes and shoes in plain view the night before. This will make it easier for you to get dressed and get moving in the morning.
- Set two alarm clocks: Put your alarm clocks away from arm’s reach, so you have to physically get out of bed to turn them off. This can help you avoid hitting the snooze button repeatedly.
- Stick to a consistent routine: Try to wake up at the same time every morning, even on weekends. This will help regulate your body’s internal clock and make it easier to get up and start your workout.
- Prioritize sleep: Aim for seven to nine hours of sleep each night. Having enough rest makes it more manageable to wake up earlier and tackle your morning exercise
- Find a workout buddy: Partner up with a friend who shares your fitness goals. Holding each other accountable can provide motivation and make morning workouts more enjoyable.
Keep a Food Diary
Keeping a food diary can be a powerful tool for weight loss and maintaining a healthy diet. Research published in the American Journal of Preventive Medicine suggests that the more detailed records you keep of the food you consume, the more weight you’re likely to lose.
In a six-month experiment involving 1,700 overweight subjects, participants were encouraged to exercise and follow a sensible diet while diligently keeping a food diary. The results were striking, with the individuals who religiously recorded their meals shedding about twice as much weight as those who didn’t keep such records.
To make the most of your food diary, here are some key things to keep track of:
Time spent eating: Note the time of day you eat your meals or snacks. This can help you identify patterns in your eating habits and plan better for healthy meals throughout the day.
Place of meal: Jot down where you have your meals, whether it’s at home, work, a restaurant, or on-the-go. This information can provide insights into your environment’s impact on your food choices.
Your mood at the time of the meal: Record your emotions before and after eating. This can help you recognize emotional eating triggers and find healthier ways to cope with stress or other emotions.
Hunger levels at the time: Rate your hunger levels on a scale before and after eating. This will help you distinguish between true hunger and eating out of boredom or habit.
Food choices and portion sizes: Be specific about what you eat and the quantities. Including details about portion sizes can give you a better understanding of your calorie intake.
Sleep Well
Ensuring you get enough sleep is a crucial factor in making sure your efforts to lose 10 pounds are successful. Various studies have highlighted the impact of sleep on our eating habits and overall weight.
According to a study published in the Journal of Clinical Nutrition, sleep deprivation can lead to an increase in late-night high-carb snacking. Further research conducted at the University of Chicago revealed that sleep-deprived individuals tend to consume snacks with twice as much fat as those who get enough sleep.
A long-term study published in the American Journal of Epidemiology found that women who don’t get enough sleep are 30 percent more likely to gain about 33 pounds over the next 16 years compared to those who sleep for eight to nine hours each night.
The link between sleep and weight gain lies in the impact of sleep deprivation on the frontal lobe of the brain, which controls impulse control and decision making. When we lack sleep, it becomes harder to resist temptations and make healthy choices.
Moreover, sleep deprivation disrupts the balance of hunger hormones, leading to increased appetite and potential weight gain. It can also lead to other health issues like high blood pressure, diabetes, cardiovascular diseases, and cognitive problems.
Surround yourself with The Right People
The influence of friends and social circles on our weight loss journey is significant, as research from the University of California shows. If you have a friend who gained weight in a given interval, you are 57 percent more likely to do the same.
However, the flip side is that having an exercise buddy who successfully lost weight increases your chances of achieving sustained weight loss, according to a study published in the Journal of Consulting and Clinical Psychology.
Further research has also demonstrated that embarking on a weight loss journey with friends can be highly beneficial. Those who have supportive friends on their weight loss journey are more likely to lose weight and maintain a healthy weight compared to those who go about it on their own.
To leverage the power of peer pressure to your advantage, start by communicating your weight loss and fitness goals within your social environment. Share your aspirations and seek support from friends and family.
Additionally, consider joining online communities on platforms like Facebook, Twitter, or other forums that offer support, advice, and monthly challenges. These communities can provide a sense of camaraderie, motivation, and accountability, making your weight loss journey more enjoyable and successful..
Here is a list of websites to check out:
Meditate to a Thinner Body
Emotional eating can significantly impact healthy body weight and hinder your weight loss goals. However, there’s good news: daily mindful practice can help you become more aware of hunger cues, emotional triggers, and feelings associated with binge eating.
In a study conducted at North Carolina State University, 80 subjects were divided into two groups. One group engaged in daily meditation, while the other group designed their own mindful practice. The results showed that the meditation group lost an average of 4.2 pounds, which was seven times more than the other group’s average of 0.6 pounds.
Furthermore, research from The French NutriNet Santé reported that regular meditation could decrease the risk of obesity by 50 percent.
To build the habit of daily meditation, you can try various forms of mindfulness practices, such as breathing exercises, Vipassana, transcendental meditation, muscle relaxation, self-hypnosis, Yin yoga, and more. Find the technique that resonates with you and make it a part of your daily routine to improve your relationship with food and enhance your weight loss efforts.
Check this beginner YouTube tutorial for getting started down the mindfulness path:
Reduce Your Stress
Cortisol, a stress hormone produced by the adrenal glands, has been linked to increased food cravings and stubborn belly fat in numerous research studies. This hormone plays a role in regulating appetite, metabolism, and body composition.
A study published in the Journal Obesity analyzed cortisol levels in hair samples from participants and found that those with higher cortisol levels had larger body weight, waist circumference, and BMI.
Stress may also affect the secretion of peptide YY (PYY), a hormone that signals fullness and regulates appetite, released by cells in the intestines and colon.
To reduce stress, consider incorporating the following practices into your daily life:
- Engage in regular meditation or mindfulness exercises.
- Surround yourself with positive and supportive people.
- Spend more time in nature and limit screen time.
- Laugh more often to release tension and boost mood.
- Treat yourself with kindness and self-compassion.
- Learn to say no to unnecessary commitments and prioritize self-care.
By managing stress levels, you may experience improved overall well-being and better weight management.
Pay cash for Groceries
Research conducted at Cornell University found that the payment method used for groceries can influence food choices. The study showed that individuals were less likely to buy unhealthy junk food when they used cash instead of credit cards.
In a separate analysis of supermarket purchases from 1,000 households over six months, it was observed that shoppers who used credit cards tended to buy more junk food compared to those who paid in cash. This suggests that using credit cards may lead to the purchase of calorie-dense and unhealthy foods, despite the potential additional cost to both health and finances.
Therefore, if you want to make healthier food choices and avoid unnecessary junk food purchases, consider using cash when shopping for groceries. It may help you stay more mindful of your purchases and make better decisions for your overall health.
Visualize the Food You Crave
Research published in the journal Science suggests that imagining oneself repeatedly indulging in junk food can actually help in consuming less of the actual food when presented with the opportunity. This finding challenges the traditional thought-suppression strategy often used in weight loss efforts.
Rather than trying to suppress thoughts about tempting foods, the study recommends embracing those thoughts and visualizing oneself indulging in the desired treats. By doing so, individuals may reduce the intensity of their cravings and feel less compelled to overindulge in unhealthy snacks.
However, it’s essential to strike a balance and maintain a healthy and balanced diet overall. While this visualization technique may help manage cravings, it should not replace the importance of making mindful and nutritious food choices for long-term health and weight management.
Don’t Diet. Build A Healthy Lifestyle
Building a healthy lifestyle is key to achieving lasting weight loss and overall well-being. Crash diets and quick fixes may yield temporary results, but they often lead to rebound weight gain and can be detrimental to overall health.
Instead of chasing after short-term solutions, focus on creating sustainable habits that promote a balanced and healthy lifestyle. Regular exercise, a well-balanced and nutritious diet, adequate sleep, and stress management are essential components of a healthy lifestyle.
Rather than depriving yourself of the foods you love, practice moderation and portion control. Allow yourself occasional treats and enjoy them guilt-free. This approach fosters a positive relationship with food and helps prevent feelings of deprivation that can lead to overeating.
Remember, a healthy lifestyle is not just about physical health but also about mental and emotional well-being. Engage in activities that bring you joy and help reduce stress. Prioritize self-care and self-compassion, as they are vital for maintaining a healthy and sustainable weight loss journey.
By focusing on creating a positive and balanced lifestyle, you’ll not only achieve your weight loss goals but also experience numerous benefits for your overall health and happiness.
The Conclusion
I’d like for the record to state that what works for some people may not work for others when it comes to losing weight.
All the strategies below are backed by real science, but that does not mean that they guaranteed to work for everyone. Your friend might lose 10 pounds by trying them. You may lose more. or less. Depends.
Everyone is different and responds differently to various methods and strategies. So experiment widely to find out what works the best for you.
I hope this article can help in some way, small or big, and keep in mind, if any of the above strategies are put into action it’s a step in the right direction—no matter how far you still have to go.
It might not be your fault that you’re in the situation you’re in right now, but it’s up to you to drive your own bus and take it where you want to go.
For more, check the links to the studies and research papers.