When to Replace Your Running Shoes, Clothes, and Gear for Maximum Performance and Injury Prevention

If you’re like me, you’ve probably kept running shoes and gear way past their prime.

But here’s the truth: holding onto old gear can actually hurt your performance—and lead to injury.

Let’s chat about how long your gear should last before it’s time to say goodbye. I’ll help you figure out when it’s time to let go and keep your runs as strong as possible.


How Often Should You Replace Your Running Shoes?

Your shoes? They’re the foundation of every great run. But even the best shoes wear out eventually.

You’ve probably heard the rule: change your shoes every 300-500 miles. That’s a good starting point, but there’s more to it than just miles.

I’ve done it too—kept running in shoes even when they were done, just to save a few bucks. Trust me, that’s when injuries pop up out of nowhere.

So, how do you know when to finally let them go?

1. The Surface You Run On

Where you run makes a big difference too.

Running on pavement? Your shoes won’t last as long.

Trails are kinder to your shoes.

But if you take road shoes onto rocky trails, they’ll wear out faster.

2. Your Running Style

Are you a heel striker or do you land on your forefoot? The way you land affects how your shoes wear down.

If you’ve got a heavy heel strike, you’re burning through that cushioning much faster.

Next time you’re at the store, check out the wear pattern on your shoes—it’ll give you a good idea of your running form.

Best tip? If you run a lot, get two pairs of shoes and switch between them. This way, each pair gets a rest, and they’ll last longer.


Signs Your Running Gear Needs Replacing

  • Thin spots
  • Visible holes
  • Loss of elasticity around toes/cuffs

Don’t wait until it hurts—replace those shoes before they mess up your form and cause injuries.


How Often Should You Replace Your Running Sports Bras for Comfort and Support?

Sports bras are meant to give you support, and once they start losing that, it’s time to replace them. If the elastic bands start to stretch out or the straps lose their shape, it’s a clear sign they’re done.

On average, you should replace your sports bras every 6-12 months, depending on how often you use them.


How Often Should You Replace Your Running Tops and Bottoms?

Moisture-wicking fabrics are a game changer—when they’re fresh. But once they lose their elasticity or start thinning out, they’re not doing their job anymore.

If you notice stubborn smells that won’t come out or the fabric starts feeling “sticky,” it’s time to let go.

I used to hold onto my favorite running shorts way too long, even though they were getting a little too see-through. Finally, I had to retire them after a very awkward moment during a group run. Trust me, you don’t want to wait that long.


When to Replace Your Running Hat

I’ll be honest: I used to hang on to my hats way longer than I should have. That favorite cap of mine? It had seen better days—faded color, sweat stains, and the brim was drooping like it had been through a hurricane.

But we runners get sentimental about our gear, right?

Here’s the deal with hats: they’re meant to shield you from the sun and keep the sweat out of your eyes. But once the shape starts to go, or the fabric becomes too worn out, it’s time to replace them.

And, let’s be real, if you notice that sweatband starting to stretch out or smell funky no matter how many times you wash it, that’s your signal to let it go.


When to Replace Your Running Sunglasses

Those sunnies are supposed to protect your eyes from the sun, but if they’ve seen too many miles, they might be doing more harm than good.

If your sunglasses’ lenses are scratched, you’re not just dealing with a cosmetic issue—you’re compromising your vision.

A good pair of running sunglasses should give you clear, distortion-free vision to see your path ahead. Once they start to get foggy, or the frames are too loose, you might as well be running blind.

My advice? If they’re slipping down your nose during your runs, it’s definitely time for an upgrade. Don’t wait for them to fall off mid-stride.


When to Replace Your Running Gloves

Gloves aren’t just for keeping your hands warm during those chilly runs—they’re a crucial part of your running kit when it comes to comfort.

But here’s the thing: running gloves have a shelf life. They’re taking on sweat, dirt, and the elements all winter long, so over time, they start to lose their insulation or get holes where you don’t want them.

Once they’ve been through a few seasons, and you notice that the fabric isn’t as warm or snug as it used to be, it’s time for a new pair.

Don’t wait for your gloves to develop holes and leave your hands exposed to the cold. Trust me, it’s not fun running with frozen fingers.


When to Replace Your Running Watch or GPS Device

We all rely on that trusty GPS watch to track our runs, monitor our heart rate, and help us stay on pace. But like everything, even your tech needs replacing every now and then.

Battery Life:

If your GPS watch is struggling to hold a charge, or it takes forever to charge up, that’s a red flag. A battery that dies quickly is a sign the watch is on its last legs. Don’t wait for it to give out in the middle of a run.

Accuracy:

Running is all about tracking progress, and if your watch starts giving you inaccurate readings—whether it’s distance, heart rate, or pace—you’re better off investing in a new device.

A GPS watch is meant to be your training partner, and if it’s no longer reliable, you’re just running blind.


When to Replace Your Running Socks

Running socks are one of those things you don’t think about until it’s too late. You’re out on your run, and suddenly, there’s a blister forming. Well, guess what? Those socks you’ve been holding on to probably have something to do with it.

Signs They Need Replacing:

  • Thin spots
  • Visible holes
  • Loss of elasticity around toes/cuffs

When to Replace:

If you’re running consistently, replace them at least every 6 months. It’s a small investment that’ll save you from discomfort, and possibly injury.


How to Store Your Running Gear

Proper storage can seriously extend the life of your gear. You might think tossing everything into the laundry basket or leaving your shoes by the door is fine, but trust me, how you store your gear makes a big difference.

Shoes:

Don’t leave them in a damp, humid environment—like the garage or the trunk of your car. The moisture can cause the material to break down faster. Instead, let them air out after a run and store them in a cool, dry place.

Clothing:

Running clothes, especially moisture-wicking fabrics, need to be stored in a way that keeps them from losing their elasticity. Avoid tossing them in a laundry hamper where they might get moldy. Hang them to dry if possible, and store them in a cool, dry area to preserve the fabric.

Proper storage means your gear stays in better shape for longer, saving you money and preventing unnecessary wear and tear.


Frequently Asked Questions About Running Gear Lifespan

1. How do I know if my running shoes are still providing the right support?

As your shoes wear down, the cushioning and support degrade. To check if your shoes are still offering the support you need, press the midsole (the cushy part) with your thumb. If it feels stiff or hard, it’s time to replace them. Also, if you notice pain in your knees, hips, or back after a run, your shoes may not be supporting you correctly anymore.

2. Can I extend the lifespan of my running shoes?

Yes! Rotating between two pairs of shoes can help extend their lifespan. By alternating between them, each pair gets a break, allowing the cushioning to recover. Also, always let your shoes dry out fully after each run and store them in a cool, dry place to avoid moisture breaking them down faster.

3. How can I tell if my running gear is too tight or too loose?

If your gear starts to feel tight or restrict your movement during a run, it’s time for a new piece of equipment. Tight clothing can lead to chafing and discomfort, while loose clothing can get in the way of your performance. Pay attention to any signs of discomfort, like rubbing or shifting, during your runs.

4. How often should I replace my running socks if I have blisters?

If you’re getting blisters regularly, even though you’ve tried new shoes or different socks, it could be time to replace your socks. Over time, running socks lose their elasticity and cushioning, which may no longer provide the protection your feet need. You should aim to replace them every 6 months or sooner, depending on how much you run.

5. How long do running sunglasses typically last?

Running sunglasses can last anywhere from one to three years, depending on how often you use them and how well you care for them. If the lenses get scratched, it’s time to replace them to ensure proper protection for your eyes.

How to Find Your Ideal Fat-Burning Heart Rate for Maximum Fat Loss

You’ve probably heard of the “fat-burning heart rate” zone, but what does it really mean?

Is running slow the secret to losing fat, or is there more to it?

Here’s the deal: your heart rate tells you how hard you’re working, but it’s not some magic number.

The fat-burning zone is where your body burns fat most efficiently—usually around 60-70% of your max heart rate.

But things are not that simple.

In this article, I’ll break down how to find your fat-burning zone, why mixing up your workouts matters, and how to use your heart rate to run smarter and burn more fat.

Ready to stop guessing and start training smarter?

Let’s get to it.


What’s the Fat-Burning Heart Rate Zone?

Alright, here’s what you need to know. You’ve probably heard the term “fat-burning heart rate” tossed around, but what does it actually mean?

When I first heard about it—I thought there was some magic formula to lose fat without effort!

Here’s the real deal: the ‘fat-burning heart rate’ is just the point where your body starts burning fat more efficiently during exercise.

It’s not about just jogging at a snail’s pace—it’s a sweet spot where you’re working, but still able to keep going.

For most folks, this zone is somewhere around 60-70% of your max heart rate. Now, you might be wondering, “How do I find that out?”

Don’t stress, it’s really simple.

Here’s how you do it: 220 minus your age = your max heart rate.

For example, I’m 38, and my max heart rate is 182. To find my fat-burning zone, I aim for 60-70% of that, which puts me between 109-127 beats per minute.

I remember when I figured this out for the first time. I was out on a run, and honestly, I had no clue if I was in the “fat-burning zone” or not. But once I figured out the numbers, it gave me a target to aim for.

I know I know. This formula might be an oversimplification and might not work for everyone. But overall, it’s a good reference point.

Fat-Burning vs. Cardio: What’s the Difference?

You know about the fat-burning zone, but let’s talk about what happens when you push harder into the cardio zone.

In the fat-burning zone, you’re burning a higher percentage of fat while exercising at lower intensities.

But when you hit the cardio zone, you’re working harder and burning more calories. It sounds a little backwards, doesn’t it?

When you hit the cardio zone, you’re working harder, burning more total calories—and even though you burn a smaller percentage of fat, you end up burning WAY more fat overall.

Here’s the kicker: high-intensity workouts burn through your body’s quick energy stores (glycogen).

And once that runs out? You guessed it—your body switches to burning fat for fuel.

Here’s my best tip for you: Don’t get too hung up on the exact numbers.

Your body is burning fat all the time, whether you’re in the fat-burning zone or pushing hard in the cardio zone.

You just have to challenge it properly. Switch things up! Try some faster runs or intervals now and then. That’s how you get your body to really adapt.


How to Find Your Sweet Spot: Fat-Burning Heart Rate Training

Now that you’ve got the math down, let’s talk strategy.

If fat loss is your goal, aim to spend at least 30 minutes in that fat-burning heart rate zone.

Not sure if you’re there? Use the talk test.

If you can hold a conversation without gasping for air, you’re probably in the sweet spot.

If you’re gasping for breath and can’t string more than a word or two together—you’re definitely in the cardio zone. And that’s fine too! It’s great for overall fitness.

Don’t stress if you’re not always in the fat-burning zone. Mix in some higher-intensity work (like intervals) to burn fat in different ways. Your body loves variety, and it’ll keep adapting.


What’s Better: Fat-Burning or Cardio?

Fat burning is important, but cardio has its place, too. When I first started running, I was obsessed with staying in the fat-burning zone.

I thought the only way to shed fat was through those slow, long runs.

But then I started adding in some sprint intervals.

And guess what? My legs got leaner, my stamina shot up, and I felt faster.

That’s when I realized: you don’t have to live in the fat-burning zone to see results.

Over time, I realized I was holding myself back. High-intensity workouts, like sprints or hill repeats, burn more calories overall—and help you get leaner faster—even if you’re not in the fat-burning zone the whole time.

So, mix it up. Use both fat-burning and high-intensity cardio for the best results.


How to Track Your Heart Rate While Running

You don’t need some fancy monitor to track your heart rate, but it sure helps. The simplest way? Grab your phone, pause mid-run, and use an app to check your pulse.

Easy, right? But if you want something a bit more accurate, I’d recommend investing in a heart rate monitor. There are wristband monitors out there that track your heart rate, steps, calories burned, and more.

Here’s my best tip for you: If you’re serious about consistency,  use a chest strap monitor. It gives  you the most reliable readings and lets you keep pushing without constantly stopping to check your phone.


Conclusion

Bottom line? Consistency and variety. Find your fat-burning zone, but don’t be afraid to step out of it every now and then.

You’re not just training your body to burn fat—you’re getting stronger, faster, and more efficient.

Stick to your training, mix in some intervals, and remember: progress isn’t just about your heart rate.

“Every run, every sweat session, you’re building the runner you want to become.

Keep showing up—and trust me, those results? They’ll come.”


Summary / Key Takeaways

  • Running alone isn’t a magic fix for weight loss.
  • Strength training helps build muscle and burns more fat.
  • Consistency is the key to seeing real results.

FAQ:

How do I calculate my fat-burning heart rate? Subtract your age from 220 to get your max heart rate. Then aim for 60-70% of that number to hit the fat-burning zone.

How many calories do I burn per mile running? On average, you burn about 100-150 calories per mile, depending on your speed and body type.

Can I still burn fat if I’m not in the fat-burning zone? Yes, you can! High-intensity workouts burn more calories overall, even if you’re not in the fat-burning zone.

How long should I stay in the fat-burning zone? Aim for at least 30 minutes in the fat-burning zone for optimal fat loss.

Is it better to run at a slow pace for longer or run faster for shorter times? Both have their benefits! Slow runs burn fat efficiently, while fast runs burn more calories overall.

Runner’s Cough: Why You Hack After Hard Runs (And What to Do About It)

You finish a tough run—legs are good, lungs feel scorched—and then it hits: that dry, hacking cough.

It might last a few minutes. Maybe longer. You’re not sick, not wheezing like crazy… but you sound like you smoked a pack mid-tempo.

I’ve been there. So have a ton of other runners. For some runners, it might feel like hacking up a lung, and it happens like clockwork after long runs or speedwork.

The good news? It’s usually not serious. The better news? There are ways to manage it.

Let’s break it down.

What Is “Runner’s Cough”?

“Runner’s cough” (aka “track hack,” “tempo throat,” or “that gross noise I make after hills”) is that annoying cough you get during or after a run.

It’s not a cold.

It’s not a flu.

It’s just your lungs reacting to stress—especially from breathing hard in dry, cold, or polluted air.

When you run hard, you suck in a ton of air—fast, dry, maybe full of gunk like dust or pollen—and it irritates your bronchial tubes. Your airways freak out, tighten up, and boom: you’re coughing.

TL;DR: Your lungs got mad. They’ll chill soon.

Exercise-Induced Bronchoconstriction (EIB)

This is a mouthful, but it’s one of the most common causes of post-run coughing—especially if it happens often.

What the heck is EIB?

It’s basically temporary airway tightening during or after exercise. Used to be called “exercise-induced asthma,” and yep—it can happen even if you don’t have asthma.

What it feels like:

Coughing that kicks in mid-run or right after

Wheezing or chest tightness (like someone’s stepping on your lungs)

Feeling out of shape, even when you know you’re not

That deep, rattling cough that comes from the chest, not your throat

A lot of runners just assume it’s normal to cough after hard intervals or long tempo runs. But if it’s consistent, it could be EIB—and it’s way more common than you think.

👉 Research shows 5–20% of people without asthma still get EIB. For folks who do have asthma? Nearly 90% of them experience it during exercise.

How to Manage EIB (And Keep Running Strong)

Here’s how I’d recommend handling this one:

Use a Fast-Acting Inhaler (If Prescribed)

Albuterol is a common one. Two puffs before your workout can keep your airways open and chill. Always follow the prescription—this isn’t one of those “more is better” situations.

I knew a guy who accidentally doubled his dose… and ended up jittery with a resting HR of 150 bpm. Don’t do that.

Warm Up Like You Mean It

Don’t blast into your run at full throttle. Give yourself 5–10 minutes of light jogging and mobility work. Think of it as “priming” your lungs.

A good warm-up can actually trigger a little airway tightening before the main effort—then your lungs adapt, and you’re less likely to flare up when the real work starts.

Cold or Dry Air? Protect Your Face

Cold air is a major trigger. I tell runners to wear a buff or thin scarf over their nose and mouth in winter.

It helps warm and humidify the air before it slams into your lungs. And it works—especially for folks who say they only cough after cold-weather runs.

Try Nose Breathing (When You Can)

It’s not easy during speedwork, but during easy runs, breathe in through your nose and out through your mouth.

Your nose acts like a built-in humidifier. Mouth breathing in dry air = fast-track to cough city.

Cold or Dry Weather Running: Meet the “Track Hack”

Ever finish a winter run and suddenly feel like your lungs are on fire and your throat’s been sandpapered?

You’re not broken — that’s just cold-air cough, also known as the “track hack.”

And if you’ve ever done repeats on a dry indoor track or run in sub-40 temps, you know exactly what I’m talking about.

Why It Happens

Your lungs like their air warm and damp. But winter air? It’s cold, dry, and rough on your airway lining.

Breathe that in hard and fast, and your lungs fight back — tightening up (sometimes causing that tight-chest, can’t-breathe feeling of exercise-induced bronchospasm) and producing mucus to try and protect themselves.

What you get is a scratchy throat, a dry cough that can last for hours, maybe even some clear mucus coming up as your body tries to rehydrate your airways.

What It Feels Like:

  • Cough starts near the end of the run or just after
  • Feels like a cold burn in your chest
  • Dry or slightly phlegmy cough
  • Raw throat or scratchy chest afterward

Even indoor tracks with dry air can trigger it. The real issue? Cold + dry = irritated lungs.

How to Deal With It

Here’s how to stop this one in its tracks.

Cover Your Mouth and Nose

Neck gaiter, buff, thermal mask — whatever it is, cover up.

Trapping just a bit of moisture and warmth in your breath goes a long way. Even a thin layer over your mouth makes the air feel friendlier to your lungs.

Run Later in the Day

Mornings are the coldest. Midday runs usually have less windchill and a little warmth from the sun.

Even just a 10°F difference can mean the difference between a smooth run and a post-run cough fest.

Go Indoors on Brutal Days

If it’s below freezing, windy, or dry as a bone, treadmill runs are totally fair game. Save your lungs.

You’re not soft — you’re smart.

Warm Up Longer

Ease into your run. Brisk walk, slow jog, dynamic drills — get your breathing warmed up before you start hammering the pace.

Cold air and fast breathing right out of the gate is a recipe for coughing fits.

Postnasal Drip: When Your Nose Messes With Your Run

Let’s call it what it is: snot sliding down the back of your throat and triggering a cough.

Postnasal drip is gross, but common — and it can totally ruin your run.

Why It Happens

When you run, especially in cold or dusty air, your sinuses ramp up mucus production.

That extra gunk drains down your throat, and your body tries to clear it out with coughing or constant throat clearing.

Allergies? Dry air? Leftover cold? All of those can crank up the drip.

How You’ll Know:

  • Wet cough (you’re bringing up stuff)
  • Throat-clearing during or after runs
  • Scratchy or sore throat
  • Sinus pressure or that annoying “mucus stuck in the throat” feeling

It’s especially common in cold weather (your nose runs more) or allergy season (hello, pollen). And if you’re just getting over a cold? Your airways are still sensitive and junky.

How to Tame the Drip:

Take the following steps to protect yourself from the drip:

Rinse Your Nose Before Running

Saline spray or a quick neti rinse can help wash out dust, pollen, or dried mucus.

It’s gross but effective. Clear the pipes before you run, and you might save yourself a hacking fit halfway through your tempo.

Try an OTC Fix

Decongestants dry things up (good if you’re drowning in mucus).

Expectorants (like guaifenesin) thin the mucus so it doesn’t stick.

Ask a pharmacist if you’re not sure what’s best for your case — especially if you’re on other meds or have health stuff going on.

Breathe Moister Air

If you’re indoors, use a humidifier.

If you’re outside, cover your mouth like we talked about earlier.

You can also breathe more through your nose, which naturally humidifies the air better than mouth-breathing.

Treat the Root Cause

Allergies? Use antihistamines or nasal sprays.

Sinus issues? See a doc.

Recent cold? Back off the pace for a bit and let the body clear it out.

It’s not always about pushing harder — sometimes it’s just about letting your system reset.

Seasonal Allergies: When the Air Fights Back

If you’re a runner with seasonal allergies, you already know what I’m about to say: spring hits, everything starts blooming, and boom — you’re coughing like you just inhaled chalk dust mid-tempo.

That cough? It might not be from effort. It could be an allergy-driven airway freakout.

When pollen or mold is floating thick in the air, your immune system throws a fit — inflaming your airways, making you wheeze, and producing histamine like it’s going out of style.

Cough, sniffle, itch, repeat.

The American Lung Association even flags pollen as one of the biggest spring allergy triggers — and it hits runners hard.

You’re outside. You’re breathing hard. You’re basically a walking allergen magnet.

What It Looks Like:

You go out for a nice run. The sun’s out. Trees blooming.

Halfway through, your nose runs faster than your pace, your throat itches, and you start coughing.

After the run? Still coughing. Eyes watering. You’re miserable.

If you also deal with exercise-induced asthma (EIB)? You might get double-hit — allergies + airway constriction. That cough gets louder and longer.

Here are my best tips on running through the allergy season without losing your mind:

  • Check the pollen count before you run. If it’s sky-high? Go treadmill. Or swap your run for cross-training that day.
  • Run at the right time. Pollen levels spike in the morning and on warm, windy days. Evening or dusk is usually better. Rainy days? Gold.
  • Pre-load with an antihistamine. Non-drowsy versions like loratadine (Claritin) or cetirizine (Zyrtec) work well for most. Just don’t try something new on a race day.
  • Wear gear that helps. Wraparound sunglasses = fewer itchy eyes. A light buff over your nose/mouth can cut down pollen inhalation.
  • Shower and change ASAP post-run. Get that pollen off your skin and clothes before it lingers in your lungs.

If the cough still kicks in despite all this — talk to a doc. You might have allergic asthma and need an inhaler. Better to manage it early than wheeze through workouts all season long.

Acid Reflux (a.k.a. Your Stomach Being a Jerk)

Ever get a cough mid-run, followed by a nasty burning in your chest or throat?

Maybe even a sour taste in your mouth?

That’s not your lungs.

That’s acid reflux, and it can wreck your runs.

When you’re bouncing up and down on a full stomach, all that movement pushes stomach acid back up the pipe (your esophagus).

If it gets far enough? It can hit the back of your throat and even your airways. That’s when the coughing starts.

Doctors call this GERD (Gastroesophageal Reflux Disease).

Or sometimes laryngopharyngeal reflux when it affects the throat.

Doesn’t matter what you call it — if you’re coughing and tasting bile during runs, it’s a problem.

Here’s how to tell it’s not asthma, but reflux;

  • You feel a burn in your chest or throat
  • A sour taste creeps up during or after runs
  • Cough happens after eating or when lying down
  • Cough is worse when running downhill or bouncing a lot
  • Inhalers don’t help — but diet tweaks do

How to Prevent Reflux

Here are my best tips:

  • Don’t eat big meals before runs. Wait 2–3 hours after eating. If you need fuel, go small and bland (banana > burrito).
  • Know your trigger foods. Coffee, citrus, chocolate, spicy or fatty meals — all can stir up reflux. Avoid these close to workouts.
  • Use meds if needed. Antacids like Tums work short-term. H2 blockers or PPIs like famotidine or omeprazole help longer-term — but talk to your doc if you’re using these often.
  • Stay upright post-run. Don’t lay down or do yoga inversions right after running. Let gravity keep the acid where it belongs.
  • Ditch tight belts or waistbands. Sounds small, but squeezing your stomach can make reflux worse. Wear looser running gear.
  • Train your core and breathing. Some reflux is mechanical — weak core muscles and poor diaphragm control make acid creep upward. Fixing posture and core strength helps more than people realize.

Vocal Cord Dysfunction (VCD) – When It’s Not Your Lungs

Alright, here’s one that flies under the radar: vocal cord dysfunction, aka VCD.

Sounds weird, right? But it’s legit—and I’ve seen runners misdiagnosed with asthma because of it.

The catch? VCD has nothing to do with your lungs.

It’s your vocal cords closing when they’re supposed to open.

Think about that: trying to suck in air during a tough run, and your throat’s literally shutting the door.

That’s VCD.

How to Know It’s VCD (Not Asthma)

Most runners chalk this up to asthma—tight chest, trouble breathing, coughing—but here’s the difference:

  • With asthma, you wheeze on the exhale
  • With VCD, you’ll hear a high-pitched sound on the inhale, and it feels like your throat’s clenching shut

I read that it’s been described  like “breathing through a straw” or “choking mid-run.”

It hits hardest during high-intensity workouts—track repeats, tempo runs, hill efforts.

You’ll probably cough, maybe feel hoarse, and your inhaler won’t help.

🎯 Key sign: If you’ve got a wheezy, tight throat during hard efforts and your asthma meds do nothing, start thinking VCD.

What Causes VCD?

It’s not allergies. It’s not lung inflammation.

Common triggers:

  • Hard effort breathing mechanics
  • Stress or anxiety
  • Smoke or strong smells
  • Even vocal strain from yelling or overuse

You could have the lungs of an Olympian—but if your voice box locks up, it’s game over.

How to Fix It (Hint: Not With Meds)

Here’s the cool part: VCD isn’t permanent. It’s very trainable—you just need the right tools.

Speech Therapy & Breathing Techniques

This is the gold standard. A speech-language therapist can teach you how to:

  • Relax your throat during inhalation
  • Use belly breathing
  • Do specific vocal cord control drills

They’ll walk you through stuff like “sniff-breathe” techniques or rescue maneuvers that help you stop an episode before it snowballs.

Think of it as strength training—for your voice box.

Rescue Breathing Tricks

These are little “in-the-moment” tools to get through an episode:

  • Quick shallow pants
  • Inhaling through pursed lips
  • Nose breathing to calm the system

Runners with VCD often learn to spot the signs early and reset their breathing before it spirals.

Avoid Triggers (If You Know Yours)

If:

  • Cold air kicks it off? Warm up longer or use a buff over your mouth.
  • Chemical smells set you off? Don’t run near traffic or smoke.
  • It’s hard effort alone? Learn how to pace and breathe more efficiently under load.

Key tip: Prevention is a heck of a lot easier than fighting your throat mid-interval.

The Good News

VCD feels intense, but it’s not dangerous long-term.

Once diagnosed, it’s usually very manageable—and doesn’t need meds.

Tons of athletes have beaten it and gone on to race strong. You just need to understand what you’re dealing with.

If you suspect it, ask your doc for a specialist referral. You may need a scope or breathing test to confirm.

Most runners with VCD are initially told it’s asthma—and end up frustrated until someone looks deeper.

How Long Does Runner’s Cough Last?

I get asked this very often: “Why am I still coughing after my run?”

Runner’s cough is common—but how long it lingers depends on what’s causing it.

Here’s the general timeline:

  • Simple airway irritation (cold air, dry air, light bronchospasm):
    Usually clears in 10 to 60 minutes post-run. Water, warm air, and rest usually do the trick.
  • Exercise-induced bronchoconstriction (EIB):
    Typically resolves in 30–60 minutes. With a rescue inhaler? You might feel better in 10–15 minutes.
  • Allergy-driven cough or postnasal drip:
    Might last a little longer—up to 1–2 hours, especially if you’re still around the trigger (pollen, mold, etc.).

When It’s NOT Normal

If you’re still coughing hard 2, 3, 4 hours later, or if it lingers all day, that’s not just “runner’s cough.” That could be:

  • A brewing chest infection
  • Uncontrolled asthma
  • Something else like VCD or an environmental trigger you haven’t identified

Pay attention to patterns:

  • Does it only happen in winter?
  • Does it go away when you run indoors?
  • Does it get worse with every run?

Those clues help pinpoint whether it’s just irritation or something bigger.

My Final Word

If winter running makes you cough, you’re not broken—you’re normal. But that doesn’t mean you have to just suffer through it.

Bundle up. Pick your time. Know your limits. Adjust when needed. And if it still doesn’t feel right, get help.

Cold air doesn’t have to be your enemy. With the right approach, you can train through winter without hacking up a lung.

Got a winter running tip or compression mask you swear by? Or maybe a story about finally solving your post-run cough? Drop it in the comments—I’m always down to learn from fellow winter warriors.

Stay warm. Run smart. And protect those lungs.

—Coach Dack

Average 5K Time for Beginners: What to Expect and How to Improve

What is a Good 5K Time for a Beginner?

Your first 5K is a huge milestone, and it’s totally normal to wonder, “How long should a beginner run a 5K in?”

As a running coach, I know everyone’s journey is different, but for most newbies, you’re looking at finishing between 30–40 minutes.

Don’t sweat it if you’re a bit slower at first – I’ve been there myself, and trust me, it gets better with time.

Most folks cross the line somewhere around 32 minutes for men and 39 for women in a typical 5K.

Fun fact: even Facebook’s Mark Zuckerberg ran a 20:35 5K, but that’s a way faster pace than most beginners (about 10 minutes faster, to be exact)!

Here’s the deal: if your first race feels like it’s taking a bit longer, that’s totally fine. Many beginners mix jogging and walking, so a time anywhere between 40-50 minutes is also totally normal.

Don’t stress about your time too much — and truth be told, for your your first 5K… showing up is a win, and finishing, without worrying about your time, is a bigger win.

Let me break down more 5K stats and numbers for beginners.

Understanding the 5K Distance

Before we talk about time goals, let’s break down what a 5K actually is.

It’s 3.1 miles. Sounds short, right? But believe me, when you’re out there racing, it feels a lot longer than it sounds.

It’s about 22.5 laps around a standard track or running back and forth on a football field about 50 times.

So, don’t underestimate it – treat each mile with respect and you’ll do great.

Average 5K Times for Beginners

Let’s look at what other runners typically do:

  • Sub 25 minutes: This is pretty fast for a first-timer. If you’re running at an 8:00/mile pace, you’re going hard! Some elite fun-run groups might see this, but it’s not the norm for a first 5K.
  • 30-40 minutes: This is the sweet spot for most beginners who’ve put in a bit of training. Hitting that 30-minute mark is a solid goal, and honestly, it’s what many Couch-to-5K programs target in about 8-10 weeks.
  • 40+ minutes: This is totally fine too. I’ve had tons of runners who took it slow with walk breaks, and they finished around this time.

Remember: “Any pace is a good pace.” If you’re not at the sub-30 level yet, don’t sweat it — just train at your own pace and work up from there. Here’s what the data says: When new runners start out, the average pace is about 13:00/mile (that’s a 42-minute 5K for women and a 35-minute 5K for men). So if you finished your first race anywhere in the 30s–40s, you’re in great company.

 average 5K time for beginner

5K Pace Chart for Beginners

Want to set a goal for your first 5K? A simple way is to figure out what pace you can comfortably maintain.

This chart below shows different paces and how they translate into your 5K time. Find a pace that feels good, and aim for the finish time that goes with it:

Let’s say you’re running at a 10:00/mile pace during training. If that feels comfortable, shooting for a 31-minute 5K is a solid, realistic first goal. Pro tip: The Mayo Clinic’s “Magic Mile” method is a great trick for predicting your 5K time. Run a hard mile, then add 1-2 minutes for your estimated 5K time.

Setting Your First 5K Time Goal

How do you choose a time goal for your first 5K?

Here’s the trick: find a goal that’s tough, but still doable.

You can try the Magic Mile method: run a mile as fast as you can, then add about 2 minutes to guess your 5K finish time.

Or you could check out local race results to see what other beginners (same age/sex as you) have done.

But listen, this is YOUR race.

Set a personal goal. If finishing without stopping is your goal, awesome. Go at your own pace, or even plan for a walk-jog strategy. If you’re shooting for a faster time — like breaking 35 or 30 minutes — that’s great too.

But don’t set a goal that’s too far out of reach. For example, if you haven’t trained at close to a 25:00 pace yet, don’t set that as your first goal.

Your First Race

For your first 5K, here’s my advice: forget the clock.

The main thing is to run or run-walk the whole distance. Endurance first, speed later.

Sure, if you already fit enough and can run the whole distance in one-go, be my guest. But I also know that many beginners are still… beginners. So aiming a little bit too high might be an overstretch.

So do what works for you.

I coached a runner who was obsessed with finishing his first 5K in under 25 minutes.

He went way too hard at the start, and by the last mile, he was walking — and not the fun kind of walk.

He was frustrated and pointed out to me – angrily – that my training plan wasn’t good enough. I simply reminded him that our goal was to finish within 30 minutes despite him being a gym regular for the past five years.

I also reminded them that lifting weights on a regular but only jumping on the treadmill every now and then helps a runner but doesn’t make one.

He was smart enough to recognize the error of his way.

When he came back for the next race, he focused on pacing and finished in 28 minutes. Not the sub-25 min he hoped for, but it was better than his first disastrous attempt.

The moral of the story? Patience and consistency are key.

Average 5K Times by Age Group: What’s the Deal?

You’re looking to run a 5K, right?

Here’s the thing: it all depends on a few factors, like how old you are and how much you’ve been running.

But let’s not stress too much – these numbers are just averages. The real magic comes from your training and your consistency. Here’s what the average 5K looks like across different age groups:

For Men:

  • 20-29: 16:45
  • 30-39: 17:41
  • 40-49: 18:13
  • 50-59: 19:31

For Women:

  • 20-24: 36:22
  • 30-34: 38:41
  • 40-44: 38:26
  • 50-54: 41:20

Your Pace and Finish Time

Your pace is key. Here’s a breakdown of what the numbers look like at different paces.

Don’t get too hung up on hitting these numbers right away—it’s all about working towards your goal.

  • 5 min/mile – 15:32
  • 6 min/mile – 18:38
  • 7 min/mile – 21:45
  • 8 min/mile – 24:51
  • 9 min/mile – 27:58
  • 10 min/mile – 31:04

If you’re just getting started, hitting a 9-minute mile is an awesome target. But with some training, you’ll notice those times starting to drop. That’s the fun part.

Age-Group Runners: Here’s the Real Scoop

We’re not all out there trying to chase down the pros.

And honestly? That’s perfectly fine.

A lot of us are just regular age-group runners doing our best. If you’re in this category, you’ll see a lot of differences in race times, and that’s because some people have trained more seriously or even ran in college. But regardless, it’s all about doing your best.

Age GroupMen’s AverageWomen’s Average
0-1534:4337:55
16-1929:3937:39
20-2429:2736:22
25-2931:0936:16
30-3431:2738:41
35-3933:4437:21
40-4432:2638:26
45-4933:1339:19
50-5434:3041:20
55-5937:3345:18
60-6440:3345:49
65-9942:5950:13

You can see the trend here—times tend to get slower as people age, but there are always those who defy the odds and keep pushing. It’s all about consistency and sticking with it, no matter what age you are.

What’s a Good Time for a 40-Year-Old?

A lot of us don’t start running until later in life, so if you’re in your 40s, you might be wondering what’s a solid time for your age group.

For guys, hitting 18:13 in a 5K is pretty good.

For women, finishing somewhere in the mid-to-late 30-minute range is an excellent target.

But, here’s the most important part: don’t compare yourself to others. Focus on your personal growth. That’s what matters most. Every step forward is a win.

Quick Tips to Set Your Goal

Setting goals is important – but they need to be realistic. Here’s how I’d suggest you go about it:

  • Do a Practice Run: Go out and run a few miles, then figure out what kind of pace you can comfortably sustain. This will help you set a solid 5K goal.
  • Be Honest About Your Training: If your 5K training is mostly easy runs, setting a 25-minute goal might be a stretch. Set a more realistic goal like 30-40 minutes instead.
  • Have Two Goals: Set one goal you know you can hit (like finishing in 40 minutes) and then shoot for a stretch goal (like 35 minutes). You’ll feel pumped even if you hit the first one!

Pacing Strategies for New Runners

This is where a lot of beginners go wrong: starting out way too fast and burning out. If you want to avoid that, here’s how to pace yourself:

  • Start Slow: Trust me on this. Start with an easy pace – don’t rush. You’ve got 3.1 miles to cover, so save some energy for the finish.
  • Find Your Rhythm: Once you hit your stride, keep it steady. Negative splits (starting slower and speeding up later) are always the best way to go.
  • Use Downhills to Your Advantage: If you’re lucky enough to have some downhills, use them to recover. Then give it 90% effort on that last mile.
  • Listen to Your Body: If you feel like you’re about to crash, don’t be afraid to slow down or walk for a bit. It’s way better than pushing too hard and blowing up before the finish.

The key is to pace yourself in a way that feels good. The last thing you want is to get caught up in other people’s pace and end up burning out.

Common Mistakes to Avoid

Let’s keep it real: beginners make the same mistakes all the time.

Here’s what to avoid so you can run smarter:

  • Sprinting at the Start: Everyone gets excited at the beginning, but if you go too hard too early, you’ll pay for it later. Start steady and build from there.
  • Skipping Warm-Ups or Rest: Don’t skip your warm-up – muscles work better when they’re ready to go. Also, don’t cram all your training into one week. Keep it steady and avoid injury.
  • Trying New Stuff on Race Day: Race day is NOT the time to try new shoes or food. Stick with what you know works.
  • Setting Unrealistic Expectations: If you’re just getting started, aiming for a 20-minute 5K right off the bat is probably too much. Set a goal that’s achievable.
  • Comparing Yourself to Others: Everyone’s journey is different. Focus on your own progress instead of comparing yourself to the person in front of you.
  • Skipping Walk Breaks: If your plan includes walk breaks, do it! It’s all about finding your rhythm and finishing strong. There’s no shame in taking a breather.

FAQs About Average 5K Times

Here are some common questions:

Q1: What is a good 5K time for a beginner?

For most beginners, finishing a 5K under 30 minutes is an excellent goal. It reflects a steady pace and a solid level of fitness, especially if you’re new to running.

Q2: How long does it take to train for a 5K?

Most beginners can get ready for a 5K in 6 to 8 weeks with consistent training. Focus on gradual mileage build-up, easy runs, and rest days.

Q3: Can beginners run a 5K without walking?

Yes! With a well-structured plan that builds endurance safely, many beginners can run a full 5K continuously by race day.

Q4: How can I improve my 5K time?

Incorporate interval training, tempo runs, and strength exercises into your weekly routine. These boost speed, endurance, and overall running efficiency.

Q5: What’s a good weekly mileage when training for a 5K?

Most beginners benefit from 10–15 miles per week, split over 3 to 4 runs. This builds endurance without overloading your body.

Q6: Should I run every day to prepare for a 5K?

Running every day isn’t necessary. Aim for 3 to 4 running days per week, allowing for rest or cross-training to prevent injury.

Q7: Do I need special shoes for a 5K?

A comfortable pair of running-specific shoes with proper support is important. Visit a running store for a gait analysis if possible.

Q8: What’s the best way to pace myself during a 5K?

Start at a comfortable pace you can maintain. Aim to finish strong by gradually increasing your effort in the final mile.

Q9: Is it normal to feel nervous before my first 5K?

Absolutely! Nerves are common but can be channeled into positive energy. Remind yourself you’ve trained and you’re ready to enjoy the experience.

Conclusion: What’s a Good 5K Finish Time for a Newbie?

Ultimately, a “good” 5K time depends on you. For most beginners, under 30 minutes is a great goal, and anything sub-25 minutes is excellent. But here’s the most important part: enjoy the process. Celebrate the fact that you ran 3.1 miles. You’re a runner. That’s what counts.

So if this is your first 5K, focus on finishing strong, having fun, and looking forward to the next race. The rest will follow.

Your turn! What’s your 5K goal? Drop a comment and let’s chat about it!

MAF Training Plan: The Ultimate Guide to the Maffetone Method for Runners

Walking five miles

Ever finish a run and still feel like you’ve got gas in the tank?

Like you could actually live your life afterward instead of crawling into recovery mode?

That was a rare feeling for me—until I ran into the Maffetone Method.

Now, I’ll be straight with you: I used to think running slow was for people who didn’t train hard enough.

Living in Bali, with hills that eat your quads and heat that melts your willpower, “easy running” sounded like a joke. I’d scoff at the idea of walking up a hill.

But then I tried it—and it flipped my training upside down.

MAF training made me eat my ego, but in the best way possible.

It taught me how to build real endurance without wrecking my body every session.

It reminded me why I love this sport—because it’s not about looking fast, it’s about becoming strong from the inside out.

So if you’re a beginner just trying to get your legs under you or a veteran marathoner tired of burnout, I’m walking you through everything I’ve learned (the hard way) about MAF.

We’ll talk about the science, the mindset shifts, how to create your own plan, and why sometimes the biggest gains come from the slowest runs.

You’ll get real tips, real examples, and yeah—some of my own stories where I nearly threw in the towel.

MAF isn’t easy, but it works. Let’s dig in.

What Is the Maffetone Method?

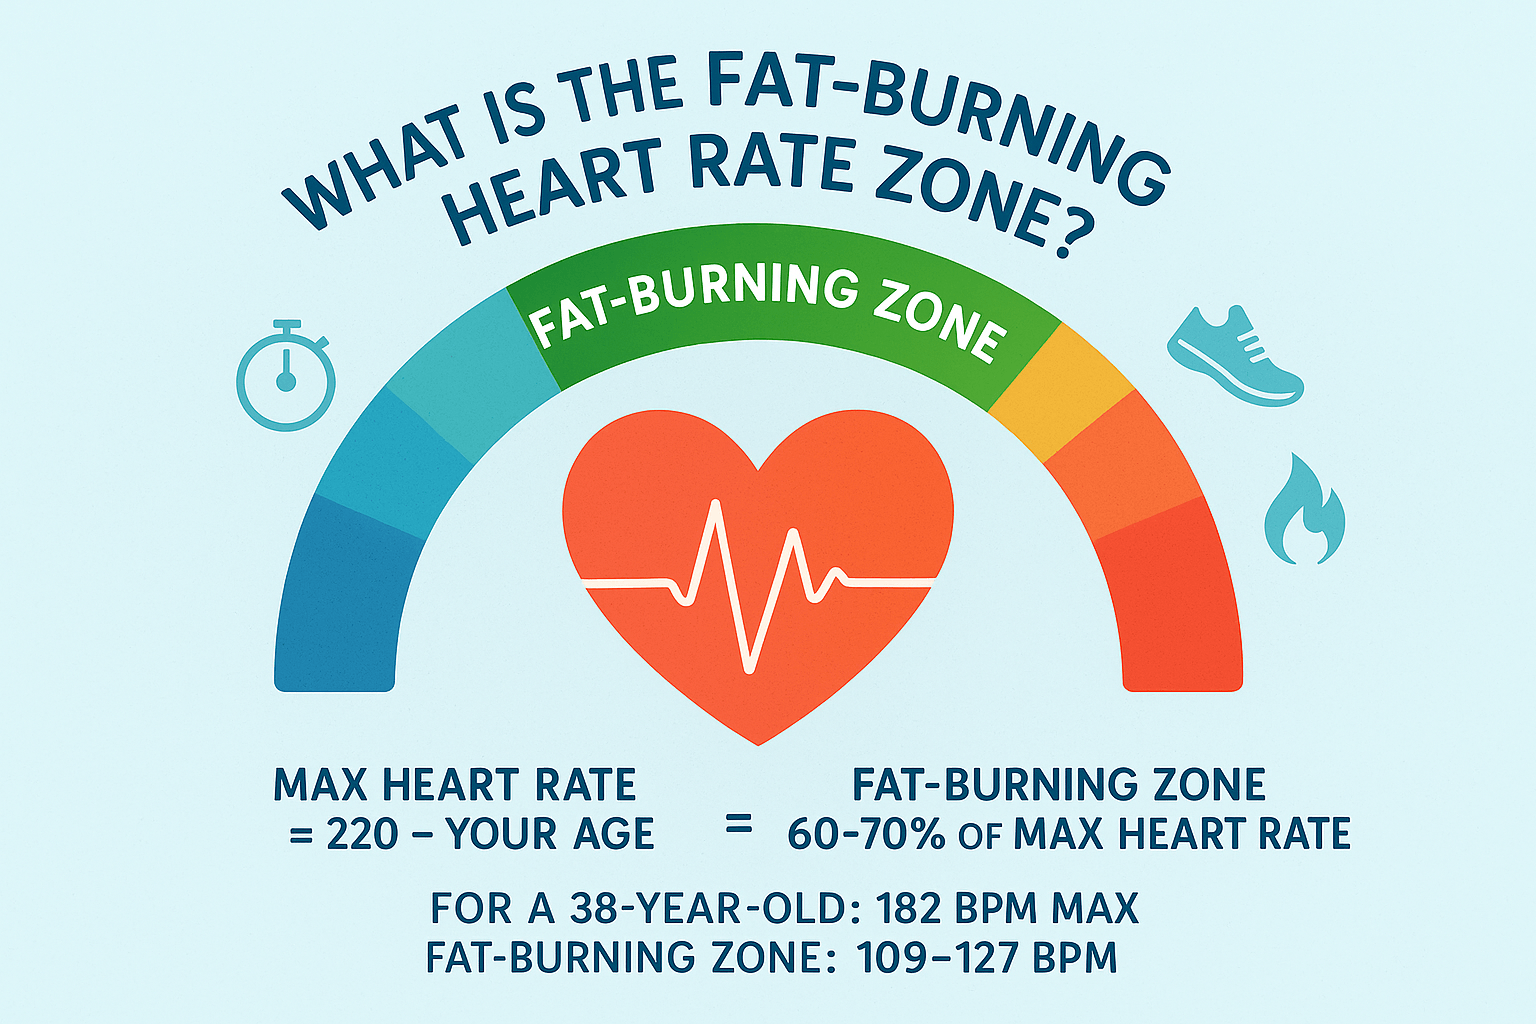
The Maffetone Method (MAF) is a way of training based on heart rate—not pace, not mileage, not how tough you feel.

The goal is to stay in your aerobic zone, where your body uses fat for fuel (Zone 2, if you’re tracking that stuff).

Dr. Phil Maffetone—a guy who’s been helping athletes since the 80s—came up with this method to focus on building aerobic power without beating up the body.

Instead of chasing speed all the time, MAF flips the mindset: train easy, build the engine, and then see the speed come.

The backbone of the method is the 180 Formula:

180 – your age = your max aerobic heart rate

That number? That’s your ceiling. You don’t go over it on most runs.

For example:

  • Got health issues or just coming back? Subtract 5–10 beats.

  • Been training consistently for a couple years? Use the base number.

  • Elite and injury-free for years? Maybe add 5.

So if you’re 40 and healthy, your MAF number is around 140 bpm. That’s your magic zone. Go over it, and you’re dipping into anaerobic territory—something we avoid during MAF blocks.

When I plugged in my numbers, I got 143 bpm. That number ruled my life for months.

I’d be jogging along, heart rate creeping up—boom, I’d back off. Sometimes that meant walking. Sometimes it meant people passing me left and right.

I hated it.

But it worked.

Why It Works (Even If It Feels Way Too Easy)

The real genius behind MAF? You train your body to run faster at the same heart rate.

You don’t need to push harder—you just become more efficient.

Over time, you go from slogging along at 12:00/mile to cruising at 10:00/mile with the same heart rate.

It’s all about adaptation.

You teach your muscles and your heart to work smarter, not harder.

Fat becomes your go-to fuel source.

Oxygen gets used better.

Recovery feels easier.

And you’re not stuck nursing overuse injuries every couple of months.

Still think it’s too soft?

Let me throw down a name: Mark Allen—six-time Ironman world champ.

The guy couldn’t run faster than 8:15/mile when he started MAF training, and that was 3 minutes slower than his usual pace.

But he stuck with it. Months later, he was running 5:20 miles at the same heart rate.

Let that sink in.

He didn’t change his gear. He didn’t find some magic diet. He just slowed down, trained smarter, and built a base most of us only dream about.

Why I Swear By Zone 2 Training 

Let’s be real—most runners want to go fast. We crave that finish-line kick, that feeling of pushing the edge.

But here’s the deal: the real gains? They start when you slow down.

Training in Zone 2, your lower aerobic zone, teaches your body how to run smart—not just hard.

It’s where your heart rate stays chill and steady, and your body taps into fat for fuel instead of guzzling through limited carb reserves.

I know, fat-burning sounds like some diet ad, but this isn’t fluff. It’s physiology.

When you’re in Zone 2, your body’s mostly burning fat and preserving your precious glycogen (that’s your carb energy). And that matters because you’ve only got about 90 to 120 minutes of solid carb fuel in you at moderate intensity.

That’s why you bonk during a long race if you haven’t trained this system.

Fat, though? Even lean runners are walking around with tens of thousands of calories stored. Zone 2 teaches your body to dip into that bank early and often. That’s how you go longer without crashing.

From Sluggish to Strong 

Here’s the cool part. Training in this zone doesn’t just help you burn fat—it reshapes your entire engine.

According to science, regular Zone 2 running leads to more capillaries (those tiny blood highways that feed your muscles), and boosts the number of mitochondria—the “power plants” of your cells.

More of those little guys means more energy, better endurance, and a heart that beats stronger and more efficiently.

Your resting heart rate might even drop.

It’s like giving your whole cardiovascular system a performance upgrade—without needing fancy shoes or tech.

When I stuck to Zone 2 during my base-building phase, I wasn’t just running slower—I was building a machine.

What About Speed?

I get it—slow running sounds like the opposite of getting faster.

But trust me, this is the long game. This kind of training lays the foundation so that when you do hit the gas, your body’s ready for it.

Elite coaches have known this forever. In fact, many of them suggest that around 70–80% of your running should be done at low intensity.

Even Dr. Phil Maffetone took it a step further with his MAF Method—where, at first, you might do nearly 100% of your running at this slow, easy pace.

Yeah, it’s strict. But it works.

It’s not about pace. It’s about heart rate.

One runner might be cruising at 7:30 per mile while staying in Zone 2, while another is doing run-walk intervals just to keep the heart rate in check.

And that’s totally fine.

Effort is what counts. Not Strava pace.

If you can talk while running, you’re in the zone. If you’re gasping for air like you’re finishing a 5K, back off.

Lifestyle Matters More Than You Think

Here’s where it gets interesting—and where Maffetone’s philosophy really shines. Your run effort isn’t just about the run.

Had a night of crap sleep? Your heart rate’s gonna spike. Stressed from work or ate junk food? Same deal. Skipped your rest day? Yep, your heart’s working harder even on an easy jog.

MAF forces you to pay attention to those things because they show up in your running—even when you think you’re taking it easy. It’s not just a training plan; it’s a mirror.

I’ve had days where I felt fine but my heart rate told another story. That feedback was a wake-up call—I had to clean up the rest of my life if I wanted better runs.

Calculating Your MAF Heart Rate 

Let’s break it down in runner-speak.

You want your MAF number? Here’s the quick-and-dirty formula:

180 – your age = your base aerobic cap.

Tweak it depending on your training background:

  • If you’ve had a major illness or injury lately, knock 10 beats off.
  • If you’re a little banged up, been inconsistent, or out of shape, subtract 5–10.
  • If you’ve been training steadily for the past couple of years with no big setbacks, keep it as-is.
  • If you’re a seasoned athlete with years of consistent running under your belt, add 5.

That final number? That’s your max heart rate for MAF-style aerobic runs.

And here’s the kicker: staying under it is fine—even better when warming up. Going over? Not okay. Every beat counts in this method.

When I first started this, I kept creeping over by 2–3 bpm and thought, “Eh, close enough.” But the truth is, those few beats shift you out of the aerobic zone and into no-man’s-land.

You’re not going easy, but you’re not going hard either—you’re just frying your system without real gains.

Heart rate monitor? Non-negotiable.

I recommend a chest strap or a reliable armband. I made the rookie mistake of relying on my wristwatch when I first dabbled with MAF. One day it told me I was cruising at 150 bpm. Spoiler alert: I wasn’t. The watch was picking up my cadence, not my heart rate. I was running blind and fooling myself.

Wrist sensors are notorious for flaking, especially in heat or during bouncy runs.

Chest straps might be old school, but they don’t lie. And if you don’t have one? You can still MAF-train by feel—just run really easy.

Like, embarrassingly easy.

The Ego Punch You Didn’t See Coming

Let’s get real—MAF running feels ridiculously slow in the beginning.

Your pride? It’s going to scream. But that’s part of the process.

I’ll never forget one of my earliest MAF runs. I was puttering along a flat stretch, and some guy walking his dog passed me. I wanted to chase him down just to prove I was a “real runner.”

But I checked my heart rate—138, safely under my 143 cap—and told myself, “Let it go, David. Long game.” I kept jogging. That was the first time I felt like I truly got what MAF training was all about.

This mental battle? Totally normal. Most runners hit it hard in the first few weeks. Stick with it.

A few months in, you’ll be gliding past those same walkers—still breathing through your nose, still under your cap—and wondering why you ever doubted the method.

Is MAF Training Right for You?

Now let’s get to the real question: Should you even bother with this stuff?

Short answer: It depends on your goals, mindset, and how beat up you feel.

Here’s who should seriously consider going full-MAF:

1. You’re chasing endurance, not just a medal.

Thinking about your first half marathon or ultra? MAF works super well for building a massive aerobic base—the foundation every distance runner needs. Without it, you’re just stacking bricks on sand.

2. You’re always injured or burnt out.

If your training cycle is just “build, break, repeat,” it’s time to chill out. MAF reduces overall body stress so you can recover, rebuild, and come back stronger—without smashing yourself into the ground every week.

3. You want to burn more fat and stop bonking.

Been there. That late-race crash where you hit the wall? That’s poor fat utilization. MAF teaches your body to burn fat more efficiently by staying in the aerobic zone. Bonus: you’ll lean out in the process if weight loss is on your radar.

4. Your “easy runs” aren’t actually easy.

If you think you’re running easy but still finishing sweaty and gassed—newsflash: you’re not going easy. MAF puts you on a leash and teaches true discipline and pacing. It’s like running school for grown-ups.

5. You want to run by feel.

It’s weird, but using a heart rate monitor helps you become a more intuitive runner. You start noticing your breathing, your footstrike, your tension levels. Over time, you’ll know what 140 bpm feels like without even looking. That’s power.

6. You’re just starting out or coming back after a break.

MAF is perfect for beginners or comeback runners. It keeps your ego in check and lets your body adjust without cooking your joints or lungs.

7. You’re fried—physically, mentally, emotionally.

If your resting heart rate’s up, your sleep’s crap, and your motivation is shot… MAF is your lifeline. It’s not sexy, but it works. Think of it as a reset button for your body and brain.

When MAF Might Not Be a Fit

It’s not for everyone.

If you only run twice a week and have a race coming up in a few weeks, MAF probably won’t work magic in that short window.

Or if you’re hooked on speed sessions and dread slow miles, you might mentally struggle with the patience it takes. (Though, honestly, those are the folks who probably need it the most.)

MAF is a slow burn, not a firework show.

Crafting Your MAF Training Plan 

Alright, let’s get real. If you’re new to MAF training—or running in general—you don’t need a fancy strategy.

What you need is a solid plan that actually works in the real world.

Here’s how to build your MAF training routine from scratch, no fluff, no BS.

Step 1: Find Your MAF Heart Rate

You’ve probably seen this already, but let’s hammer it home:

Take 180 and subtract your age. That’s your rough max aerobic heart rate.

For most folks, your sweet spot will sit about 10 beats below that number up to the max.

So if your MAF is 140, your working zone is around 130–140 bpm.

You don’t need to stay glued to the top of that range. Hover anywhere in the zone and you’re doing work.

As a beginner, you’ll probably want to sit in the lower end anyway to make sure it’s truly easy.

I remember when I first started—anything above 125 felt like I was pushing it.

Take your time. This is about building, not burning out.

Step 2: Gear Up Like You Mean It

You need a decent heart rate monitor. Period.

Chest straps are best, but optical armbands or wrist sensors can work—just know wrist sensors can be a little moody.

Wear it tight, check it often, and don’t freak out if it spikes randomly.

Also—shoes matter. More than most people think.

MAF runs are slow and steady, but that slower pace can change how your feet hit the ground.

If you’re shuffling more, you need shoes that actually feel good at that pace.

I’ve had runners who swear by higher-cushion or more flexible soles for their easy runs. Try a few pairs, see what clicks.

Step 3: Build a Weekly Rhythm That Fits You

The beauty of MAF? It’s chill. That means your body can handle more volume—eventually.

But don’t get greedy too soon. Start with something manageable and grow from there.

Here’s a rough breakdown:

  • Brand new to running? Run/walk three times a week. Let’s say Tuesday, Thursday, Saturday. Keep it short—20 to 30 minutes. Walk breaks are not weakness. They’re part of the deal.
  • Been running a few months? 4–5 days a week is doable. Add a longer session on Sunday, keep the others short and sweet.
  • Got some races on the radar? You might hit 5–6 days, following that old-school “3 weeks build, 1 week back-off” cycle.

This is flexible. Life happens. Just aim for consistency—not perfection.

Step 4: Start Every Run Slow (Like, Sloth-Level Slow)

Here’s the rookie mistake: bolting out the door like you’re chasing a PR.

Don’t do that.

When you start from rest, your heart rate shoots up fast. It’s called cardiac lag.

Fix it by easing in.

Me? I walk for 2–3 minutes. Then I jog gently for another couple, heart rate still well below MAF. I don’t get to my MAF zone until minute 10.

It’s not wasted time—it’s the setup that makes the rest of the run smoother.

Step 5: Use the Talk Test

Forget the numbers for a second.

Can you breathe through your nose?

Can you talk in full sentences?

If yes, you’re probably right where you should be.

If not—if you’re gasping, mouth open, wheezing through a sentence—you’re going too hard.

In Bali’s heat and humidity, nose breathing feels impossible some days.

But back in cooler weather? It’s a solid gut check.

Learn to listen to your body. It’s smarter than your watch.

Step 6: Walk Breaks = Progress (Not a Step Back)

Let’s kill this myth right now—walking doesn’t mean you failed.

It means you’re training smart.

Early on, even a slow jog might shoot your heart rate above your cap. That’s fine.

So jog, watch your HR, then walk until it drops.

Repeat.

You’ll start with short jogs and longer walks.

Then, without forcing it, you’ll flip that around.

One day you’ll notice—you haven’t walked in 15 minutes. That’s improvement.

Got hills? Walk them. I do.

There’s no ego in grinding up a hill at 170 bpm just to say you ran it.

Walk strong, stay aerobic, move on.

Step 7: Long Runs Are Still the Cornerstone

Even with MAF, long runs matter—especially if you’re training for a 10K, half, or full marathon.

Keep them fully aerobic.

Pick one day a week (usually weekends) and just go a little longer.

If you’re used to 30-minute runs, make your long run 45 or 50. Don’t jump to 90 minutes out of the gate.

Add 5–10 minutes a week, then back off every few weeks. That rhythm keeps you building without frying your legs.

Since MAF is all easy pace, you can bump mileage a little faster than in high-intensity plans—but only if your body’s cool with it.

I’ve seen beginners go from a 3-mile long run to 10 miles in a few months, walking part of it, all in zone 2.

That’s how you build endurance without burning out.

And don’t sweat the pace.

Yes, it might be slow. Yes, you might walk some of it.

That’s not just okay—it’s expected.

Step 8: Cross-Training & Strength

Just because you’re training MAF-style doesn’t mean you skip everything else.

In fact, this is the perfect time to sneak in some strength work and mobility—especially since you’re not fried from hardcore intervals.

Think push-ups, planks, squats, deadlifts—basic, honest work.

And don’t worry, strength doesn’t usually jack up your heart rate like running (unless you’re going full CrossFit beast-mode). Maffetone himself is a big believer in strength and mobility.

Two days a week of proper strength training? That’s gold.

You’ll be more durable and less injury-prone.

Pro tip though: Don’t turn your lifting sessions into HIIT. I see people trying to “lift for cardio” and end up gassed like they’re in a spin class.

Chill. Rest between sets. Nail your form. Save the heart rate spikes for your long runs.

Now, aerobic cross-training? Absolutely.

Bike rides, swimming, elliptical—all fair game at MAF heart rate. It all counts toward your aerobic engine.

I’ve coached runners who couldn’t run due to injury, but they kept their base solid by cycling at 130 bpm.

Your heart doesn’t know the difference—it just beats.

If you get bored with just running, toss in a swim or a mellow bike ride once a week.

That mix keeps your legs fresher and your brain sane.

Step 9: Keep Tabs on Your Body

Track your progress. Not just with pace, but with how you feel.

Use the MAF test monthly. But also watch your energy.

If your MAF pace tanks or you’re constantly dragging, take a hard look at what else is going on: poor sleep, stress, ramping up mileage too fast?

Don’t be that person who thinks slow running means you’re invincible. It’s still training. You still need rest days.

I recommend 1–2 days off per week, especially if you’re new to this.

And “off” doesn’t mean lazy. Walk. Stretch. Do yoga. Recharge.

One more tip: listen to your heart—literally.

If you head out and your heart rate shoots up 15 beats above normal on an easy jog? Something’s off.

That’s your body waving a red flag.

I’ve had days where my watch says 150 bpm before I even get going—on those days, I turn around or take a walk instead.

Your ego won’t like it, but your recovery will thank you.

Step 10: When (and How) to Add Speed

After a few months of solid MAF base work—say 3 to 6 months—you can start mixing in some faster stuff if your goal calls for it.

That’s the beauty of this approach.

You’ve built the engine. Now you can hit the gas.

This is where 80/20 training kicks in: 80% MAF, 20% quality work. Intervals, tempos, hill reps—you’re ready for it now.

As I’ve explained earlier, Mark Allen, one of the greats, did exactly that after his base phase and unlocked a whole new gear.

But here’s the deal—only add speed if you’re chasing something specific.

If your goal is general health or just finishing a marathon without collapsing, you might not need much fast stuff at all.

Some folks live happily in the low-intensity lane and still get fitter every year.

If you’re eyeing a 5K PR though? Yeah, you’ll need to fire up those legs.

Just make sure speed doesn’t trash your base.

Keep testing your MAF pace. If it slips after adding intervals, back off and recalibrate.

One quality session a week and a moderate tempo can be plenty.

The rest? Keep it slow.

That’s how you build forever fitness.

Step 11: Fuel Like It Matters

MAF isn’t just about what’s on your watch—it’s also about what’s on your plate.

You don’t need to overhaul your entire diet, but you do need to eat like your training matters.

Whole foods. Less junk. Try not to pound sugar before every run.

Maffetone often encouraged trimming refined carbs and playing with fasted runs to boost fat-burning.

Personally? I’ve found that dialing back sugar, especially during base building, helps me feel more steady on long runs.

Sleep, stress, hydration—it all ties in.

MAF rewards the runners who treat their bodies like performance machines, not trash compactors.

Eat enough, recover well, and let the aerobic magic do its thing.

Step 12: The Boring Truth—Consistency Wins

Here’s the not-so-sexy truth: MAF works best when you stick with it.

Miss a day? Who cares. Just get back to it tomorrow.

One good week won’t change much, but six good months? That’s where transformation lives.

Track mini wins.

Celebrate those moments—like staying under MAF heart rate on a hilly route or finishing a long run feeling like you could keep going.

Journal your training. Find a rhythm. Enjoy the process.

And when in doubt? Remember the motto:

Slow down to get faster.

It’s not just a catchphrase—it’s a mindset shift. Trust the process.


Sample MAF Running Plan for Total Newbies

Here’s a no-fluff layout to help you ease into MAF training without burning out:

Weeks 1–2

  • Run 3x/week for 20–25 minutes at your MAF heart rate

  • Expect plenty of walking—it’s normal

  • Cross-train 1–2x a week if you want to move more

Weeks 3–4

  • Bump it up to 4 runs/week

  • Each run around 30 minutes. Try stretching one to 40 minutes

  • Always keep your heart rate capped at MAF

Weeks 5–6

  • Aim for 4–5 runs/week

  • Mix: 2 runs at 30 minutes, 2 at 40–45 minutes

  • Long run creeps up to around 60 minutes

  • By now, walking might be less frequent as your aerobic base builds

Weeks 7–8

  • Keep the rhythm going

  • Gradually stretch one run to 75–90 minutes if you’re thinking of a future half marathon

  • The rest can stay at 30–45 minutes


Test Yourself

Do a MAF test at the end of week 4 and again at the end of week 8.

This helps you see if your pace is improving at the same heart rate.


Rest Weeks Matter Too

Every 3–4 weeks, plan a down week.

Cut the volume by 20–30%. This is where the magic happens—your body adapts and gets stronger.

You can either reduce your running time or swap one run for a brisk walk.


Make It Fit You

This plan isn’t one-size-fits-all.

If you’re younger, already active, or recover quickly, you might be able to handle more.

If you’re older, brand new to running, or dealing with nagging aches, pull back.

MAF training works because it’s flexible. The heart rate formula stays the same, but the pace, mileage, and walking ratio will look different for everyone.

I’ve coached people in their 60s doing MAF with walking breaks—and they still improved.

I’ve also worked with runners training for ultras who used this exact layout as their foundation.

The key?

Stay consistent and keep your ego in check.

Sample Week – Beginner 10K Plan (MAF Style)

  • Monday: Total rest or gentle yoga

  • Tuesday: 30-min MAF run (run/walk if needed). ~2.5 miles. Keep HR ~130–140.

  • Wednesday: 30-min brisk walk or bike ride (stay under MAF). Or short run if you’re feeling good.

  • Thursday: 40-min MAF run. Maybe 3–4 miles. Walk the hills if your heart rate spikes.

  • Friday: Strength training (bodyweight-focused, not cardio-crazy).

  • Saturday: Long run: 60 minutes at MAF (5–6 miles).

  • Sunday: Easy jog or walk (20–30 mins). Or full rest and some mobility.


Sample Week – Marathon Base-Building Plan

  • Monday: 5 miles easy (MAF)

  • Tuesday: 8 miles easy (MAF)

  • Wednesday: 5 miles + strength work

  • Thursday: 8 miles easy (MAF)

  • Friday: Rest

  • Saturday: 15-mile long run at MAF

  • Sunday: 4-mile recovery jog (way below MAF, just moving the legs)


Walking on Hills Isn’t Weak—It’s Smart Running

Let me tell you a little story.

There’s this hill not far from my place. It’s not Everest or anything, but it’s steep enough to make your quads curse.

First time I hit it during MAF training? My heart rate monitor basically screamed at me halfway up. I had two choices—slow down to a near stop or swallow my pride and walk.

Now, the old me? I would’ve kept running no matter what. Because “walking = failure,” right?

Wrong.

MAF David decided to be smarter, not stubborn. I slowed to a power walk, felt a little goofy doing it, but guess what?

My heart rate stayed right where it needed to be. And I finished the rest of that run strong.

Fast forward a couple of months—after putting in consistent effort—I could jog more of that hill.

Eventually, I made it to the top with a slow trot, all under my MAF heart rate cap. No alarms, no ego, just progress.

That was real aerobic fitness talking.

So if there’s a hill on your route, don’t fight it.

Walk if you need to. That’s not weakness—it’s just you being smart about your training. Gravity doesn’t care about your ego.


Ready to Give MAF a Try?

By now you know that the journey won’t be easy – at least not on your ego – but the rewards can be incredible.

I encourage you to take the MAF challenge: commit to several weeks of dedicated low heart-rate running and see what happens.

You might be amazed at the transformation in your endurance and how you feel.

Remember, every runner’s path is unique, but the principles of patience, consistency, and listening to your body are universal.

So, strap on that HR monitor, embrace the process, and run on your terms.

In a few months, you could be running stronger, faster, and healthier than ever before – all thanks to slowing down.

Couch to 10K Plan: Easy 12-Week Beginner Training Guide

You’ve finished your first 5K—nice work! I remember that feeling, crossing the line knowing you’ve just nailed 3.1 miles. It was a big moment, and I couldn’t wait to take on something bigger. Next up?

The 10K. I was nervous, no doubt. How was I going to double that distance? But here’s the deal: you don’t need to change what’s working. Just build on it.

I took my Couch to 5K plan and made it work for a 10K.

And it worked. It’ll work for you, too. Just keep the same steady approach and push a bit further.

You’ve already done the hardest part—getting started. Now, let’s focus on that next 6.2 miles.

Let’s get to it.

Understanding the 10K Distance

Alright, let’s break it down: What’s a 10K? It’s 6.2 miles.

Now, that might sound like a lot at first, but trust me, you’ve got this.

Here’s how I thought about it when I first started:

  • Imagine 50 laps around a standard indoor track.
  • Or 91 football field lengths (including end zones).
  • Or 26.25 climbs of the Empire State Building.

Doesn’t sound so bad, right? Breaking it down like that helped me mentally.

Instead of thinking about 6.2 miles, I’d focus on one lap at a time. That’s what made it feel doable. If you break it up into smaller chunks, the whole thing feels less intimidating.

how far is a 10K

Who’s Ready for a 10K?

The 10K is a sweet spot. It’s long enough to challenge you, but not so long that it feels impossible. If you’ve been running 5Ks regularly, it’s a perfect next step.

But don’t jump in without building a solid base. If you’re just starting, don’t rush into 10K training right away. I’d recommend that beginners spend a few weeks walking first — up to an hour at a time — before starting any real running.

Now, here’s where you need to listen to your body: if you’re feeling pain or dizziness, stop. You don’t want to push through anything that’s going to set you back. Progress at a pace that feels right.

Trust me, it’s okay to slow down if you’re not feeling it. Listen to what your body’s telling you, and build from there.

Setting Realistic Goals and Pacing

Let’s talk about time goals.

For reference, elite runners finish a 10K in under 30 minutes.

But, for most of us, that’s not the goal. Average time for a guy? Around 55 minutes.

For a woman? Around 1:03. But here’s the secret: this isn’t about being fast. It’s about building your endurance.

If you’re looking to estimate your 10K time, just double your 5K time and add a little bit for fatigue. So, if you run a 5K in 30 minutes, your 10K might be somewhere around 1:03–1:05. It’s not an exact science, but it’ll give you a starting point.

But don’t stress over times — focus on your pace. Instead of asking, “What’s my time?” ask yourself, “How long can I keep running at a steady pace?” That’s the real goal here.

Here’s how your pace impacts your 10K finish time:
10K in miles -

The 12-Week Timeline: Why Patience Pays Off

So, why 12 weeks? Seems like a long time, right?

But trust me, it’s the sweet spot for beginners who’ve already got a bit of fitness under their belt (like, you know, walking daily).

Most coaches will tell you that training for a 10K takes a few months. If you’ve been running for a bit, 12 weeks is usually enough to get you race-ready.

If you’re starting from scratch, no worries. Some people recommend doing 6–8 weeks of walk/run first to get your body used to the movements before diving into the real training. Once you’re there, another 12 weeks will do the trick.

The key is to build slowly. Let your muscles, bones, and joints adjust at their own pace. If you rush it, you’re begging for an injury. The rule of thumb?

Increase your mileage by no more than 10–15% each week. Don’t try to push harder every week. Let your body catch up by sticking with the same mileage for a couple of weeks.

Training Intensity: The Talk Test and Heart Rate

Here’s the thing—your runs should NOT feel like a race every time. Most of the time, you should be running at an easy, conversational pace.

Use the talk test:

Can you hold a conversation or sing short bursts? If you’re gasping for air, slow down. If you can’t chat, this isn’t sustainable. So, aim for a level of effort where you’re cruising along at a 5 or 6 out of 10.

Another way to look at it? Heart rate. Try to stay at around 65–75% of your max heart rate. This is Zone 2, or your aerobic zone. It’s an easy jog pace where you could run forever.

Trust me, keeping this pace on your easy days will pay off big time. I was amazed at how my body adapted when I stuck to this zone.

If you push too hard on every run, you’re going to burn out fast. Instead, save the tough sessions (like tempo runs or strides) for specific days. Most of your runs should be easy. Why? They help build a solid aerobic base so you can run further without breaking down.

In practice, I kept my breathing steady and made sure I wasn’t gasping for air. Some days, I’d even run while talking to a friend or listening to a podcast. That kept it chill and fun.

Cross-Training and Strength Work

Look, if all you do is run, you’re missing out.

Cross-training helps reduce the risk of injury—I’ve seen it firsthand. When you mix it up and move in different ways, you strengthen muscles you might not use as much while running.

It helps prevent problems like weak stabilizer muscles or tight hips. That’s just the way it goes. By mixing in different workouts, you’re spreading out the workload and protecting your joints.

But don’t skip strength training. Runners rely heavily on their legs and core, so building strength in key areas is a game-changer. Focus on the glutes, hamstrings, quads, and calves.

I swear by bodyweight exercises like squats, lunges, calf raises, glute bridges, and planks. These moves build the “engine” of my run. After just a few weeks, I could feel a huge difference in my legs and knees.

Even just one good set of strength exercises can change everything. After a couple weeks of squats and lunges, I felt stronger, my knees felt better, and I was faster. If you’re new to strength training, start simple.

Squats and step-ups work your quads and glutes, calf raises hit the calves, and planks build your core and hamstrings. Strength helps prevent injury and keeps you from overtraining, especially as you start adding speed into the mix.

Make sure you’re doing at least two strength or cross-training workouts per week. But don’t go overboard—give your muscles time to recover between workouts. Active recovery counts too, like an easy bike ride or even yoga.

Embracing the Run/Walk Method

If you’re just starting out—or slowly building your mileage—consider the run/walk method. This strategy was popularized by Jeff Galloway back in 1974 when he discovered that adding planned walking breaks helped beginners finish 5Ks and 10Ks without crashing or getting injured.

The coolest part? It worked. His runners finished the race injury-free after just 10 weeks of run/walk training (jeffgalloway.com).

I’ve been there. In my early days, I kept it simple: run for 1 minute, then walk for 1 minute. Repeat. That first month was tough, but it kept me from feeling like I was about to pass out.

If you push yourself too hard, too fast, you’re gonna burn out. Mixing in those walks? It helps your body recover, keeps your heart rate from getting too high, and keeps you from losing focus.

Here’s the deal: you alternate between running and walking in intervals—like 60 seconds running, then 30 seconds walking. It gives your legs a break without stopping altogether.

As time goes on, you’ll gradually extend the run portion—2 minutes running, 1 minute walking, then 3:1, then 4:1. This is interval training for a race—it saves your legs for the long run.

Rest and Recovery: Non-Negotiable

Your training plan needs rest. Period. Rest days are built-in recovery—they’re not a cop-out. I learned this the hard way. I used to skip my rest days, and, no surprise, I ended up burned out or injured.

Rest isn’t a luxury. It’s part of the process. At least one full rest day a week is key. For most beginners, two easy days a week work even better.

Take it easy on those days—do some light stretching or nothing structured. I used to schedule Thursdays and Sundays as my rest days. Even if I felt fine, I stuck to it. No excuses.

Quick Tip: If you’re feeling extra sore, sluggish, or mentally wiped, don’t ignore it. Take an extra day off. Getting to the start line healthy is more important than any single workout.

Your 12-Week Couch-to-10K Training Plan

Here’s a simple 12-week plan. It includes 3 run/walk workouts, 2 cross-training or strength days, and 2 rest days every week. The run/walk days gradually increase your running time, while cross-training keeps your body strong. Modify it based on your schedule, but aim to hit each type of workout.

Week 1 – Getting Started

I’ll never forget my first week of running. I was nervous, doubting myself—but I just kept it slow. For this week, we’re doing run/walk intervals. Try running for 1 minute, then walking for 2 minutes. Repeat that for 6-8 rounds. Total time? About 20-25 minutes.

  • Runs (3× this week): Run 1 minute, walk 2 minutes for about 20-25 minutes.
  • Cross-training (2× this week): Light cycling, swimming, or yoga. Changing up your cardio will keep you fresh and prevent burnout.
  • Rest (2 days): Full rest. Seriously, rest is just as important as running. It’s about recovery and letting your body rebuild stronger.

Mindset: You’re probably asking, “Can I really do this?” I had the same doubts, trust me. But I kept showing up, even when it was tough. It’s all about taking it one run at a time. Before you know it, you’ll see the progress. Keep at it.

Week 2 – Building the Habit

Okay, you made it through Week 1. Now, we’re gonna build on that. This week, we’ll run for 1.5 minutes, then walk for 1.5 minutes. Do that for 6-7 rounds, which will give you about 25-30 minutes total.

  • Runs (3× this week): Run 1.5 minutes, walk 1.5 minutes for 25-30 minutes.
  • Cross-training (2×): More swimming, cycling, or strength training. Strengthening your legs and core will help you as you increase your mileage.
  • Rest (2 days): Full rest. No skipping it.

Mindset: It might feel a bit harder as you up the running time, but that’s part of the deal. The first time I ran 2 minutes straight felt like a huge win. You’ll get there, too. Just keep going one step at a time.

Week 3 – Finding Your Stride

By Week 3, your body is starting to groove with running. It’s like your body is finally getting the rhythm, and you’re feeling stronger. This week, we’ll do 2 minutes of running, followed by 2 minutes of walking for 6-7 rounds, for a total of about 28–30 minutes.

Trust me, you’ll start feeling like you’re picking up steam.

  • Runs (3×): 2 minutes running, 2 minutes walking for about 28–30 minutes.
  • Cross-training (2×): Keep up with your cross-training but add in some strength work. When I started building up my mileage, strengthening my glutes, hamstrings, and core made a world of difference.
  • Rest (2 days): Take two full rest days. If you’re feeling sore, don’t hesitate to take an extra rest day. The goal is to listen to your body and not push too hard, too soon.

Mindset: Here’s the deal: it’s easy to get caught up in comparing yourself to others or worrying about how far you have to go. But listen, you’re doing great! You’re already further along than you realize. Stick to the plan, keep showing up, and celebrate the small wins.

Week 4 – Stepping Up

You’re on the right track! You’ve built a solid foundation, and now we’re stepping it up. This week, try doing a longer run of 8–10 minutes non-stop. For the other runs, do 3-minute runs and 2-minute walks for 25–30 minutes. The key is to get comfortable pushing just a little bit further.

  • Runs (3×): One long run of 8–10 minutes, and two shorter runs with 3:2 intervals for around 25–30 minutes.
  • Cross-training (2×): Keep strengthening those legs and core. Squats, lunges, planks — all solid stuff to keep your form sharp.
  • Rest (2 days): Full rest. Let your body catch up with the increased effort.

Mindset: I remember when I was nervous about running for 10 minutes straight. But here’s the thing — it wasn’t as bad as I thought. You’ll feel the same. Focus on one interval at a time and enjoy watching yourself progress.

Week 5 – Momentum

You’re about to hit that “I can do this!” feeling. This week, let’s aim for a 25–30-minute long run. For the other two runs, try 4-minute runs with a 1-minute walk for about 30 minutes. You’re going to feel more confident and capable.

  • Runs (3×): One long run of 25–30 minutes (~3 miles). Two shorter runs with 4:1 intervals for about 30 minutes.
  • Cross-training (2×): Keep your cross-training easy but active. Swimming, cycling, or a lighter strength workout will help you stay in shape without overdoing it.
  • Rest (2 days): Rest up! If you feel sore, take extra time to recover. It’s better to rest than to risk injury.

Mindset: You’ve been putting in the work, and now it’s showing. You’re making real progress. I remember when running 3 miles felt like a huge challenge, and now here you are, getting closer and closer to your goal. Keep pushing.

Week 6 – Halfway Challenge

You’ve made it halfway — congrats! This week, you’re going to crush your first long run of 4–5 miles (40–50 minutes). Don’t stress if it feels tough; just keep it steady, find a pace you’re comfortable with, and know your body is getting stronger each step.

  • Runs (3×): One long run of 4–5 miles (40–50 minutes). Two shorter runs with 5:1 intervals (~30 minutes).
  • Cross-training (2×): Keep doing strength work. It’s all about keeping those legs strong as you build your distance.
  • Rest (2 days): Full rest. Hydrate, stretch, and get some good sleep to help with recovery.

Mindset: You’ve already put in the work to get here, and this is a big milestone. You’re tougher than you think. Trust me, soon you’ll be looking at a 10K and thinking, “That’s nothing.”

Week 7 – Stepping Toward 10K

You’re getting so close now! Aim for a 5-mile long run (45 minutes) this week. For your other runs, stick with 4:1 or 5:1 intervals for 30 minutes. It’s all about building endurance and confidence.

  • Runs (3×): One long run of 5 miles (45 minutes). Two shorter runs with 4:1 or 5:1 intervals (~30 minutes).
  • Cross-training (2×): Add in core and leg strengthening to keep your form on point.
  • Rest (2 days): Full rest. Focus on recovery and let your body do its thing.

Mindset: I remember when I was feeling a bit nervous about running that 5-mile mark. But once you hit it, you’ll feel like a superhero. Stay positive — you’ve got this. Trust your body.

Week 8 – Final Build-Up

Alright, time to push for your longest run yet: 6 miles (60 minutes). For the other runs, do 5:1 intervals for about 30 minutes. This is your last big training week before you taper, so let’s make it count.

  • Runs (3×): One long run of 6 miles (60 minutes). Two shorter runs with 5:1 intervals (~30 minutes).
  • Cross-training (2×): Strength and flexibility work — yoga’s a great addition for keeping your body loose and limber.
  • Rest (2 days): Full rest. Make sure you’re well-rested and ready for the final push.

Mindset: This week’s a big one. I know it’s intimidating, but remember: you’ve earned this. You’ve been building endurance, and now, it’s time to push your limits. You’ve got what it takes. Let’s crush this.

Week 9 – Taper and Tune-Up

It’s time to scale back a bit and let your body recover. This week, keep your runs easy — just 15–20 minutes — and do light cross-training to stay fresh. You’ve done the work; now it’s time to let your muscles recover for race day.

  • Runs (2–3×): Two easy runs (15–20 minutes). One short, steady run (20 minutes).
  • Cross-training (1×): Keep it light with swimming or yoga.
  • Rest (3×): Full rest.

Mindset: The finish line is so close now. Take it easy this week, and remember: you’ve done all the hard work. It’s normal to feel a mix of nerves and excitement — just enjoy the ride.

Week 10 – Race Week / Celebration

It’s here — race week! Keep your runs light (10–15 minutes) to stay loose, then get ready for race day. You’ve trained hard, and now it’s time to trust that training and take on the challenge.

  • Race Day: Start slow. Trust your training and focus on your pace. When you cross that finish line, take a moment to soak it all in — you’ve earned it.

Weekly Breakdown:

You’ve got all your runs, cross-training, and rest days laid out for you. Stick to the plan, adjust as needed, and keep showing up. This is how you build the strength and endurance to crush that 10K.

10K in miles

Congratulations!
By Week 12, you’ll have built the endurance to rock that 10K! Keep showing up, stay focused, and keep pushing yourself. You’ve got this!

Here are some useful links on the history of the 10K and some interesting facts.

Note – If this 10K plan is too much for you, try my couch to 8K schedule instead.

FAQ: Couch to 10K Training

Q1: How long does it take to go from couch to 10K?

Most Couch to 10K programs take 8 to 12 weeks, depending on your starting fitness and consistency.

Q2: Does Couch to 10K really work?

Yes—Couch to 10K plans are designed to build endurance gradually, helping beginners run a 10K safely and confidently.

Q3: How many days a week should I train?
Most plans recommend 3 to 4 days of running per week, with rest or cross-training days in between.

Q4: What if I miss a day or can’t finish a workout?

It’s okay—just pick up where you left off or repeat the missed workout before moving on. The key is to stay consistent and patient with your progress.

Q5: Can I walk part of the 10K?

Absolutely! Walking breaks are common, especially for beginners, and they help you manage your energy.

Q6: Should I add strength training to my Couch to 10K plan?

Yes—strength training helps prevent injuries and improves overall running performance.

Q7: Do I need special shoes for Couch to 10K?

Invest in a pair of comfortable, supportive running shoes that fit well to reduce the risk of injury.

Q8: How fast should I run during training?

Run at a conversational pace, where you can talk without gasping. Speed comes naturally as fitness improves.

Q9: What if I feel pain while running?

Stop and assess—mild soreness is normal, but sharp pain might indicate an injury. When in doubt, rest and consult a professional.

How Many Miles Is a 100K? Complete Guide & Training Tips

So, you’re thinking about running a 100K race.

That’s over 62 miles.

Sounds like a crazy long distance, right?

I mean, imagine running two marathons back-to-back—that’s a 100K. It’s a big challenge, but don’t let that freak you out.

If you’ve done a 50K or a marathon already, this is just the next step. You want to see how far you can push your limits, and honestly, that’s why we do this, right?

Trust me, with the right mindset and some solid training, a 100K can totally be within your reach.

Since I’m planning to run my first 100K this year (BTS 100 in Java), I decided to write a long post about how I’m planning to train for this distance (already ran a few 50Ks and 75Ks) so you can have a rough idea on how to structure your training plan once you also decide to go a 100.

Sounds like a good idea?

Let’s get to it.

So, What Exactly is 100K?

Alright, let’s break it down.

A 100K is 62.1 miles.

Yeah, that’s insane when you put it in perspective.

It’s a whole new ballgame. It’s 49 miles more than a half marathon, 36 miles more than a marathon, and 30 miles more than a 50K. Do the math—that’s like running 20 full 5Ks in a row.

Yeah, twenty.

It doesn’t really hit you until you’re out there, one foot in front of the other, and the miles start stacking up.

At first, it feels like a lot. But once you get into the groove of training, you realize breaking it down into chunks makes it way more manageable.

But don’t get me wrong. Most 100K races aren’t your typical road events. Most ultra events take plan on trails and treacherous terrains so comparing them to road events when it comes to distance alone is not fair.

But don’t worry, I’ll be sharing with how I’m planning to prepare my body for the crazy vertical gains and technical terrain. For reference, BTS ultra 100K is around 4700m of elevation gain with a 32 hours cut-off time. Not the most challenging course, but I know it’s gonna be challenging enough for me as a first-timer.

how many miles is a 100K

How Long Does It Take to Run a 100K?

Expect to spend anywhere from 10 to 15 hours on your feet.

And yes, that means running through meals, running through the dark, and covering an entire day of effort.

I’ve never run a 100K before, but I’ve done several 50K and 75K races, so I know it’s no walk in the park.

I’m preparing for my first 100K this December, and just thinking about it is both exciting and a little nerve-wracking.

I can already picture myself asking, “Why did I sign up for this again?” But I know that crossing that finish line after such an epic journey will be unforgettable.

Curious about times? The average 100K time sits at 09:09:35. A super fast time? Anything under six hours. But for most of us, it’s about that steady, “grind it out” pace.

Are You Ready for a 100K?

Let’s be honest—jumping straight into a 100K with zero ultra-distance experience is a bad idea.

Doesn’t matter how strong you think you are. You need time to build up to this kind of distance.

For me, after knocking out several 50K races, I knew that a 100K was the logical next step. But I also knew it would take a whole different kind of training.

Get yourself some ultra-distance races under your belt—50K, 75K. Those will give you the foundation you need.

And when you cross those finish lines, don’t just feel good about finishing. Push yourself to finish strong. Those races will set you up mentally and physically for the 100K.

Get Your Mind Ready Too

Let’s talk mental game.

If you think a 100K is only about your physical strength, you’re missing the point. It’s mostly mental. You could be in great shape, but your mind is going to be your toughest opponent.

I’m mentally prepping for this 100K by reminding myself it’s going to test me like never before.

I expect moments where I’ll question why I’m running for hours. And that’s okay. I’m focusing on the process—taking it one week at a time. I’m not thinking about the whole 100K yet, just the run I’m doing today.

When I ran my first 50K, I hit mental lows where I wanted to quit. But every time, I reminded myself that the finish line was still within reach if I just kept going. It’s about believing you’re capable of more than you think.

Spend Time on Your Feet

You might think long runs are all about speed, but nope, it’s about time on your feet.

When I do my long runs and hikes, I ain’t thinking about speed—I’m only focused on how long I could keep going.

You need to get used to being on your feet for hours, whether you’re running or hiking.

That’s why I’m planning on doing back-to-back long runs and full-day hikes, sometimes lasting 8-12 hours.

That simulates the kind of mental and physical endurance I’ll need for the BTS 100. Getting my body used to being on your feet for long stretches is crucial. These long days have been a big part of my prep for this race.

Fueling Is Key

You can’t get away with half-baked fueling when you’re running a 100K. Unlike a 5K where a few gels might get you through, long-distance running demands a solid nutrition plan.

Without it, you’ll hit the wall way before the halfway point.

Believe me, I’ve learned the hard way. Some nutrition choices had me feeling like a champ, while others left me wishing someone would drive me off the course.

The trick? You’ve got to experiment. Try different foods, hydration plans, and see what works best for your body on those long training days.

Picking Your First 100K

Choosing your first 100K? It’s a big decision.

Don’t dive straight into an insane race right out of the gate. Go for something that’s relatively flat and in a climate that you can handle.

I learned the hard way that a course with steep hills or crazy weather can take you out early. Trust me, you want to pick a race that won’t break you mentally in those first miles.

For your debut 100K, find a race with solid support. Look for aid stations and volunteers who’ve got your back. Sites like UltraSignup are perfect for finding races that match your experience level. Finish your first, and you’ll be ready to tackle the next challenge.

I chose the BTS 100K because (1) I’ve already joined a few races in the same region (think Bromo Desert and Bromo Marathon) so I know what to expect when it comes to trail difficulty, elevation, and weather.

Plus (2), some of my friends have already joined this event as their first 100Ker and have praised it highly for how well it’s organized and relative easiness of the terrain course compared to other ultra events.

Just take a look at the course map and you can tell.

Integrating Vertical Training

In preparation for the elevation changes, I’ve been adding hill workouts into my training plan. Steep climbs and descents are mentally and physically challenging, but the more you train on them, the better you’ll handle them during the race.

I’ve been incorporating hill repeats into my weekly runs, which means sprinting up a hill and then jogging or walking back down to recover. These workouts help build the leg strength you’ll need, especially for descents, which can be surprisingly taxing on the quads. Also, don’t forget about power hiking for those steep climbs—it’s a skill that’ll save you a lot of energy when the terrain gets tough.

If you’re training for a race with significant elevation changes, you’ll want to get used to the terrain in advance.

Train on the kind of surfaces you’ll be racing on.

For me, I’ve been running on rocky trails and sandy paths to simulate the different types of technical terrain I’ll face. The more variety you add to your training, the more prepared you’ll be for race day.

100K Training Plan: Building Endurance and Resilience Step by Step

Training for a 100K isn’t just about running long distances; it’s about smart, steady progress and recovery.

Here’s a breakdown of a 24-week training plan for beginners (like me!) aiming for their first 100K race.

It’ll guide you step by step through base building, endurance, peak training, and tapering.

Beginner 100K Training Plan (24 weeks)

Phase 1: Base Building (Weeks 1-8)
  • Mileage: Start with around 25 miles per week, increasing by 10% every two weeks.
  • Key Workouts:
    • Long Run: Start with 10 miles, building up to 16 miles by Week 8.
    • Easy Runs: Two or three runs per week at a relaxed pace. These runs should feel comfortable—no speed involved.
    • Cross-Training: One session per week (e.g., cycling or swimming). These are essential for building overall strength without the impact of running.
    • Rest Days: Two days per week to allow recovery and prevent injury.

For me, this phase is all about getting the body used to higher volumes of running. I’ll be making sure I’m training pain-free and gradually increasing the load. The idea is to ease into it and avoid pushing too hard too soon.

Phase 2: Building Endurance (Weeks 9-16)
  • Mileage: Gradually increase to 30-40 miles per week, with one cutback week every three weeks to avoid overtraining.
  • Key Workouts:
    • Long Run: Build up to 20-22 miles for your longest runs.
    • Back-to-Back Long Runs: Start incorporating these on weekends. For example, I might run 14 miles on Saturday, followed by 10 on Sunday.
    • Tempo Runs: One weekly run at a comfortably hard pace, for about 15-20 minutes. This will help improve speed and stamina.
    • Cross-Training and Core Work: Two sessions a week to strengthen supporting muscles, which will help avoid injury.

This phase is where I’ll be building resilience for the long haul. My long runs will gradually get longer, and I’ll really start to focus on pacing, nutrition, and hydration.

Phase 3: Peak Training (Weeks 17-22)
  • Mileage: Peak at 45-50 miles per week.
  • Key Workouts:
    • Long Run: Aim for one long run of around 28-30 miles, along with shorter long runs of 15-20 miles.
    • Back-to-Back Long Runs: These will continue, ideally on challenging terrain to simulate race conditions.
    • Intervals: One weekly session of intervals or hill repeats.
    • Cross-Training: Maintain strength and flexibility with yoga, core exercises, or light cycling.

By this stage, I’ll be running my longest distances—this is where the body and mind really start to feel the challenge. It’s also the phase where I’ll focus on mental toughness, making sure I can push through fatigue and get accustomed to the race-day discomfort.

Phase 4: Tapering (Weeks 23-24)
  • Reduce mileage to allow your body to recover and prepare.
  • Key Workouts: Keep up with shorter, easy runs and one last long effort at about half your peak distance.

By this point, I’ll be cutting back on the mileage to let my body rest and recover while still maintaining a level of fitness. Tapering can be tricky—physically, you feel like you want to keep running, but mentally, you’ll appreciate the extra recovery.

Common 100K Training Questions

I know that you’ve probably got a bunch of questions floating around in your mind right now, so let’s address some of the most common concerns.

What should I eat before a 100K run?

Before a 100K, I’ll be eating a balanced meal that combines complex carbs, lean protein, and healthy fats to fuel my body.

Examples include oatmeal with almond butter and fruit, a quinoa bowl with grilled chicken, or a hearty smoothie. Make sure you eat 3-4 hours before race day to give your body time to digest.

How many miles should I run each week when training for a 100K?

Weekly mileage varies depending on experience. For beginners, like me, you should aim to start around 20-30 miles per week, and gradually build up to a peak of around 45-50 miles. Intermediate runners might start at 35 miles per week, eventually reaching 60-70 miles during peak weeks. But always balance these miles with recovery days to avoid overtraining.

What gear is essential for a 100K ultra marathon?

The right gear is crucial for comfort and performance. I’ll be using a hydration vest or pack, trail shoes (planning to buy a Hoka Speed goat 5) with great traction, moisture-wicking clothing, and blister prevention essentials like anti-chafing balm and high-quality socks. I’ll also make sure to have fueling options like gels, electrolyte tablets, and energy bars at the ready.

So in total you’d need a comfortable hydration vest or pack, trail shoes with good traction, moisture-wicking clothing, and layers if you’re running in varying weather conditions.

How much recovery do I need after a 100K run?

After completing a 100K, I’ll need at least two to three weeks of dedicated recovery. I’ll start with gentle movement like walking or light stretching, then gradually ease back into running. Staying hydrated, getting proper nutrition, and prioritizing sleep will help speed up my recovery.

What Makes a 100K Different?

Training for a 100K isn’t like training for shorter races. It’s all about building staying power. Here’s what you should focus on:

  • Mileage Progression: Instead of peaking at a marathon’s 26 miles, you’ll build to 30-35 miles in a single run, with back-to-back long runs becoming part of your routine.
  • Fueling Strategy: Your body will need constant fuel to keep you going, so developing a fueling plan is critical.
  • Mental Prep: Ultra races demand mental endurance just as much as physical stamina. Visualizing success and maintaining a positive mindset can make all the difference.


Mastering Proper Treadmill Running Form: Tips For Better Technique

How to Run On a Treadmill

Running on a treadmill doesn’t feel natural at first — I get it.

You hop on, press start, and suddenly your form feels stiff, your neck’s tight, and you’re glancing at the screen every five seconds like it’s going to give you permission to stop.

But here’s the truth: a few simple tweaks can turn that awkward machine jog into a smooth, efficient session that actually transfers to outdoor running.

Research backs this up too — studies show that with a slight incline and proper posture, treadmill mechanics can closely mimic outdoor conditions (yep, it’s not just in your head).

Let me walk you through the same form fixes I use with the runners I coach — the ones that helped me go from clunky treadmill strides to feeling fast, light, and pain-free, even during long winter mileage sessions.

You’ll get practical tweaks, relatable stories, and real-runner tips you can use today.

Let’s get into it.

Start With an Athletic Posture 

Before you even touch the “Start” button, take a second to scan your setup from head to toe.

Head & Shoulders

  • Lift your head. Gaze forward. Not at your shoes. Not at the pace screen. Forward.

  • Roll your shoulders back and let them relax — no tension.

When I started out, I used to hunch over and peek at the display every 30 seconds. My neck would be toast after even a short run. Now I imagine scanning the horizon like I’m on a sunrise trail — it naturally fixes the slouch.

Spine & Core

  • Think “tall and active.”

  • Stand upright, lean just slightly from your ankles (not your hips), and keep your spine long — not stiff.

  • Tighten your core like someone’s about to poke your belly. That’s your base.

Back when I ignored this, I’d end treadmill runs with nagging lower-back pain. Once I focused on “running tall,” that pain disappeared. My balance improved too — especially when the belt picked up speed.

Hips & Feet

  • Face your hips straight ahead, not swaying side to side.

  • Keep your feet hip-width apart, toes pointing straight forward.

This keeps your knees tracking well and prevents awkward compensations that can throw off your stride. Too narrow and you’ll feel unstable. Too wide and your form starts leaking energy.

And yes, it’ll feel weird at first. You might catch yourself thinking, “This is too upright.” That’s just your old habits talking. Trust me — give it a few sessions and this new alignment will feel like home.

Don’t Stare at Your Feet. Seriously. Stop That.

This one’s huge — and most runners mess it up.

Where your eyes go, your form follows. Look down too often and you’ll hunch, lose balance, and feel stiff. I’ve coached dozens of runners who constantly drift on the treadmill — and it always comes back to the same bad habit: watching their feet like they’re walking a tightrope.

Fix it:

  • Pick a spot 10–15 feet ahead. Wall sign? Exit light? Picture on the wall? Doesn’t matter.

  • Just look forward — not down. It straightens your spine, lifts your chin, and frees your chest for easier breathing.

It’s how you’d run outside, so mimic that.

Also — if you’re addicted to checking your pace, cover the screen with a towel for part of the run. I do this myself on easy days. You’ll start tuning into your breathing, your stride, your effort — instead of just chasing numbers.

Quick Reset Tip: Every 5–10 minutes, do a “form scan.”

  • Are your hands clenched? Shake them out.

  • Shoulders tight? Drop them.

  • Breathing shallow? Take a slow, deep breath.

Small resets = big returns.

Mimic Your Outdoor Running Form

One of the biggest mistakes I see on treadmills? Treating them like a different sport.

Your running form shouldn’t suddenly go weird just because you’re indoors. The more your treadmill stride mimics your outdoor stride, the better.

Here’s how to get it right.

Use Your Real Stride — Not the Treadmill Shuffle

Run like you’re on the road. That means using your natural stride — not tiny panicked steps or exaggerated lunges just because the belt’s moving underneath you.

I see it all the time: people overthink the treadmill and end up changing everything.

If you usually run with a midfoot strike and moderate stride, stick with that. Don’t let the belt mess with your mechanics. Focus on landing your foot under your hips, not way out in front.

If you reach forward too much, the belt will yank your foot back before you’ve even had a chance to stabilize — and that’s when trouble starts.

I’ve coached runners who lost months to shin pain just from letting the belt dictate their stride. Keep it controlled. Let the treadmill follow your form — not the other way around.

Fix the Overstriding Mess

Overstriding — landing with your foot too far in front — happens outside too, but it’s even more punishing on a treadmill.

One guy I coached joked that he felt like “a drunken circus bear with crap form” when he first came back to treadmill running after years off.

I laughed, but I knew exactly what he meant. Overstriding feels clunky and off. You heel strike hard, the belt yanks your foot back, and your knees take the hit.

The fix?

  • Shorten your stride just slightly.
  • Bump your cadence.
  • Aim to land closer to your midfoot or forefoot — not your heel.

When your foot lands beneath you, the treadmill actually helps push you into the next step, making the whole motion feel smoother.

Add a 1% Incline — Trust Me

Here’s a trick that makes a huge difference: bump the incline up to 1%.

Why? Because that small incline mimics the energy cost of running outdoors.

The Journal of Sports Sciences backs this up — a slight incline compensates for the missing wind resistance and that little assist the belt gives you.

You don’t need to go wild — even 1–2% is enough. Personally, I find 2% is my sweet spot. It makes the run feel “real” — not artificially easy like a flat belt.

It also fires up your calves and glutes more and protects against the downhill-like pounding you’d get from staying at 0%.

Bonus: less repetitive stress on your legs = less chance of shin splints.

Here’s your guide hill treadmill training.

Stand Tall — Ditch the Forward Hunch

You’ve probably heard that a slight forward lean is good for outdoor running. That’s true — from the ankles, with a tall spine.

But on a treadmill, that belt is already doing some of the forward work.

So if you lean too far forward on the ‘mill? You’re just throwing off your balance and straining your back or neck.

Instead, focus on running tall:

  • Chest up

  • Eyes forward

  • Head neutral

Think “proud runner, not slouching zombie.”

Stack your ears over shoulders, shoulders over hips. If you catch yourself hunching or staring at your feet, reset your posture.

Mental Trick: Pretend You’re Outside

I’ll be honest — treadmill running can feel boring.

But here’s something I tell runners I coach: Visualize your favorite outdoor route while you’re on the machine. Seriously.

Close your eyes for a few seconds, picture that path, then sync your form with that memory. You’ll move more naturally — and it’ll snap your brain out of treadmill autopilot.

If something feels off (maybe your strides feel choppy or you’re slamming your heels), slow the pace.

Form > speed. Every time.

Shorten Your Stride 

I know I sound like a broken record but this bears repeating.

Back when I first started running indoors, I didn’t think much about my stride. I just hopped on, hit “start,” and hoped I looked like I knew what I was doing.

But I was overstriding like crazy — basically reaching forward with every step like I was trying to win a long-jump contest.

My knees didn’t appreciate it.

Then I discovered cadence.

Why Cadence Matters

Cadence is just how many steps you take per minute. Most solid runners hit somewhere around 170–180 steps per minute on easy runs.

That number isn’t just for outdoor purists — it applies on the treadmill too. In fact, it’s even more important indoors, where your form can go sideways fast.

Here’s the deal: when you increase your cadence, you automatically take shorter, quicker steps, which keeps you from overstriding.

A study in the Journal of Sports Science showed that this reduces the impact forces on your joints.

Translation? Less stress on your knees and ankles. That’s a big win in my book.

Too slow, and you’re just stomping the belt with every step — basically punching your joints in the face.

Cadence = Less Energy Burned 

Here’s the fun part. Most runners find that when they up their cadence, running actually feels easier.

Less bouncing, less braking, less wasted energy.

How to Actually Fix Your Cadence

This is the part most runners skip — but it’s where the magic happens.

  • Find your current cadence. Count how many times one foot hits the belt in 30 seconds and double it.

  • If you’re below 170, aim to bump it up slowly — just 5% at a time.

  • Use cues. Think: “Quick feet.” Or, pretend the belt is hot and your goal is to barely touch it.

  • Use a playlist or metronome. Look for songs around 170–180 BPM. Let the beat drive your stride.

I tell my runners: Your feet should be popping off the treadmill, not dragging like you’re stuck in glue.

Over a few weeks, your body will adjust. You’ll feel smoother, lighter, and your knees will thank you.

Cadence Also Wakes Up Lazy Muscles

Here’s something most people don’t realize: Running on a treadmill tends to turn off your hamstrings.

The belt does some of the work pulling your leg back. Studies show hamstring activation drops by 10–15% compared to running outside.

What does that mean? If you just cruise without thinking about form, your glutes and hammies might take a nap — leading to muscle imbalances and eventually pain.

A quicker cadence, especially paired with a midfoot strike, helps bring those muscles back into the game.

You’re not just “floating” — you’re working with purpose.

Let Your Arms Do Their Job 

Let’s get honest — if you’ve ever death-gripped the treadmill rails mid-run, you’re not alone.

I’ve been there too. In my early days, especially on steep inclines, I’d hold on like the machine was trying to buck me off.

Here’s the truth: Grabbing the rails wrecks your form. It’s one of the top mistakes I see runners make indoors.

Free Arms = Real Balance

Your arms are designed to swing. That’s what keeps your body balanced as your legs move.

Hold the rails, and you’re locking your upper body, throwing everything off.

You’ll probably lean back or shuffle. Your stride shortens. You end up stiff, awkward, and totally off rhythm.

Instead:

  • Let your arms swing naturally — bent at about 90 degrees
  • Keep your hands loose
  • Move them front to back (not across your body)
  • Stand tall. Let them lead your stride.

You might feel a little shaky at first, but give it a few runs.

Your core and balance will kick in and start doing the real work.

Grabbing the Rails = Cheating

Yup, I said it.

When you hold on, you’re taking weight off your legs and leaning into the machine. My old coach said it perfectly:

“You’re not getting your heart rate up. You’re not burning enough calories.”

Ouch. But true.

Holding on reduces your leg workload, messes with your posture, and cheats your fitness goals. If you’re doing a hard workout, it should feel hard — not supported by your arms.

What to Do If You Feel Wobbly

If you’re holding on because you’re off balance or it feels too fast, lower the speed or incline.

Better to run a little slower hands-free than to go fast while hanging on for dear life.

Rails are there for emergencies — not for every run. Build your stability. It’s part of the training.

Arm Swing 101

Here’s how to dial in arm form:

  • Elbows bent at ~90 degrees
  • Swing from the shoulders
  • Hands near your waist, moving gently back and forth
  • No clenched fists, no crossing your arms across your chest
  • Think: compact and relaxed

Fun fact: a strong backward arm drive actually helps drive your legs. It’s all connected.

Treadmill Mistakes That Wreck Your Running Technique

Let’s cut through the fluff.

If you want to get stronger on the treadmill — not just survive it — then you’ve gotta stop making these common mistakes.

I’ve seen them all, made some myself, and coached runners out of every single one.

Here’s what to watch for, and how to fix it without overthinking.


1. Overstriding Like You’re Chasing a Bus

You’re landing way out in front of your body — heel smashing down, legs fighting the belt.

That’s a recipe for sore joints and a stiff back. You’ll feel like you’re battling the machine instead of flowing with it.

Fix it: Shorten that stride. Pick up your cadence. Think quick, light steps — your foot should land under your hip, not in front. A midfoot strike works best. And hey — if your steps are loud, you’re stomping. Try to sound like a ninja, not an elephant.


2. Hunching Over Like You’re Reading Texts

Staring down at your feet or the treadmill screen? That slouched posture wrecks your neck and shoulders.

I used to finish runs with more neck pain than leg fatigue.

Fix it: Keep your eyes forward, chin neutral, chest open. Pretend a string’s pulling you up from the crown of your head. And do a quick shoulder shrug and drop every now and then to shake out tension. One runner I coached fixed their neck soreness just by lifting their gaze. No massage needed.


3. Clutching the Rails Like You’re on a Rollercoaster

Holding on for dear life? That’s fear — or fatigue — messing with your form.

It also robs you of balance, core engagement, and calorie burn.

Fix it: Drop your speed or incline to where you can go hands-free. Your arms are built for balance and rhythm, not decoration. Unless you’re climbing Everest on a 15% grade, ditch the rails.

4. Running on Your Tiptoes or Slamming Your Heels

Some folks bounce like they’re jumping rope. Others stomp like they’re marching.

Both mess with your stride and wear out your calves or knees.

Fix it: Aim for a soft midfoot strike. Your heel can gently kiss the belt, but your foot should land almost flat under your body. Think: light and quick. If you’re bouncing too high, you’re on your toes. If you’re thudding, you’re probably heel-slamming. I teach all my beginners this: quiet steps = efficient form.


5. Leaning Forward Like You’re in a Wind Tunnel

Leaning from the waist (instead of from the ankles) puts stress on your back.

It’s usually your body’s way of saying, “This pace is too dang fast.”

Fix it: Stand tall — ears over shoulders, shoulders over hips. Lock in your core. If you feel like you’re falling forward, hit that speed button and dial it down. Treadmill belts move for you — you don’t need to lean in like it’s uphill.


6. Hugging the Front Like It’s a Safety Blanket

Staying too close to the console cramps your stride and kills your arm swing.

It also makes you feel claustrophobic, like you’re about to trip.

Fix it: Slide back a bit. Find the center of the belt and claim your space. That extra room gives you freedom to move naturally. If you’re scared of drifting, clip on that safety key and start slow. You’ll build confidence with every run. I always tell my athletes: give yourself space to move like you would outdoors.

7. Tensing Up Like You’re Being Chased

Clenched fists. Tight shoulders. Locked jaw.

You’re not running — you’re bracing for impact. Happens a lot when nerves kick in or the pace creeps up.

Fix it: Shake it out. Literally. Do the following: wiggle your fingers, drop your arms and give ‘em a little floppy shake, and unclench your jaw and take a deep belly breath. You should feel relaxed and loose — like water flowing, not a robot ticking.


Everyone Slips Up

Even the pros. Even me.

Don’t beat yourself up if your form falls apart now and then.

The good news? The treadmill gives you instant feedback. If something feels off — slow down, reset, fix it, and go again.

And yeah, maybe you feel awkward sometimes, like everyone’s watching you.

Truth is, unless you’re flailing like Phoebe from Friends, no one cares.

You’re doing the work. That’s what matters.

Run a 10K in One Hour: Essential Strategies for Beginners

Run a 10K in one hour

Ready to run that 10K in under an hour? That was me not too long ago.

When I got into training, the thought of running 6.2 miles in under 60 minutes seemed impossible.

My first 5K race? About 33 minutes. I was pumped, but the idea of running twice that distance and doing it faster? A little intimidating.

But here’s the thing—I did it. And if I can, so can you.

In this guide, I’m gonna share exactly how I got there and how you can too.

We’ll talk training plans, interval workouts, pacing (yep, negative splits!), and why cross-training should be your best friend.

Plus, we’ll touch on how to fuel up, stay hydrated, and keep your mind strong when things get tough.

Let’s get to it.

Setting the Sub-1-Hour 10K Goal

Alright, here’s the deal. A sub-1-hour 10K means you’re averaging 6 minutes per kilometer (or about 9:39 per mile).

Sounds like a lot, right? But trust me, it’s possible.

I felt the same way when I started. But once I got a solid game plan, it became doable.

Where are you now? If you’re running a 5K in around 30–33 minutes, you’re already on the right track.

That’s pretty close to the fitness level needed for a 65–70-minute 10K. Getting those extra minutes shaved off? Totally possible with the right focus and effort.

The 8-Week Sub-60 10K Training Plan for Beginners

If you want to break an hour in your 10K, you need to build endurance AND speed. It’s not gonna happen overnight, so plan on 8-10 weeks of training. Your body needs time to adjust.

You’ll be running 3 to 4 times a week. But don’t forget—cross-training and rest days are just as important for injury prevention and overall fitness. Here’s a breakdown of what a typical week might look like:

sub 1-hour 10K training plan

(pls don’t mind the little error in the image, I’ll be fixing it later)

Let me break down what this plan is all about:

  • Monday (Rest or easy run): Keep this light. If you’re running, aim for a relaxed pace. This is all about recovery and base-building.
  • Tuesday (Interval training): Speed work is key to hitting that sub-60 goal. Intervals push your VO₂ max and leg turnover. This means your body gets used to running faster, and you can hold a quicker pace over the full 10K.
  • Wednesday (Cross-training or strength): Think of this as a way to build overall fitness and prevent injury. Activities like cycling, swimming, or weightlifting can help you get stronger without overloading your legs.
  • Thursday (Tempo run): Here, you’ll work on your lactate threshold, which is the pace you can sustain without your legs screaming at you. This is where you’ll get a feel for your 10K race pace.
  • Friday (Rest or light cross-training): Listen to your body. If you’re feeling worn out, skip the run and do some light stretching, yoga, or another gentle cross-training activity.
  • Saturday (Easy run): This is all about keeping the legs moving and building mileage. Keep it easy, don’t push the pace, just keep it comfortable.
  • Sunday (Long run): This is where you build your endurance. Don’t worry about speed—just focus on running for longer periods, aiming to build up to 10-12K before race day.

Balancing Speed and Endurance Training for a Successful 10K

When you’re training for a 10K, it’s all about finding that sweet spot between speed and endurance. You need both to run faster and longer.

Here’s how each piece of the puzzle comes together:

Long Endurance Runs

These long runs are usually your weekend workouts when you’ve got more time to spare. You’ll hit 60 to 90 minutes per session.

Now, I know this sounds counterintuitive, but you’ve gotta keep it slow and steady. You might be thinking, “This feels way too easy.” But that’s the point.

Going slow helps you build your endurance and teach your body how to burn fat. It’s like building the engine that’ll carry you through the race.

As you get stronger, a 60-minute run will start to feel like a walk in the park.

Interval Training (Speed Work)

Speed work is all about short bursts of fast running, followed by recovery.

Here’s an example: 400-meter repeats on the track—one lap all-out, then jog a lap to recover.

This type of training works wonders for improving how efficiently your body uses oxygen when you’re pushing hard.

And don’t forget the mental side of things. Speed work teaches you to push through that discomfort of running fast.

You’ll start to get comfortable with that “I wanna stop” feeling, and that mental toughness will make a big difference in your 10K.

Tempo Runs (Threshold Runs)

Tempo runs are where you push yourself to hold a pace that’s tough, but you can sustain it. You’re shooting for a pace that’s 10-20 seconds slower than your race pace. So, if you’re aiming for 9:40 per mile, a tempo run might look like 10:00–10:10 per mile.

The goal here is to raise your lactate threshold. That’s the point where your muscles start screaming for mercy.

By pushing that threshold up, you’ll be able to run faster and longer without crashing. It teaches you to hold that hard pace and feel in control—just like you will on race day.

Easy Runs & Recovery

Not every run needs to be a killer workout. In fact, most of your weekly miles should be at a chill pace.

Easy runs and rest days are just as critical as speed work or tempos because they give your body the chance to recover and soak up all the hard work you’ve been putting in.

Cross-Training: Your Secret Weapon

When I first started training for races, I made the rookie mistake of thinking that more running was the answer.

But overtraining led to aches and injuries. Adding cross-training into my routine was a game-changer.

It kept me fit and helped me avoid burning out.

Cross-training can include cycling, swimming, rowing, or even hiking—anything that gets your heart rate up without the pounding impact of running. F

or example, going for a bike ride on a Wednesday will work your cardiovascular system, strengthen your legs, and give your running muscles a break.

Try to cross-train on 1-2 non-running days a week (like Wednesdays or Fridays). Just 30-45 minutes of moderate effort is great. But don’t overdo it—if you’ve had a tough spin class on Monday, keep your Tuesday run easy.

Pacing Strategy for a 10K: Run Smarter, Not Just Harder

When it comes to the 10K, your pacing strategy can make or break your race.

If you’re going for a sub-60, you’ll want to aim for around 9:39 per mile (or 6:00 per km) – that’s your target pace.

But the real trick is how you pace yourself over those 6.2 miles. Start smart, finish strong – that’s the goal.

  1. Practice Race Pace in Training

Before race day, make sure you’re getting used to that goal pace during your training. Toss in some tempo runs and interval workouts that match your 10K pace.

Think of it like this: doing a few 800-meter repeats at goal pace with short rest breaks.

This helps you get familiar with how that pace feels – so when it’s race day, it’s not a shock to your system.

Back when I was training for my first sub-60 10K, I was sure I’d never hit race pace in training.

But with enough effort and consistency, it felt like second nature by race day. Trust me – getting used to that pace in training is key.

  1. Start with a Plan for Splits

A pacing strategy isn’t just about pushing yourself to the max from the start – it’s about knowing when to hold back and when to give it everything.

For a 60-minute 10K, aim for a 5K split around 29:30. Your mile splits should stay around 9:39.

Don’t get obsessed with hitting that exact split every mile. Use the splits as a rough guide – but know it’s okay to have a little wiggle room. The real goal here is to avoid going out too fast and crashing, or running out of gas too soon.

When I first started planning my splits, I was obsessed with hitting every single one perfectly. Now I know: it’s about sticking to the plan and not getting greedy too early.

  1. Master the Negative Split

Here’s where it gets interesting: the negative split. That’s when you run the second half of the race faster than the first half.

Sounds wild, right? But trust me, it works.

You’ve got to start a little slower to keep some gas in the tank for the last stretch.

If you try to sprint out of the gate to “bank time,” you’ll likely crash and burn – hitting that dreaded wall.

A negative split strategy? That’s the one that helps you finish strong and sometimes even faster than you planned.

Let me give you an example breakdown for a ~59-minute 10K:

  • Mile 1: ~10:00 (Warming up, easy pace)
  • Mile 2: ~9:50 (Getting into the groove)
  • Mile 3: ~9:40 (At goal pace, feeling good)
  • Mile 4: ~9:30 (Pushing a bit now)
  • Mile 5: ~9:15 (Feeling confident, ramping up)
  • Mile 6: ~9:10 (Giving it everything in that last mile)
  • Last 0.2: ~:**50 (Time to kick it into gear and finish strong!)

The principle here is simple: start controlled, finish strong. I used to think I needed to push hard from the start, but once I tried a negative split, it changed my whole race.

  1. Use Markers and Mental Cues

During the race, those mile (or kilometer) markers are your checkpoints. They’re perfect reminders to check in with yourself and stick to the plan.

Early on, I always tell myself, “Slow down, we’ve got a long way to go.”

Around the middle, I remind myself, “This is it, keep this pace and stay on track.”

By the end, it’s all about digging deep: “Alright, let’s finish this thing!”

Some runners break the race into smaller sections – maybe 0-5K is about staying controlled, 5K-8K is about maintaining, and then that last 2K? That’s your chance to give it everything you’ve got.

  1. Don’t Forget the Warm-Up

A proper warm-up is crucial for a race like the 10K. Get in a light jog and throw in some dynamic stretches – think leg swings, lunges, whatever wakes up the legs. Spend about 10 minutes warming up, and make sure you’re ready to hit that goal pace right from the start.

But don’t overdo it. Keep the warm-up easy, with maybe a couple of short accelerations to get your legs firing. You don’t have time to ease into it – you’re going to be at race pace fast, so be prepared.

Race Day Fueling:

A 10K race is pretty straightforward when it comes to fueling.

Day Before:

You don’t need to go all-out on carb-loading like you might for a marathon, but you should still make sure your meals the day before have a decent amount of carbs – about 50-60% of your calories.

Pasta for dinner or extra rice throughout the day will do the job.

Skip anything too fibrous, spicy, or greasy in the 24 hours before the race – you don’t want stomach issues on race day. And of course, hydrate well. Your urine should be a light straw color by evening. That’s a good sign you’re on track.

Morning of:

Get a familiar breakfast in about 1.5–2 hours before the race.

Something that’ll give you energy without sitting heavy in your stomach.

A piece of toast with peanut butter and a banana, or oatmeal with some fruit, works well for me.

Keep sipping water or a sports drink, but stop about 30 minutes before the race starts to avoid that sloshing feeling. And don’t forget to hit the bathroom – you’ll feel better once that’s out of the way.

During the 10K:

You don’t need to eat during a 10K – your body has enough energy stored to fuel you for the race.

If you’ve had a good dinner the night before and breakfast on race morning, you’re set.

But hydration is still important. Make sure to grab water at least once during the race. Most races have water stations around the 5K mark.

Just grab a cup, take a few sips (sip, don’t gulp), and keep moving. If it’s hot or you’re a heavy sweater, you might want a sports drink for the electrolytes, but water usually works just fine for a 10K.

If you think you’ll take longer than 90 minutes to finish (or if you didn’t eat much before), have an energy gel on and take it around 30–40 minutes in. But honestly, most runners won’t need it.

After the Race:

You did it! Time to celebrate, but before you collapse in a pile of joy, try to follow the 3 R’s of recovery in your next meal or snack:

  • Rehydrate – water or a sports drink.
  • Refuel – get some carbs back in with a bagel or fruit.
  • Repair – get some protein to help your muscles recover.

You can keep it simple with a banana and some water, then grab a bigger meal within 1–2 hours. Maybe that burger or pizza you’ve been dreaming about? That’ll help reduce soreness and get you ready to run again soon.

The Mental Game and Crossing the Finish Line

Training for a sub-1-hour 10K isn’t just about pounding the pavement—it’s a mental battle, too.

You’re gonna hit some rough patches.

Trust me, I’ve been there—doubt creeps in, motivation dips, and the body just doesn’t seem to cooperate some days.

And that’s totally normal. But here’s the thing: developing mental toughness is just as important as getting the right miles in.

It’s the thing that’ll help you push through when your legs feel like they’ve been hit by a truck and get you across that finish line strong.

Mini-Goals for Motivation

Instead of just staring down the big 60-minute goal, break it down into smaller, bite-sized wins. This isn’t about hitting the big number right out of the gate. Celebrate when you hit your first 5-mile run.

Or maybe you manage to stick to your training schedule and run 3 times a week consistently.

How about improving your 5K time?

Every time you knock out one of these mini-goals, you’re gonna feel a boost in confidence.

Trust me, keeping track of your progress—whether on an app or a good old training log—helps so much. Just seeing how much farther or faster you’re running than a month ago? That’s pure motivation.

Embrace the Tough Runs

Look, not every run’s gonna feel like you’re cruising on cloud nine.

I’ve had mornings when getting out of bed was the hardest part of my day.

You’re gonna have runs where your legs feel heavy or you feel like you’d rather just snooze the alarm than get up and move.

But here’s the secret: those tough days?

They make you stronger—mentally and physically.

Every time you push through, you’re telling yourself, “I don’t quit when things get hard.” That’s the kind of mentality that’s gonna carry you through those last miles of your 10K.

But remember, listen to your body.

Pain’s one thing, but if something sharp or serious starts up, it’s time to rest.

Training’s about consistency, not trying to be perfect every time.

Visualization and Mental Rehearsal

Before race day, take a few minutes each day to visualize your success.

Picture yourself at the starting line—feeling calm, excited, and ready.

Imagine hitting your target splits and keeping your pace steady. And then, see yourself crossing the finish line with that clock ticking past 59 minutes.

I know, it sounds kind of cheesy, but trust me—it works. A lot of athletes do this to mentally prepare, and it’s a great way to get your brain in gear before the big day.

Race Day Nerves

So, it’s race morning. You’ve done the work, but that nervous energy is still there. That’s totally normal. A little bit of nerves means you care about hitting that goal. Use it. Turn those nerves into excitement.

Stick to your usual pre-race routine—get your breakfast in, do your warm-up, and remind yourself you’ve got this.

You’ve done the hard work, and now it’s time to let it show. Sometimes, that nervous adrenaline can even give you a bit of a boost. When the gun goes off, take a deep breath, smile, and enjoy the ride. You’ve earned this.

The Final Stretch

Okay, this is the tough part. Your legs are on fire, your lungs feel like they’re going to explode, and every part of your body is screaming for you to slow down.

But this is where you dig deep. You’ve been through harder stuff in training. Think back to those brutal workouts you crushed or focus on a runner ahead that you’re gonna pass.

When you’re just meters from the finish and you see “59:xx” on the clock, give it everything you’ve got.

That moment of pure exhaustion will turn into pure adrenaline. When you cross that line, it’s not just about the time.

It’s about every single training session, every tough run, and every bit of growth that got you there. Take a second to soak it in. The pride and joy you feel when you finish—there’s nothing like it.

FAQ: Running a Sub‑1‑Hour 10K

Q1: What pace do I need to run a 10K in under 1 hour?

To break the 1‑hour 10K barrier, you need to hold an average pace of 6:00 per kilometer, or roughly 9:39 per mile. That means every kilometer counts—so consistency is key, not just speed bursts.

Q2: How should a beginner train for a sub‑1‑hour 10K?

Start with a smart mix of easy runs, intervals, and tempo sessions—gradually increasing both pace and mileage. For example:

  • Easy runs for endurance

  • Intervals (e.g., 4×800 m) for speed

  • Tempo runs (20–30 min near goal pace) for stamina
    Keep the 10% rule in mind and build your base steadily.

Q3: How long does it take to run a sub‑1‑hour 10K?

With 3–5 quality runs per week—including one tempo session and interval work—many beginners can hit a sub‑1‑hour 10K within 8–12 weeks. Your starting fitness level will guide the exact timeline.

Q4: Can I run a 10K under 1 hour every day?

Running at goal pace daily is highly taxing. Instead, aim for 3–4 hard-paced sessions per week, with rest or easy days in between. Recovery is essential for building strength and avoiding injury.

Q5: How many weekly miles should I run to aim for sub‑1‑hour?
Most training plans suggest 25–35 miles (40–55 km)/week, giving you enough volume to support speed work without burning out.

Q6: What’s a good workout to improve pace for a sub‑1‑hour 10K?

Try interval workouts like 5×1 km at 5:45/km pace, with 2–3 min recovery jogs. This sharpens your race pace and helps your body get used to the effort.

Q7: Should I include long runs when training for sub‑1‑hour?

Yes! A weekly long run of 10–12 miles (16–19 km) at an easy pace builds endurance and aerobic foundation—crucial for maintaining pace in the final kilometers.

Q8: How important is tempo running for reaching 1‑hour?

Tempo runs are essential—they teach your body and mind to sustain faster efforts. Include 20–30 minutes at just slower than goal pace once per week.

Q9: What signs mean I’m progressing too fast or slow?

Progress is good—but watch for stiffness, nagging aches, or stalling times. If you feel flat every run, ease back. If your tempo efforts feel easier over weeks, you’re on the right track.

Q10: What should I do in the week leading up to a sub‑1‑hour 10K?

During taper week, reduce mileage by 20–30%, keep workouts short and sharp, hydrate well, and prioritize sleep. Then trust your training and go for it!

What challenges are you working through?

Drop a comment—I’d love to hear your story. And hey, if you’ve got a friend chasing their own 10K PR, share this guide with them. Let’s help each other out. See you out there on the roads—and at that sub-60 finish line!

How to Train For Your First 8K: Plans & Expert Tips

How to Train For Your First 8K

So, you’ve signed up for your first 8K—awesome!

This race is just shy of 5 miles (4.97 miles, to be exact), and it’s the perfect distance to push your limits without jumping straight into a 10K.

It’s that sweet spot for runners who want something a little more than a 5K but aren’t quite ready for the big league yet.

Let’s get to it.

How Far is an 8K?

As I have already mentioned, an 8K is about 4.97 miles.

Yeah, just under five miles. When I first started pushing past 3 miles, that “extra” distance felt like running a marathon.

But once I hit my stride, 5 miles didn’t seem so bad at all. It just takes the right training, and suddenly, that distance feels more like a challenge you can totally conquer.

My first time running more than 3 miles. I was thinking, “Okay, this is a big deal.” But guess what? It wasn’t as tough as I thought.

The secret? A solid plan and sticking with it. That extra distance? Not as intimidating as I made it out to be. It was all about switching my mindset from “I don’t know if I can do this” to “I’m going to crush this.”

Training for Your First 8K

When I trained for my first 8K, I didn’t follow some rigid plan.

Here’s what worked for me:

  • Long runs to build endurance
  • Interval training to work on speed
  • Tempo runs to maintain a steady pace without burning out

I kept it simple, not overcomplicating things.

I listened to my body—sometimes pushing myself, sometimes giving myself extra rest.

Some weeks I needed more recovery, other weeks I felt strong enough to push harder. This flexibility helped me stay consistent without burning out.

Key Workouts: What Helped Me Most

For me, tempo runs and intervals were the foundation of my training. Tempo runs helped me build the ability to keep a strong, steady pace. It’s not about going all-out—it’s about hitting a rhythm that feels tough but doable.

Usually when I’m doing a tempo run, I’m pushing myself to a challenging pace, but still being able to talk. By the end, I feel tired, but it that good kind of tired. This always helps me on race day.

What’s more?

Intervals. Yes, they are brutal but they deliver. Short bursts of effort followed by recovery—those intervals got me faster and taught me how to recover quickly.

I’d push hard for a couple of minutes, then jog or walk to catch my breath, and repeat. They always make a huge difference in how fast and strong I feel.

Weekly Training Plan: A Simple Approach

I don’t want to sound like a broken record but here’s again how I broke down my weekly training:

  1. Long Run: I built up to 5-6 miles each week, focusing on endurance. This was my “big” run of the week.
  2. Speed Work/Intervals: One or two shorter, faster runs to boost my pacing for the race.
  3. Tempo Run: A steady-paced run to practice pacing and build confidence for race day.
  4. Cross-Training: I didn’t just run—I did strength training (squats, lunges, planks) and swam to keep my body strong and injury-free.

I didn’t run every day. Rest days or easy cross-training were key. Don’t skip those rest days—they’re just as important as your workouts.

Building Your Weekly Training Plan

Aim for 3-4 runs each week, with at least one rest or cross-training day between them.

Every week, make one run longer than the others (your “long run”). Start small—maybe 3-4 miles for your long run, and then add 1 mile each week. But remember, don’t increase your mileage by more than 10% each week! Here’s an example of how to build up:

  • Week 1: Easy runs of 1.5 miles, 2 miles, and 2 miles.
  • Week 2: Build to 2 miles, 2 miles, 3 miles.
  • Week 3: 2.5 miles, 2.5 miles, 3 miles.
  • Week 4: 2.5 miles, 3 miles, 4 miles.
  • Week 5: 3 miles, 3 miles, 4 miles.
  • Week 6: 3 miles, 3 miles, 5 miles (about race distance).
  • Week 7: 3 miles, 3 miles, 6 miles (bonus confidence).
  • Week 8: Taper with shorter runs (e.g., 4 miles, 3 miles, 2 miles), then race day!

By Week 6-7, your long run should be around 5 miles, so you’re ready to rock race day! On non-running days, rest or try low-impact cross-training like biking or swimming. And listen to your body—don’t run hard two days in a row. Recovery is key!

Easy Runs, Long Runs & Pace

Most of your runs should be easy—think conversation pace. Keep that easy pace at about 60-65% of your max heart rate. These relaxed runs help build your aerobic fitness and keep burnout or injury at bay.

Your long run should be easy too—it’ll gradually get longer, but it’s all about steady effort. Some coaches recommend peaking a bit above race distance (6-7 miles) for a confidence boost, but do what feels right for you.

When your long run day comes, treat it like this: start at a comfortable pace—don’t go out sprinting! Just keep moving. The goal isn’t to hit a specific speed; it’s to finish strong.

Tempo Runs & Intervals (Speedwork)

As you get stronger, add one tempo run or interval workout per week to increase speed:

  • Tempo Run: After a 10-15 minute easy warm-up, run 15-20 minutes at a “comfortably hard” pace—about 25-30 seconds slower than your 5K pace. Cool down with another 10 minutes of easy running. This is a solid, challenging effort that helps teach your body how to sustain a faster pace for longer.
  • Interval Workout: Warm up with 1 mile easy, then do short bursts at your goal 8K race pace. For example, run hard for half a mile (or 3-4 minutes), then jog or walk easy for 2 minutes. Repeat 3-5 times, then cool down with 1 mile. These intervals train your legs to handle race pace and build speed endurance.

Cross-Training & Strength

Cross-training is your secret weapon to stay strong and injury-free. Add 1-2 cross-training sessions each week, especially on rest days. Try cycling, swimming, the elliptical, or even a brisk walk. These activities boost cardio fitness without adding extra impact on your legs.

Also, make sure you’re doing strength training 2-3 times a week. No need to hit the gym for heavy lifting—bodyweight exercises like squats, lunges, and planks after a run are perfect. Strength training helps improve your running efficiency and reduces the risk of injury. It’ll make you feel stronger and more powerful on the road.

And don’t forget recovery. Take at least one full rest day each week. Foam-roll tight muscles, stretch gently after runs, and get plenty of sleep and hydration. Your body needs to rebuild, especially as the mileage increases.

Recovery: The Key to Avoiding Injury

Here’s one of the best lessons I learned during my training: focus on recovery. I used to think I needed to run more to get better, but all I got from that was burnout and sore muscles. Once I started embracing rest, everything started to fall into place.

On rest days, I didn’t just sit around—I stretched, foam-rolled, and sometimes did some light swimming to keep the blood flowing without the pounding of running. My muscles needed time to repair, and recovery allowed me to push harder the next week.

Cross-Training: Why It’s Crucial

If you’re only running, you’re missing out. Cross-training was a game-changer for me. Strength training helped me build the muscles I needed to run more efficiently, while swimming and cycling gave me a cardio boost without adding more stress to my legs. A little variety went a long way, keeping me injury-free and preventing fatigue from all the pavement pounding.

Race Day Strategy: Stick to What You Know

I have one simple rule for race day: Don’t try anything new. I wore the same shoes, used the same gear, and ate the same breakfast I had during training. It’s easy to get caught up in the excitement, but sticking to what works makes all the difference.

By race day, you should know exactly what works for you. Wear the same shoes and clothes you’ve trained in, and fuel up with a breakfast that you know sits well with you (like oatmeal or a banana, 2-3 hours before). Warm up with a few easy strides.

When the race starts, take it easy. It’s tempting to sprint off with the crowd, but resist!

Start at a controlled pace that feels comfortable—like you could chat with a friend. Use your run/walk plan if you’ve practiced it. Then, if you’re feeling strong in the last 1-2 miles, give it a little gas.

Aim for a negative split (run the second half faster than the first).

And remember, the win is crossing that finish line. Even if you have to slow down at the end, finishing is the real victory.

FAQ: Training for an 8K Race

Q1: How long does it take to train for an 8K?

Most beginners can get ready for an 8K in 6 to 8 weeks with consistent training. The key is gradual mileage increases and balancing easy runs with rest days.

Q2: What is a good training plan for a first 8K?

A solid 8K training plan includes easy runs, cross-training, and progressive mileage builds. Include rest days and occasional speed workouts to build confidence and stamina.

Q3: How many miles is an 8K run?

An 8K run is approximately 4.97 miles, making it a fun challenge for runners ready to go beyond the 5K distance.

Q4: Can I train for an 8K if I’m new to running?

Absolutely! Even beginners can tackle an 8K by following a structured, gradual plan that balances running and rest, while focusing on building endurance safely.

Q5: How many days a week should I run when training for an 8K?

Most beginners benefit from 3 to 4 running days per week. This allows enough training volume while keeping injury risk low.

Q6: Should I include cross-training in my 8K plan?

Yes—cross-training like cycling, swimming, or strength training can boost overall fitness and reduce injury risk.

Q7: What pace should I aim for in an 8K race?
It depends on your fitness level, but many beginners target a steady, conversational pace, gradually building speed as fitness improves.

Q8: How do I stay motivated during 8K training?

Set small goals each week, run with friends or groups, and celebrate milestones along the way. Staying consistent is key.

Q9: What gear do I need for 8K training?

Comfortable, supportive running shoes, moisture-wicking clothes, and a reliable watch or app to track mileage and pace. Don’t forget water for hydration.

Your Turn: Share Your 8K Journey!

I want to hear from you! What’s your 8K goal? Have you started training yet, or are you about to? Drop your thoughts and questions below—let’s keep this conversation going. Whether you’re just starting or you’ve been running for a while, let’s motivate each other as we work towards our goals.

Remember, you’ve got this. One step at a time, one run at a time. Before you know it, you’ll be crossing that 8K finish line with a big smile on your face.

Happy running!